JG MP5k M-LOK Conversion
Description
PDF[edit 29.1.2021] Released SimplerHandguard, version of handguard with less Mlok holes, it's simpler to print and more durable.
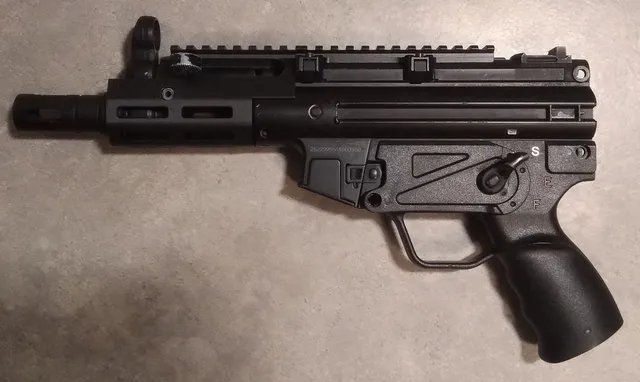
First of all, this is for JG MP5k's only, the one with two piece metal receiver. This is replacement for top piece. And yes, this is airsoft only(duh!). Also important to note, the model sacrifices battery space on top of gearbox, you'll have store battery in stock or externally. Suggested inner barrel length is 229mm(same as in MP5)
Holes on the handguard are up to M-lok standards. Top ones(closest to charging handle) are mostly for aesthetics, but you may be able to attach some of very slim m-lok stuff.
Stock adapters are slightly modifies versions of https://www.thingiverse.com/thing:4236162 and https://www.thingiverse.com/thing:2764060 differences are aesthetic to make smoother transition to new upper body.
Print Settings
Rafts:
Yes
Supports:
Yes
Notes:
Parts are oriented the way I planned them to print.
Print parts with high infill, especially handguard(for durability) and barrel(for stiffness).
Post-Printing
Barrel lengths
138mm barrel is almost flush with handguard, 150mm is maximum my printer can print, with thick thread adapter(like hornbill in picture) it will hide 229mm barrel in stock flash hider. 154mm is same as 150mm, only for thin thread adapter.
You will need
3x m5 bolt with the thread length of no more than 11mm
1x m3 cap head bolt with thread length of approximately 20mm.
1x m3 hex nut.
1x marui style mp5k thread adapter( if you're going to use barrel attachments).
Optional, if you go with two part rail:
1x m6x 52mm bolt, down to 35mm will do too. Max bolt cap diameter is 10.5mm.
Assembly
1: remove upper part of receiver.
2: put in charging handle before installing handguard, screw endScrew in front of handguard.
3: Loosen body screws and install the barrel, then tighten bodyscrews
4: install the the handguard, put screws and bolts in don't over tighten m3 screw! Screw M5 screws on the bottom and sides, they can be tightened quite hard, just don't over do it.
4,5: If you're using 2 part rail, connect rail1 to rail2, fix with m6 screw.
5: install rail and then back plate or stock. Done!
Category: Sport & OutdoorsTags
Model origin
The author marked this model as their own original creation. Imported from Thingiverse.