Links for Linked Dipole / Inverted Vee

Description
PDFThis is a linked dipole link which can be used with any 1.8mm OD wire. This includes the spool of DX Wire that I have here, as well as the 20 gauge silicone wire that BNTechGo sells on Amazon. I also used 2mm banana plugs to connect the links, but you can definitely use this without any special hardware: that's even how you tune the antenna up!
You will need a dipole center for this. I have a design for that which I'll be posting shortly, but it's a short coax choke going to two banana plugs. I literally made my first iteration of it out of an old soda box, and made contacts using that one.
Linked dipoles are great: I built a 5-bander, which is 1.1 or better at the frequencies I'm after, and I can change bands in under a minute thanks to using a telescoping fishing pole as a mast. (Details on that will go on my dipole center and choke design.)
Goal
In the past, I have run DX-wire in a delta loop without smooth corners. After a surprisingly short span of time, the insulation worked its way clear of the actual wire, which is not great for long-term antenna viability. The fix for this was a corner tiedown, which is very closely related to this design: object 352389. It's worked great, so when I wanted to build a linked dipole, it was in my mind.
The goal of these designs is minimizing the strain on the wire at the corners (or links). Instead of wrapping it around a tight corner, the wire goes through a smooth, round, wire-sized channel. This transfers the tension of the wire into the link over a large area, and should reduce the amount of insulation creep or wear.
Note that all surfaces on the link (except the flat ends) are rounded over: it should be safe for wire insulation no matter how you tie onto it, but long-term insulation will still creep at sharp corners.
Material
I have printed the links out of PLA and PETG. PETG is a better material if you can get it to print, but PLA works just great. I also printed one out of ASA, but it was surprisingly brittle and not recommended. It may be a good choice for the washer assemblies, though.
I've only printed the washers out of PLA, but they probably work fine in any material that can bridge a couple millimeters.
Procedure
Print out a pair of links for each band you want to use. You'll need one between each pair, and then one more at the end to tie off on.
Use an online calculator to determine your wire lengths (I used SOTABeam's calculator). Cut wires to the appropriate lengths, plus an extra foot/30cm, to give plenty of wiggle room for tuning. Strip the ends somewhat generously, and twist up the strands to keep them vaguely tidy.
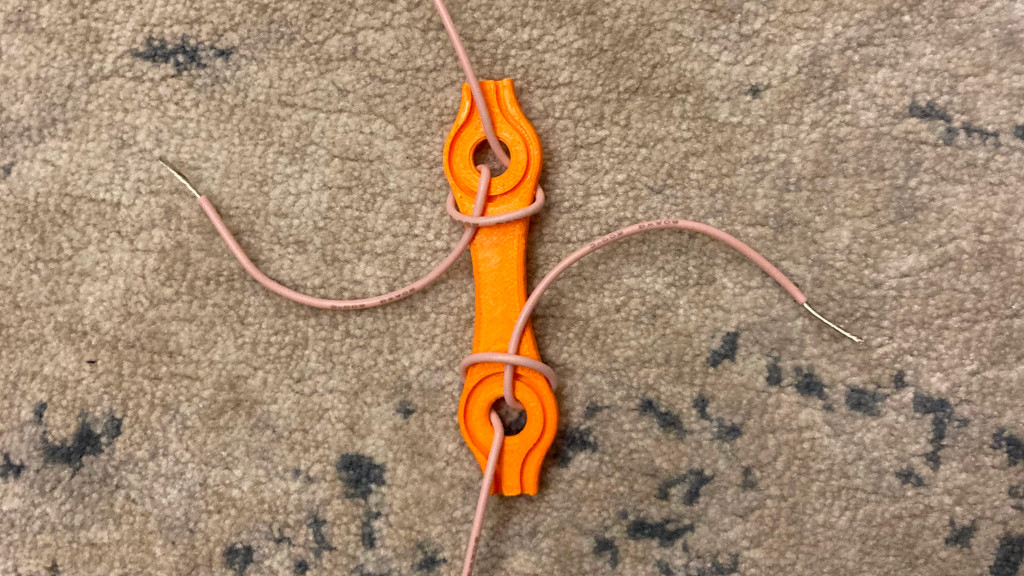
Connect your wires as seen here: through the holes, with loose tails that are easy to keep apart, but will still reach each other. Make sure you don't swap any wires. Doing so may result in spending an extra hour in the trimming process, with bizarre resonances. Or so my friend told me, I would never make such a silly mistake.
Take your linked dipole out to a field/yard for trimming. Starting at the shortest length, trim it as you would any other antenna. After you tune up the shortest section, twist its ends into the next segment, and tune up that one. Rinse, and repeat.
Bear in mind that you're actually making N antennas with this project, so take some water and snacks with you. If you haven't made a dipole before, I recommend making a single-band speaker wire dipole before starting on this project.
Once you're happy with the tuning, return to the shack and put pairs of banana plugs and jacks on the ends at each link. I did mine with the plugs to the short end and the sockets to the long end, so that I could extend the antenna with new links in the future if desired.
Print out enough of the washer assemblies to have a few spares in your field bag, just in case you need them. The nut side is designed to take Redneck Heat Inserts: I put the nut a onto a 40mm long M3 screw with the tip sticking out, heat it with a lighter for a few seconds, then push it into place. The tip of the screw sticking out is important, as it guarantees that no melted plastic fouls the through-hole.
After those are all prepared, you're ready to feed the wire into the link. Practice with some spare wire to get the hang of it, as it is possible to tear up the insulation on your freshly-tuned segments! In the current version, you need to start it at the flat end, and gradually drag the tail into the slot. I find that holding the wire in the slot with the end of my thumb, while holding the end between my thumb and forefinger and feeding with a twisting motion works best.
Once the wire is in its home, immediately put on the washer/nut assembly for it. The wide, bumpy sides are designed to match up with a pinching motion. Once you have the nut started, it goes very quickly. Note that your wire sticks just barely proud of the slot, and the washer on that side actually compresses it a bit: don't spin that side. In the process of tightening, the screw side might spin a bit as you spin on the nut. This is okay: as long as the nut spins faster than the screw, you're making progress towards seating it. Towards the end, there's enough tension on the screw head to stop it spinning, and you can get the nut to seat tightly very easily.
Do you want flags/labels?
If you want to have tags for the bands on your dipole, print off the linked_dipole_flag model as many times as needed. It has a nice flat surface for labeling, as well as a slot for tying on short streamers to enhance the visibility in a setting with other people around. The hole for the wire has a gentle curve to it, so it should stay in place wherever you put it, but still be easy to slide around.
Parts used:
- Wire: BNTECHGO 20 Gauge Silicone Wire, Pink B071NP33PG
- 2mm banana plug+jack: SoloGood 2mm Bullet Banana, B07H97G7NY
- 2mm banana plugs with sleeves (for the dipole center): B07TLKNX7Y
- 2mm banana jacks, panel mount (for the dipole center): B01E7XUOK6
- Adhesive lined heat shrink tubing: B084GDLSCK
- M3 washers
- M3 nuts
- M3 8mm long screws (any type, though I like chonky heads for this, as it makes it easier to start the nuts without tools)
Alternative designs
Of course, there are a bunch of designs for this sort of thing out there.
Probably my favorite alternative design is K6ARK's super cute little links (326108). They're nice and small, very minimalist, but they do offer a good positive stowing position for unlinked segments, which is neat. I may actually do a slightly improved version of these soon, as they're just that cute (and I want to make a second dipole anyway: this one is meant to be very visible in a city park, but a less visible one would be handy).
My current second favorite alternative is DL2MAN's linked dipole design (349134), with nicely labeled links, a definite plus when you're re-linking in a hurry. His tiny balun housing is the real highlight there for me, though. It's got all the things you'd want from it, and it's as small as you could hope for. On a windy day, weight at the top of your fishing rod matters a lot. Most of the force is wind-loading from the wires, but having extra weight up there really drags the mast down.
The other design currently on Printables is N2YQT's Linked Dipole Insulators (371021). They're basic, but look like they'll print reasonably quickly, and get the job done. I think K6ARK's may print faster, but I haven't actually checked. If you're just playing around with an antenna, these are solid options to get some chunks of insulator.
Finally, a general design is the classic “cutting board insulator.” These generally look a lot like N2YQT's design, but made with a cheap HDPE cutting board. If I was going for a “holes in a bar” design, I'd definitely consider this approach. HDPE is very easy to work with, and its chips usually aren't too a total pain to clean up.
However you make one, I hope to catch you on the air one day via a linked dipole!
Changelog
2023-02-19:
Updated the dogbone link from v2 to v3. This has three functional improvements:
* Makes the wire raceway a bit more open at the top, so it's easier to press in the wire
* Narrows the ends of the dogbone, which hopefully makes it less likely to snag itself
* Adds a cutout to the links, for flags, supports, or what have you
There are no changes to any part except the dogbone in this update.
Tags
Model origin
The author marked this model as their own original creation.