Tensegrity Project
Description
PDFSummary (Continued):
Impress guests while marveling at the physics of the universe in style with this tensegrity structure. Created in tandem with @Rishisafish, this group project was a blast, and you should check out their profile as well. The sculpture stands at about 24 cm tall, 22.5 cm in length, and 7 cm wide. We used these hooks in order to construct the structure.
Lesson Plan and Activity:
Our goal was to work together as a group to design and create a single custom tensegrity structure using somewhat complex geometry and designs (as determined and approved by our client). We were to plan, design, print, assemble, revise, reprint, and re-assemble a final version of the design, which was to be approved by the client for rigidity and integrity.
Parts List:
You will need to print one of each piece included in this model; “Dab_Wave_Print_V2”, “Dab_Cloud_Print_V2”, and “Dab_Cloud_Print_V2”.
Assembly/Construction Instructions:
Tools you will need:

- Ruler (with a “cm” side)
- Pencil
- Hammer
- Clamps
- Super Glue
- Sandpaper
- Needle-Nose pliers (preferably smaller ones)
- Flush Cutters
- Cutting or scraping tool
- Small Phillips screwdriver
- String (Fishing Line is highly recommended for its durability, and was used in demo)
- Hooks (1mm diameter) (Linked in the summary)
Step 1 - Prepare your parts for assembly:
1a) Print each part, and once printed, remove them from the assembly/print bed.
1b) Remove any support filament and excess material
1c) Sand down/finish parts to your liking (optional)
Step Two - Install Hooks and Fit Pieces Together:
2a) Locate the 10 indents you will find on the 3 parts. This is where all the hooks will be

screwed in. Screw in all 10 hooks in the holes on the cloud, bolt, and wave. Use needle-nose pliers to fit the hook in, and use your hand to screw the hook in. Use the same needle-nose pliers to tighten, if needed. Note that these hooks are fragile, so be careful when tightening, they may snap.
If all 10 hooks go in with no problem, Great! You are all set to move on to step 2e!
If not all 10 hooks go in, here are some troubleshooting tips:
- 2b) If a hook doesn't fit into a hole: Clamp down the object to the work surface before starting. Using a tiny Phillips head screwdriver and a hammer, gently tap on the hole to deepen the holes where the hook does not fit and increase force as needed. Check and repeat this until hooks fit (Note: this is a clip of a V1 version of a part, but the outcome will be the same on the V2 parts ------>)
- 2c) If the hole is too large/hook is not staying in place: Use a small amount of super glue to partly fill the hole, then insert hook, and wait for glue to cure as listed on the instructions on the packaging of the glue.
- 2d) If the hook snaps and/or hole is blocked: Using the same process as in 2b or use a drill bit of ~0.1cm and drill ~0.6 cm deep right next to the original hole. The slight change in distance will not make a difference in the structural integrity of the assembled product.
Now that you have your hooks in,

2e) Fit the bolt into the indent in the base of the cloud.
If the bolt fits into the cloud properly, congrats! Move to step 3!
If the bolt does not fit into the cloud properly:
Sand down (using sandpaper) or scrape off (using a cutting tool) the sharp edges at the top of the bolt and/or any excess plastic on the inside of the large rectangular intrusion at the base of the cloud. Repeat until parts fit. Note that this will require force, and that is intended, it is a friction fit.

Step Three - Achieve Tensegrity by Tying Parts Together:
3a) Cut a piece of fishing line or other string for each pair of hooks. The length of the piece of string should be approximately double that of the distance between the hooks (that way, it is easier to tie).
3b) Tie the piece of fishing line using square knots (left over right, right over left). Optionally, to ensure security, make tight simple knots right next to the square knot, one for each end of the line. Repeat this step for each pair of corresponding hooks. The strings should not intersect with each other, they should be parallel to each other. The left and right hooks at the back of the wave correspond to the left and right hooks on the back of the cloud, respectively. The left and right hooks at the front of the wave correspond to the left and right hooks on the front of the cloud, respectively. The hook underneath the curve of the wave corresponds to the hook at the end of the bolt. It is recommended to tighten with needle nose pliers by clamping down on the string/fishing line and pulling.

3c) Cut/trim any excess fishing line/string using flush cutters. Before you do this, ensure that the knots are tightly tied.
CONGRATS! You’re all done! Enjoy!
Design Choices:
@Rishisafish and I had a very hard time coming up with a unique design, one that was uniquely ours. Eventually, we settled with a design focused around some sort of spiral or curves near the middle, with wave-like parts (see below).


We continued refining our sketch, and eventually agreed on a structure made of three parts; the wave as a base, a bolt in the middle (coming from the cloud), and a cloud top (see below). The original idea was to have the bolt come in from the left and angle inwards into the center. However, we changed the design so that the bolt would come in from the right, similarly to the earlier sketches, as it reduced the complications when having to design around the curve of the top of the wave, and was more structurally sound, as it would have less sharp angles, meaning it would be less likely to snap under a compressive force. We also created the friction-fit system that we would later use to secure the bolt inside the cloud (See sketch on the right for revised design).

Note: V1 will refer to Version 1, V2 will refer to Version 2. These correlate to the first and second printed revisions of the tensegrity structure, respectively.

Note: All holes for hooks were added in V2 models of parts.
The wave remained almost entirely the same throughout the entire project (except for minor adjustments to the curve). A notable change (made before printing our first draft), as per requested by the client, was making an extruded cut to hollow out the wave, cutting down on printing time and cost. The thickness of the wave was further cut down in the final version.
(From top to bottom: Pre-Print, Version 1, Version 2)


Another change made was as per request of our client, who requested that we curve the end and slightly shorten it, so that it would be able to fit more comfortably onto their print bed. (Left: Version 1, Right: Version 2)


The Bolt went through many, many iterations, with multiple design and artistic changes. These were rejected either because they did not look visually appealing or would not work because they were too thin/thick. Here are some examples of models that ended up not being used. One noticeable change between the rough drafts and prints is that the insertion top became angled with V1 and V2. This was to accommodate for the fact that the bolt would be angled to “curve” into the wave. We played around with the angle of it, but decided to keep it mostly perpendicular.
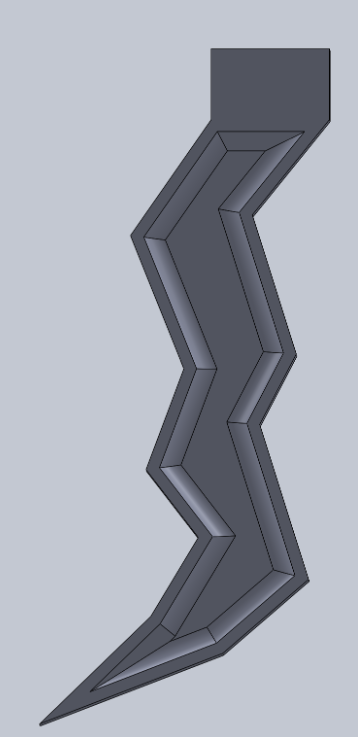
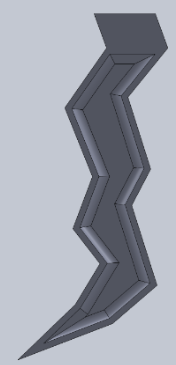


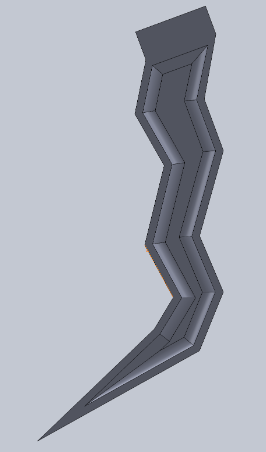

The biggest problem that we encountered after printing and assembling the first version was that the bolt was “hugging” the wave (it was too close to the wave), breaking the illusion of the structure “floating”, and was a cause of an imbalance of tension forces (more detail below). Part of the solution was to redesign the bolt so that the “stem” was further away. This was achieved by significantly steepening the angle at which the bolt came down from the cloud, as well as making the bolt much slimmer. (Left: Version 1, Right: Version 2)


Another issue that was encountered was that the end of the bolt easily fractured when we attempted to hammer in a small hole for the hook. This was fixed in V2 by adding a pre-printed hole that the hook could screw into. The top of the bolt was also shortened in V2 to account for the slimmer cloud (see more info below)
The cloud, similarly to the wave, did not go through that many changes, other than being hollowed out, with more being removed with each iteration. This was requested by our client in order to save them on printing time and cost. Because the cloud was so slim, this meant that the top of the bolt also needed to be cut down.
Pre-Print Version


Version 1


Version 2


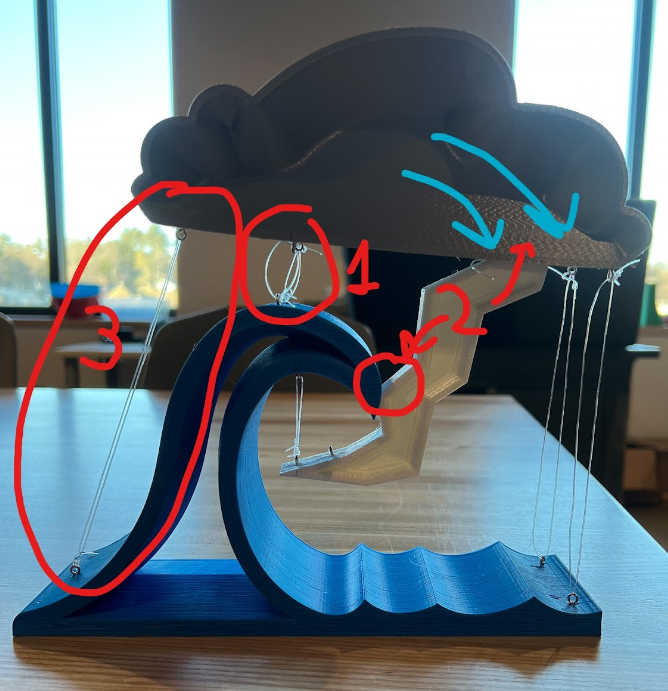
The final assembly of all the parts was one of the most complicated parts of this project, as we had to bring all the components together and make sure everything actually worked. We had three major changes between the first version of the entire printed tensegrity structure, and the second one.
1. The hooks between the top of the wave and the middle of the cloud were removed in V2, as they turned out to serve no purpose in creating or maintaining the tensegrity of the assembly.
2. The issue of the bolt “hugging” the wave, caused by an imbalance of tension forces, causing the cloud and bolt to noticeably lean to the right. This was fixed by… (see 3) (The leaning is represented by blue curved and straight arrows).
3. Replacing the one pair of hooks in the center of the back of the cloud and of the wave with two pairs of hooks on each side, balancing out the tension forces created by the two pairs of hooks in the front of the assembly.
(Below, top to bottom: Tensegrity Structure V1, Tensegrity Structure V2)

Tags
Model origin
The author marked this model as their own original creation.

