Pocket Diva - a portable Project Diva Controller
Description
PDFHeya,
I'm stoked to finally release a first revision of my current project:

Info
Pocket Diva is an open source controller for Project Diva using mechanical switches and running QMK firmware that is portable and fast to play on.
It uses the Seeed Xiao RP2040 for it's size, speed and USB-C port.
Please ignore the holes in the photo, i didn't want to resolder everything for the photos into another body.
Currently the controller DOES NOT have joysticks, which will come in the next revision, so at the moment it is only fully compatible with PPD and only partially compatible with Project Diva Mega Mix + and Project Diva Arcade Future Tone.
To play those “partially” compatible games you'll need to use AutoHotkey.
I included a script in the AutoHotkey.zip folder which will map the slider inputs to:
Q > left stick left
E > left stick right
U > right stick left
O > right stick right
This is not perfect though, holding a note that is either a circle or square and then pressing a mapped slider in the same direction, will ignore that slider input and will miss the note.
So I can only recommend this if you play charts without sliders or easier charts.
Build
Parts needed:
- 11x Threaded inserts M2
- 11x M2x5mm countersunk screw
- 8x Mechanical keyboard switches
- 8x Keycaps
- 1x Seeed Studio XIAO RP2040
- 1x USB-C cable
- … and the printed parts of course
Check the BOM in the following link for more info where to get these parts:
https://1drv.ms/x/s!Ajm5NX2cRICztibQG_JmqPrrY-eC?e=laozD8
Print settings:
The parts should be printed with the following settings
| Filename | Top/Bottom Layers | Walls | Infill | Orientation |
| pocketDiva_body_v0.1 | 4 | 4 | >15% | Side with cutouts facing down |
| pocketDiva_bottom_v0.1 | 3-4 | >2 | >25% | Counterbores facing up |
| pocketDiva_mcu_bracket_v0.1 | N/A | >2 | 100% | N/A |
Wiring:
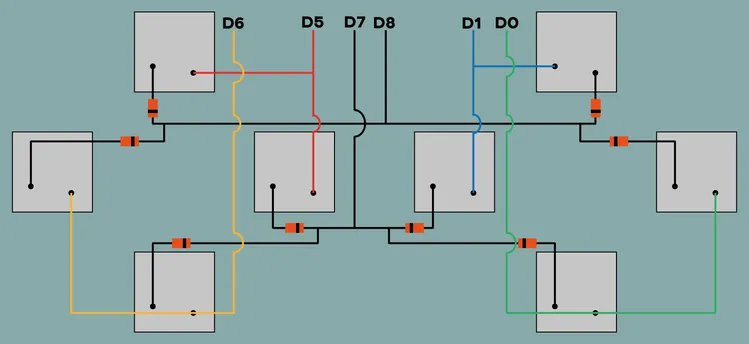
For reference on the wiring, please check the following image or the .zip folder:
The switches are wired in 4 columns and 2 rows.
You'll need to solder the diodes column to row (COL2ROW).
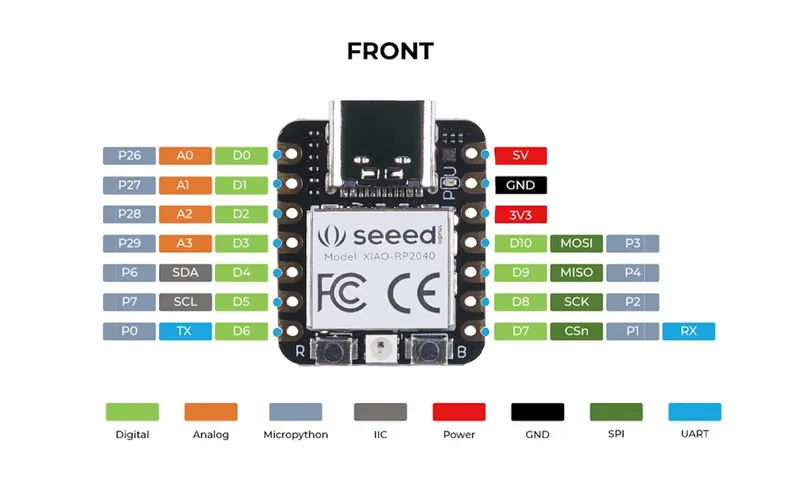
The wires should be connected like shown above (colors depending on what you use) using the following pinout:

Firmware:
Firmware files can either be downloaded through this link or the included .zip file
https://drive.google.com/file/d/1TIoMRnr7r48PgIAkHoksBMVIdiLJxof1/view?usp=sharing
Flashing the firmware
pocket_diva_default.uf2 is the already compiled firmware!
You don't need to compile the firmware with QMK yourself if you keep the default button bindings.To flash the firmware on your Xiao RP2040 hold the BOOT button pressed and then plug in the USB cable.
After a few seconds let go of the button and a folder will appear on your screen.
Drag in the .uf2 file into that directory that just opened and thee board will start the flashing process.
Once done, Windows should say that a new device, named pocket diva, has been connected and is ready to use.
Once flashed you can now use the controller, enjoy!
If there are any issues with the files or model, please let me know.
I'll make sure to check from time to time.
Also let me know if you remixed the model as I'd love to see what you came up with.
All files are OPEN SOURCE so do whatever you wish with them as long as proper credit is given :)
You are allowed to sell printed parts and assembled controllers as much as you please,
but you are NOT allowed to sell the files by themselves!
Tags
Model origin
The author marked this model as their own original creation.
