Scan Tower : Calibrate a Filament's Fan & Temperature Settings (Bambu X1/X1C/P1P or any printer)

Description
PDFThis is yet-another-calibration tower, with several tests for overhang/bridge performance, but also other tiny features that I think represent common use cases in detailed 3D printing.
One of the things the Bambu X1/X1C/P1P printers cannot do for you is calibrate fan speeds for different filaments auto-magically. Temperature and cooling, along with flow and pressure advance is important to do for good printing performance, particularly for overhangs & bridging performance, as well as stringing.
This model tests curved, straight, and thin overhangs in different orientations and by repeatedly printing a model at different heights. I have pre-sliced Fan and Temperature 3MF files for you, but you can “Scan” any printing variable you wish at 10 mm intervals.
This model tries the most challenging types of curved overhangs, up to 90%, as well as bridges (100% overhang). It also prints several tiny features to make sure you don't accidentally over-optimize for one area of performance at the cost of another.
Which file should I use?
Bambu/SoftFever Users : (other slicers see below)
Note: These files assume you are using an X1C (machine I tested on). If you are using a X1 or P1P or other machine, you will need to copy/paste the custom before-layer-change code into a copy of your machine's profile and save a copy and then slice. See the temperature instructions below for where to find this.
- Temperature : 5xTempScan.3MF (This file does 5 different temps)
- Fan Speed: 10xFanScan.3MF (This file scans 10 different speeds)
If you use another slicer or want different sizes, STEP & STL files are included for 10x,5x,1x and separate base and repeating unit.
Important Instructions:
It is very important to make sure you're scanning the variable you think you are by checking in the slicer preview (temperature or fan speed view). Additionally, my files have a preset for Overture PETG by default setup. Make sure to change it to your filament of choice!
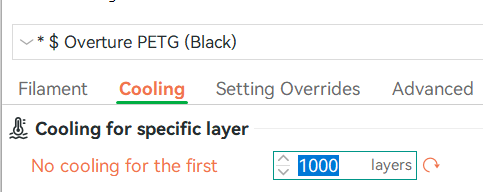
- For fan-scanning it is very important to change your filament cooling settings temporarily to not conflict with the machine “before-layer-change” overrides that have been setup for you in the 3MF files! Simply change your filament settings to specify no cooling for the first 1000 layers to prevent issues:
- For temperature scanning you will need to go into the machine GCODE settings and set the temperatures you want to scan. Click here to open the dialog, and then find the Before Layer Change G-Code dialog and modify the temperatures you want to scan, along with your starting temperature (see other-slicer instructions):

Then change the yellow highlighted values:

PrusaSlicer / SuperSlicer / Other Users:
- I've provided the STL & STEP files for you folks. You'll need to configure your slicer to scan the variable you want by adding the appropriate “Before Layer Change G-Code” in your slicer. Here's copy-paste templates for 5x Temperature and 10x Fan towers:
Example Temperature code:
{if layer_z<2.0}M104 S285 ; Temp Tower starting temp{elsif layer_z<=12.0} M104 S285 ; Temp Tower Temp #1{elsif layer_z<=22.0} M104 S280 ; Temp Tower Temp #2{elsif layer_z<=32.0} M104 S275 ; Temp Tower Temp #3{elsif layer_z<=42.0} M104 S270 ; Temp Tower Temp #4{elsif layer_z<=52.0} M104 S265 ; Temp Tower Temp #5{endif}
Example Fan Code:
{if layer_z<2.0}M106 S0 ; FanTest floor 1 (no fan){elsif layer_z<=12.0} M106 S26 ; FanTest floor 2 (10% fan){elsif layer_z<=22.0} M106 S51 ; FanTest floor 3 (20% fan){elsif layer_z<=32.0} M106 S77 ; FanTest floor 4 (30% fan){elsif layer_z<=42.0} M106 S102 ; FanTest floor 5 (40% fan){elsif layer_z<=52.0} M106 S128 ; FanTest floor 6 (50% fan){elsif layer_z<=62.0} M106 S153 ; FanTest floor 7 (60% fan){elsif layer_z<=72.0} M106 S179 ; FanTest floor 8 (70% fan){elsif layer_z<=82.0} M106 S204 ; FanTest floor 9 (80% fan){elsif layer_z<=92.0} M106 S230 ; FanTest floor 10 (90% fan){elsif layer_z<=102.0} M106 S255 ; FanTest floor 11 (100% fan){endif}
Other Printing Details
- Filament Print Temperature: Any filament will work for temperature scanning. I recommend using default fan settings for that filament type when scanning temperatures to get a good guess at which temperature is ideal.
- Filament Fan Speeds: This test variant is particularly useful on filaments that need to balance strength or warping with detail and quality. Typical examples include PETG, Nylon, ABS, etc.
- Layer height: Typically 0.20 or 0.16 mm. The 3MF files provided are the faster 0.2 mm prints, but are easily changed by adjusting the layer height in the slicer. 0.2 mm is also more challenging and may help accentuate temp/cooling differences. However, you should use whatever layer height you use the most frequently.
- Nozzle size: This test assumes you are using a standard 0.4 mm nozzle, but in theory can work with any nozzle with some adjustments.
Why did I make it this way ?
I adapted this model from the thingiverse model here , but made several modifications to really push the printer hard to accentuate differences between different settings. These included adding several new features and adjusting the overhangs to be longer and more aggressive in various different ways.
Which printers does this work with ?
Any printer! However, the 3MF files contain BambuSlicer settings to make people's lives easier who use that slicer. This was sliced with SoftFever's fork (v1.4.2) of the official BambuSlicer, but it is also drop-in compatible with the official slicer. Works fine also with PrusaSlicer, but you'll need to do your own “before layer change” setups for fan/temperature.
Tags
Model origin
The author marked this model as their own original creation.