Auto Incrementing First Layer Calibration

Description
PDFThis is a calibration strip I have started using. It is similar to other notched strips except I have modified the g-code to automatically increment though a range of live-Z offsets. It starts printing at +0.1mm above the live-Z setting and at each notch it steps down by .02mm so by then end it is 0.1mm below the live-Z (-0.1) and the center section is your current live-Z. This takes 4 minutes to print and then you can see how much to adjust the live-Z to get the first layer you are looking for. You do not make any manual live-Z adjustments while this is printing.
The model file is uploaded, but if you re-slice it you will lose the automatic incrementing, so that's kind of pointless. Currently there are files for PETG/PLA for Mk3S and MINI, let me know if you would like any additional versions.
CAUTION:
Be aware that these g-code files will send you nozzle 0.1mm below your current live-Z. This is only ½ your first layer and should be 0.1 mm above the bed. DO NOT use this if you do not KNOW you are at least close to the right z-offset; if you are already more than 0.1mm too low it will hit your bed. Don't use this as your first pass with a new nozzle / plate.
USAGE
In the example below (Figure 1) you can see the gaps between extrusions starting at +.06, with some noticeable holes between the infill and perimeter at +.04, so these are all too high.
When the nozzle is too close it pushes the material out too far so that it interferes with next pass, which has even less space and so it is a compounding affect (sometimes causes waves in first layer) and eventually the nozzle starts to catch on the extra material and pulls it up in places, you can see this starting at -.02.
I would say a +.01 or +.02 adjustment is ideal based on this strip, but sometimes you need a little more squish for adhesion.
I look for a little blending in the “crotch” where the infill doubles back (Figure 2), but only a few mm.
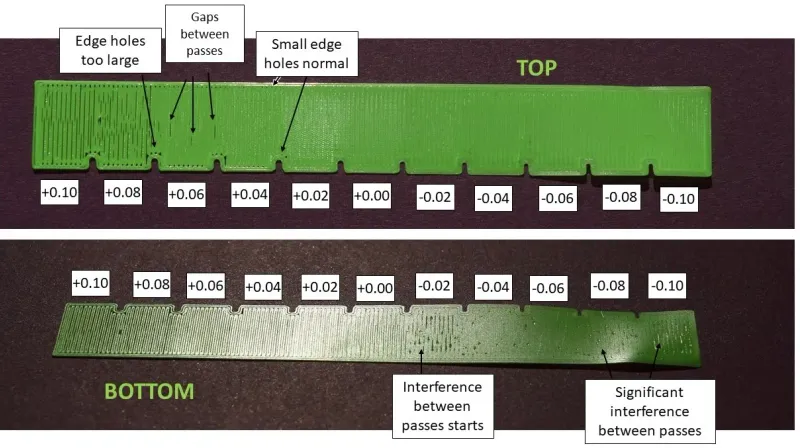
Figure 1
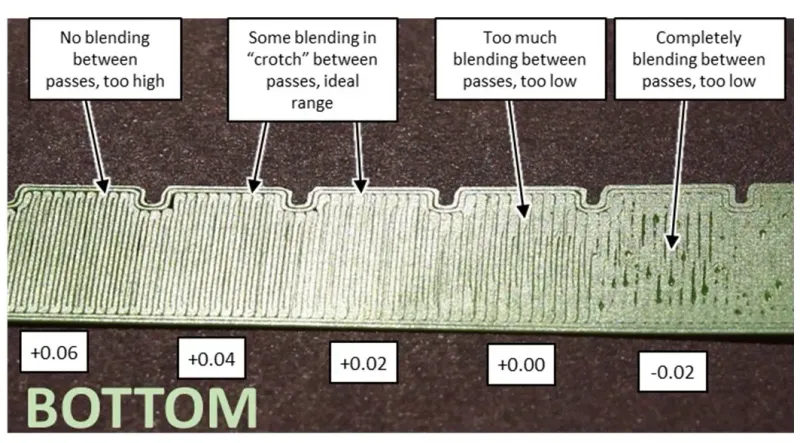
Figure 2 - Bottom Surface Detail
Tags
Model origin
The author marked this model as their own original creation.


