Bambu Labs X1 Magnetically Detachable Purge Bin
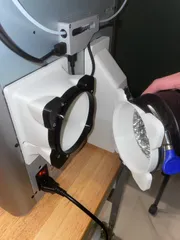
Compartment enclosing the chute to store purge filament. The compartment is magnetically attached for easy disposal.
92
288
2
2897
updated September 7, 2024
Description
PDFThis is a small bin for collecting purge filament from the purge chute from the printer. The bin fully encloses the purge chute outlet, preventing fumes and heat from dissipating into the environment and is magnetically detachable so that it is easy to dispose of waste filament.
Required Materials
Printed Components:
- Interface Plate (x1)
- Note: I'd recommend printing this part with 4 or more wall lines and >50% infill to increase the strength of this part because the embedded magnets have a tendency to bend the part.
- Waste Filament Compartment (x1)
Additional Components:
- VHB Tape (12 mm width)
- 8x2mm Refrigerator Magnets (x20)
- Note: The magnets I used in making this model came from this pack which claims that the magnets are 2mm thick. When I measured them with my calipers, they were closer to 1.65 mm. If you're attempting this build, ensure that the magnets you're using are 1.65 mm thick or consider editing the Carbon X1C Waste Compartment.f3d file.
- Optionally, you may wish to include super glue when embedding the magnets to prevent them from working themselves free over time
Assembly
- Attach VHB tape around the bottom of the Interface Plate.
- Embed 10 8x2mm Refrigerator Magnets into each of the appropriately sized holes on the Interface Plate. Although not required, I recommend using an alternating pattern for the polarity of the magnets which seems to reduce the bending in the part caused by the magnets.
- Embed 10 8x2mm Refrigerator Magnets into each of the appropriately sized holes on the Waste Filament Compartment. Ensure the orientation of the magnets matches that installed on the Interface Plate.
- Test to ensure the Waste Filament Compartment and Interface Plate are magnetically attracted and attach when brought together.
- Remove the protective film over the VHB tape on the bottom of the Interface Plate
- Align the Interface Plate with the purge chute outlet and the through-holes on the Interface Plate with the screws above and below the purge chute outlet.
- Press firmly to secure the Interface Plate to the back of the printer.
- Place the Waste Filament Compartment over the Interface Plate. The parts should magnetically pull together.
Model origin
The author marked this model as their own original creation.


