Wifi 4x8x8 LED Clock with automatic time update

Description
PDFThis has been a passion project of mine for a while. I have worked on it for a couple of months and I've had an un-boxed version of it running for about all that time. This clock will reach out to a web server (either on your internal network or to an external website) and get it's data and time from the html header(it's always GMT). So you put your GMT offset in the code and use the Arduino IDE to program your Wemos D1 Clone.
This project is based on the Wemos D1 Mini (or clone) and the 4x8x8 MAX7219 LED Matrix Module. The code and instructions are listed below to connect the two boards.
I used the following sites for the electronics in my box except I designed my box end to fit a Clone of the Wemos D1 Mini that I got on Amazon here. I got the MAX7219 on Amazon here
YouTube Video on on how to set up the Wemos D1 Mini
Website with code and wiring instructions
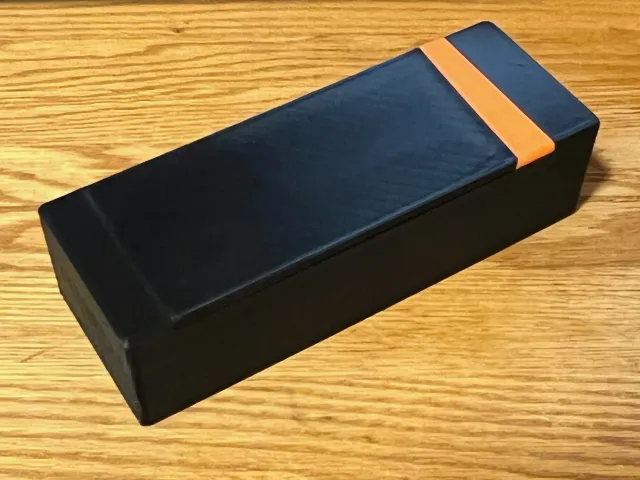
The Clone Wemos fits into my end piece and slides in and clips in place, holding it firmly. You will need to remove the connector on the MAX7219 and either put a right angle connector facing the length of the board or solder the wires directly to the board. The wires on the Wemos clone should pass through the slots in the spring clip on the end piece. Then a friction fit is all that is needed to hold the end piece in place. There are screw holes if you'd like to secure it, but I have not found it necessary. I have pre-placed supports in the .3mf files so that you will need only minimal supports to print this clock case.
Also there is a slit in side of the front window for you to place some red gel filter for better contrast. This is optional, but I like the effect. You may have to clear the path for the filter with a craft knife (especially where the supports were) to make it easier to slide in place.
Printing
Print on square end for both parts
Filament - PLA
Infill - 10-15%
Layer Height - .20mm
Supports - Minimal supports for the front window on the box. My .3mf file has the supports included.
Parimeters - 4 works well
Additional Parts - None
Bed Adhesion - You may want some glue stick to ensure good bed adhesion.
Rafts - None
Scaling - Will not fit parts if scaled
Filament Change - None
Post Printing Notes:
The supports are easly cleaned out. Once your clock is tested and running just fit it into the box and enjoy.
Happy Printing!
You can help
To help cover the expenses of printing prototypes for the models I share, please consider a donation by purchasing an item from my Amazon wishlist here
Please leave a comment and let me know how you like this model.
Also, if you like this model, check out my other models over here:
https://www.printables.com/social/130916-hendersons-handcrafts/models
Award winning Model “Japanese Toolbox” for the "Box Contest: here:
https://www.printables.com/model/260100-japanese-toolbox-inspired-locking-lid-box
Below are just few of my other models |
 |
Tags
Model origin
The author marked this model as their own original creation.