Computer Science Sorting Algorithms Learning Tool
Description
PDFAbout This Project:
This project was created for an AP Computer Science A class, to help the students learn about selection and insertion sorting algorithms.
This project comes with multiple parts. There is the base, the slider, and seven number pieces.
As seen in the photos, The slider sits on the tracks in the base, and the number pieces sit in the spots on the base. This project is used to learn the selection or insertion sorting algorithm, so the orientation of the slider depends on which algorithm you choose to work through. Each spot for a number piece on the base represents a variable/storage spot for a piece of information, shown by the actual number manipulatives, which can be moved from spot to spot. The top row of spots represent extra storage. Here is more information on selection and insertion sorting:
https://www.geeksforgeeks.org/difference-between-insertion-sort-and-selection-sort/
To learn how to use this model, scroll down to the How to Use section.
There are two sizes: a student model and a teacher model.
Student model
- Base: 12.5cm x 8cm x 0.8cm
- Slider: 22.58cm x 4.6cm x 1.3cm (not including supports that stick out from one end)
- Number pieces: 1.2cm x 1.9cm x 0.8cm
Teacher model
- Base: 39.52cm x 22.4cm x (about) 2cm
- Slider: 71.47cm x 11.62cm x 2.36cm (not including supports that stick out from one end)
- Number pieces: 4.1cm x 6.5cm x 1.5cm
- Stand: 20cm x 10.25cm x 7.43cm
How to Use:
(Read the About This Project section first for necessary information)
To use this model as selection sort and to sort in ascending order (from left to right), begin with this configuration, with the numbers in a random order:

First, find the smallest number, then swap with the first number (on the left) in the row. To mimic how a computer does this, you will need to utilize the extra storage with one spot acting as a temporary variable:


Now, the first number in the row is sorted, so the slider moves over to cover the one spot:

Continue to find the smallest number in the list and swap it with the first spot you can see on the left, until you get to the end. After you finish, remove the slider to see the whole list sorted:

To use this model as an insertion sort and to sort in ascending order (from left to right), begin with this configuration, with the numbers in a random order:


Move the slider one spot to the right:

If the number on the right is smaller than the number on the left, use the temporary variable spots (the top row) to swap the two numbers:


For each time you move the slider over one spot, swap the numbers as many times as needed, until you no longer need to swap numbers to get it in the right order. Repeat this until you have gone through all the numbers: moving the slider, then moving the numbers. By the end, the row will be sorted:

The Objective:
This model was created for the AP Computer Science A teacher, who was using pieces of scrap paper to help students explore how the computer uses sorting algorithms. The goal was to create something that could replace pieces of paper into something easier to manipulate.
The Design Process:
From start to finish, this project took about 6 months of work.
I started with the paper model that I was trying to improve on. I brainstormed multiple ideas and met with the teacher to understand exactly what she wanted the model to do. I also made paper models to see how they would turn out in real life. This is the first idea I came up with:

When I met with the teacher, we came up with a few things we wanted this model to accomplish, and here are some of my notes from the meetings
- Could make a slider to find the smallest number
- Do we want the slider to cover temp. spots?
- Don't want 3 arrays
- Insertion sort doesn't work with this model. Could move the pieces instead.
- 3x2 smallest pieces
Here is another model I came up with:

I did calculations to see how long we could make the slider, given the printer was an Ender 3:

I came up with some more design ideas:


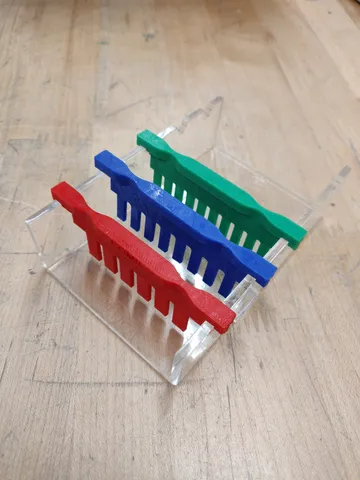
I decided on the design that I thought would work the best, and we printed out part of the base, some number pieces, and the slider to make sure everything fit together.


None of the engravings came out on the slider, but everything else fit, so we printed the first full base and another slider in green, which is easier to see. On the black slider, you can see the glue marks from printing on a glass bed. We switched to printing on a different bed to fix this.

We also printed out a full set of numbers:

We forgot to remove supports when printing the slider. While the engraving was there, it needed to be reprinted to be easier to see. This time, we used red filament:


But it was a little tight and did not slide on the base as easily as I wished.

After a few months, I revisited this project. While the slider needed to fit better in the track in the base, there also needed to be more room between the slider and the number pieces to make the number pieces easier to remove from the base. You can see this in the photos below.
The base was modified to waste less filament, and to have extra space to make it easier to grab the number pieces. The slider was also modified to be wider since the base was changed. We printed both the new slider and base. The light green base is the first model, and the dark green base is the modified version:


The slider was too loose when sliding in the track in the base. So, the slider was modified to be a bit wider to be tighter.

Here was the next version of the slider, which had the right amount of grip in the track:

But with all the modifications, the slider became too heavy and was not tight enough to be held horizontally by the base:

So, I added little supports to one end of the slider to keep it vertical. We printed another slider:

The final model was done:

We started to print out 12 models for the teacher: 12 sets of number pieces, 12 sliders, and 12 bases (We ended up using multiple colors because we ran out of the filament we were originally using).


We decided to create a teacher version, which should just be a larger version of the model I have already completed. I tried to figure out exactly how much I would need to scale the model. I was given a rough estimate from the teacher, who said that she thought that the base should be about the size of a piece of printer paper. I created a paper model based off of that, where I scaled everything up uniformly. But the number pieces were too small and students would be unable to see them from across a room. The slider and base would be too large and the number pieces would be too small.
And I ran into another problem. The model cannot be simply scaled up by a certain factor because that would waste a lot of filament. For example, I had added space between the number pieces and the top of the slider to make the pieces easier to grab. But when I directly scale up the model, there is a lot of unnecessary space there. And scaling the model in different directions by different ratios didn’t work either.
I made a few paper models to see exactly how big the model would be. The model on the top was based off the base being the size of a piece of printer paper, and the model on the bottom was after I modified everything to fit larger number pieces:

Then, we decided to print out some of the number pieces to make sure they were the right size. We decided to print out 0 and 6 because those numbers needed to be modified, since we decided to make the engraving of the numbers go all the way though instead of just part of the way like the original number pieces.

And while I had figured out the size of the number pieces, because I could not uniformly scale the model up, I still had to try to figure out exactly how large to make the base and the slider, even with the new paper model. I tried to measure the size of the current model and scale it up:

One of the most difficult areas to scale was the space between the number pieces and the top of the slider:

After I figured out that distance, I had to decide on the spacing of the tracks and the spots for the number pieces:

I tried multiple different scales based off of multiple dimensions.

After I finished the base, I needed to make sure that the slider would fit in the base:

I was able to scale up the slider and we printed it out, using one of the new printers, which has a conveyor belt and can print infinitely long objects. We ran out of filament partway through the print, so the slider came out with 2 colors:

We used a CR30 printer to print the slider. The printer bed did leave some marks on the slider. For example:

I used a heat gun, sandpaper, and some water to try to clean up the rough edges and remove the marks:

One issue with this slider was that the end supports were too short:

So, I modified the end supports on the slider to be the correct height.
Since the slider was otherwise the correct size, I knew that the base I created would need to fit the slider. To ensure this, we printed a cut out of the base (because printing the whole base takes a long time and a lot of material). It took multiple tries to get the track and slider to fit together correctly:

The final slider was printed, and I used the same technique as on the test slider to remove the marks on the final slider.


But then, the longer slider end supports broke off (the blue parts in the picture below). While I could have glued them back on, it would be stronger to print the parts and insert them into the slider. I tried to measure the size that I needed and printed it out. But the parts were too small (in orange):

I tried again, printing the supports in an L shape and pushing it into the slider. This was not ideal, but did work. You can see the difference between the original end piece that broke and the replacement part:


And the slider was done.
The number pieces were all printed. The base was also printed on a gMax 2 printer, but it broke on the last layer, leaving the base unfinished.


Because the gap between the number pieces and the base were not large enough to easily fit the numbers into the base, I sanded down the sides and corners of the number pieces slightly:

And because the base wasn’t complete, we tried to print a top layer to glue onto the top of the base to make it look better (we first printed out a test piece):

But these pieces were printed with a different printer from the base, so they were calibrated differently and didn’t fit together properly. Because it would take too much time and effort to adjust the printer, we decided to add hot glue onto the top of the base to give it a more finished look instead. While it isn’t perfect, it is better than leaving it unfinished:


The last thing to do was to create a stand for this larger model because it is heavy and hard to hold upright:

We decided to make part of the stand hollow to save material. This also had the added bonus of being lighter. I used a heat gun to make the sides smoother.


Luckily, the model fit perfectly onto the stand:


Model origin
The author hasn't provided the model origin yet.