SBox V1 and V2 Fixes
Description
PDFOverview of Resolved Issues from the Original Design
- The screw holes on the bottom left of the boxes are too large in the original V1 and V2 designs. M3 screws can be inserted and removed with slight pressure.
- The left side of the original V1 and V2 lids have a geometry issue that keeps the latches from properly seating.
- The original V2 medium box is shorter than the V1 medium box.
- The original V2 medium and large boxes remove the ability to use the side handles.
- This issue may be resolved on Michal Fanta's posting at this time.
- The original small V2 box removes the ability to use the front handles.
- Michal has fixed his model and uploaded it again. To be clear, the model he has uploaded DOES now support his front handle.
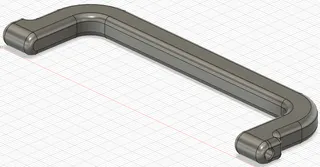
- The model I've uploaded here also fixes the issue. The Small V2 box here supports the front handle.
- The handle I've uploaded is for the original V2 Small box that (accidentally) doesn't support the front handle. Only use this handle if you've printed a box that doesn't support the front handle.
Revisions of My Fixes
- Bottom_Small_V2_Symmetry_Handle_Fix_M3Hinge - Rev B fixes an issue reported by ExuZ. The “nubs” that hold the handle in place were inset by approximately 1mm. This resulted in a rectangular, 1mm protrusion into the inside of the box.
Description of Issues
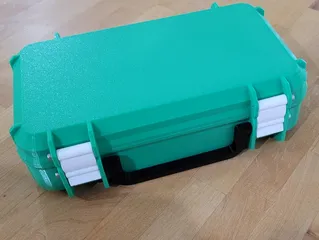
Michal Fanta's Stackable Toolbox designs are fantastic. I've printed seven boxes so far and don't expect to slow down any time soon. They stack well, latch together, and my kids love storing their small toys in them.
However, there are a few issues with the boxes. The lids interfere with the latches, causing them to not seat properly on the left side. This can be pretty easily seen if you have two boxes. Stack them and latch them together. Take a look at the latches on the left side vs those on the right. The right side is fully seated while the left side hits the lid.
Here's a picture showing how the latches seat with an original lid:

Here's a similar picture, but with a fixed lid.
These pictures show the issue in the geometry:

Additionally, two of the holes on the boxes are too large. If you use M3 screws to assemble the design, the screw can just be pushed into place without using any tools. I placed two models into PrusaSlicer and overlayed the holes. The hole on the left side of the blue model is larger than the hole on the right side of the orange model.
Fixing the Issues
I fixed the issues in PrusaSlicer without actually editing the models. I do not know if these .3mf files will work fine in other slicers, but I'm not certain. To fix symmetry, I used the following process:
- Load the .stl into PrusaSlicer
- Stand the model on its side
- Used the Cut tool in PrusaSlicer to remove the top half of the model
- Laid the model onto the bed in the correct printing orientation
- Copied and pasted the model
- Mirrored one side along the Y axis
- Rotated one side 180 degrees
- Set the same X and Y coordinates for both parts to align them properly
- Merged the two halves into a single model for printing
- They're now ready for slicing
Fixing the height of the medium box and fixing the handles on the medium and large box were similar. Just a lot of cutting up V1 and V2 models, mashing them together, then carefully aligning features.
Tags
Model origin
The author remixed this model.


