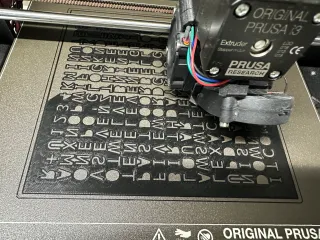
WordClock 16x16 LED matrix


Description
PDFWordClock 2024 variant of this model is available too.
Click here for details. =)
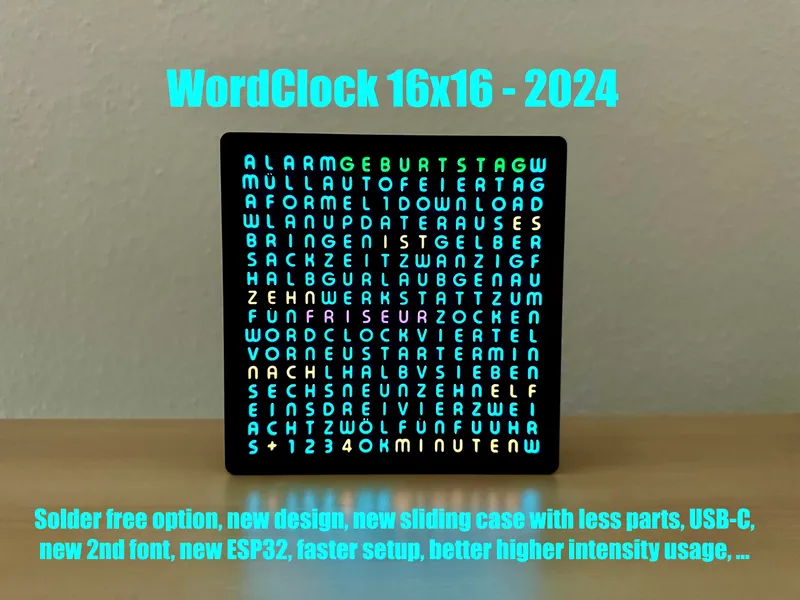
WordClock 16x16 LED matrix, super easy build, no supports to print, 3 wires to solder only. Telegram, smart home integration and external events can be displayed. Layouts for DE, EN, NL and FR available…
Notes:
- For the older notes please have a look at the end of the page…
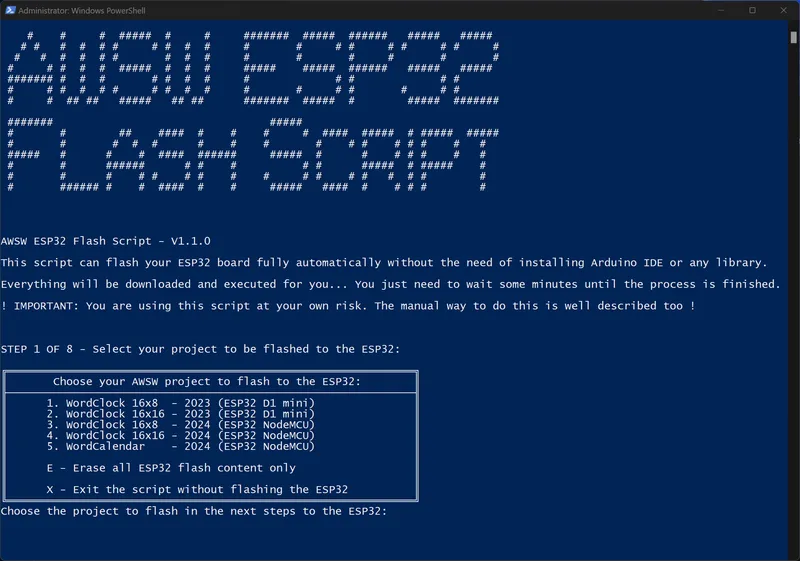
- 10.11.2024: Added a new script to flash the ESP32 without the need of the Arduino IDE:
- 21.12.2024: Software update V4.2.0 is now available including several new functions:
- Direct software update without the need of an computer or the Arduino IDE as introduced with WordCalendar 2024 before. Watch this video for details. You will need to select the used ESP32 board after the update to this version to download the correct files for your used ESP32 in future. A new page asking for this information will be shown when you enter the web configuration portal after the update.
- Scrolling texts function that shows dynamic texts like the IP-address or the initial startup messages much better readable. Watch this video for details.
- New startup and initial setup texts included.
- The installed software version is now shown during startup in case the “WordClock” text is set active.
- The IP-address information to enter the web configuration portal should be shown more clear to read now.
- Faster startup on reboot.
- Link to an Telegram HowTo added to let you know how you can add this function.
- Added a “test mode” in the “Maintenance” section to check all time word output texts faster.
- Lots of small changes to the web configuration portal to make the device better.
- To update to this new version from older software versions you will need to use the ESP32 flash script once to get the new software update variant. If you just new installed your WordClock you will get the newest version with the script already. =)
- 05.01.2025: You will now find the ESP32 flash script as a variant of the known MS Windows script for the usage in macOS too. Thanks a lot to John (Rave Props) @JohninNL_289006 for adding this macOS variant! This should make it even more simple to setup the project for macOS users. =)
The project was also shown on the "Conrad TechnikHelden" channel: Thanks guys for the nice video! =)
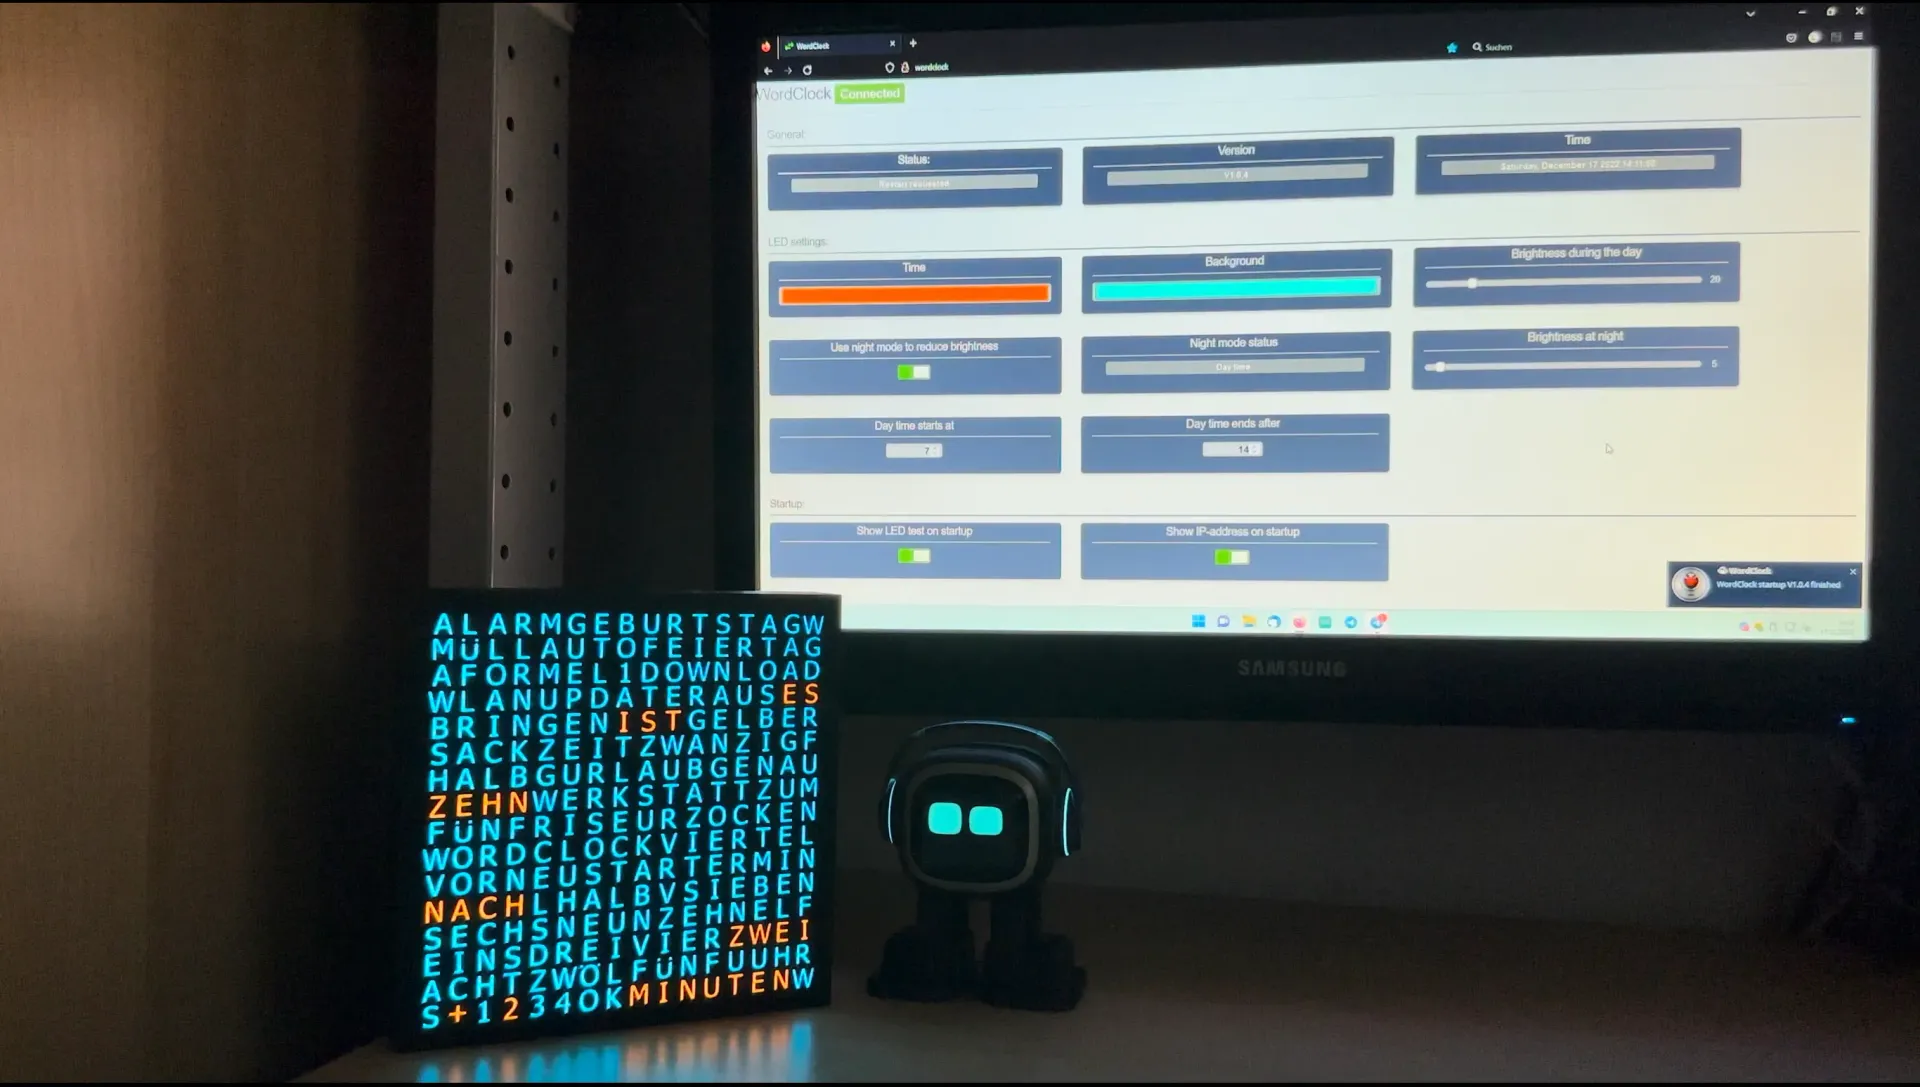
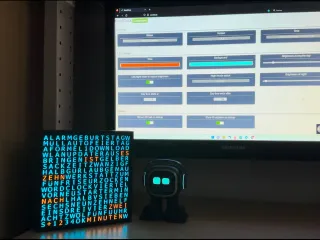
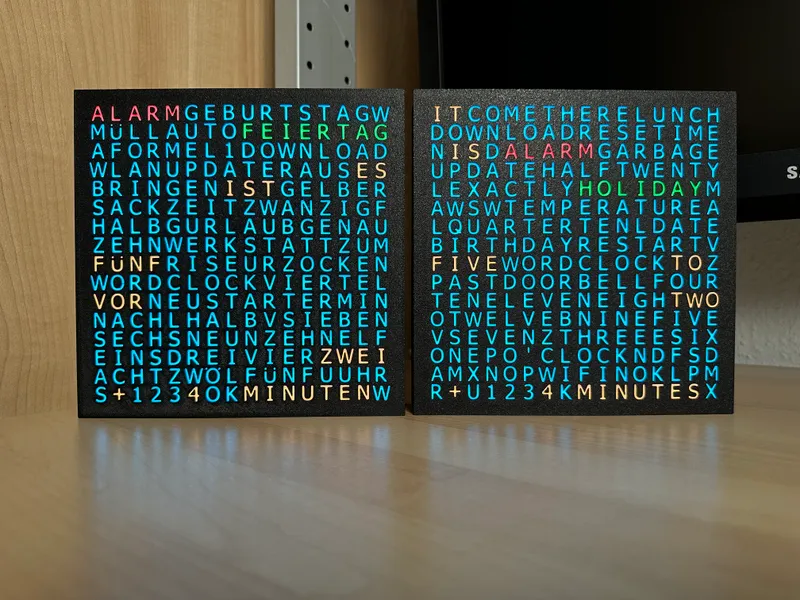
Pictures of the “Online Mode” of V3.2.0:

Pictures of the “Offline Mode” of V3.2.0:
Video (DE):
Music credit: Used some free music from Apple iMovie.
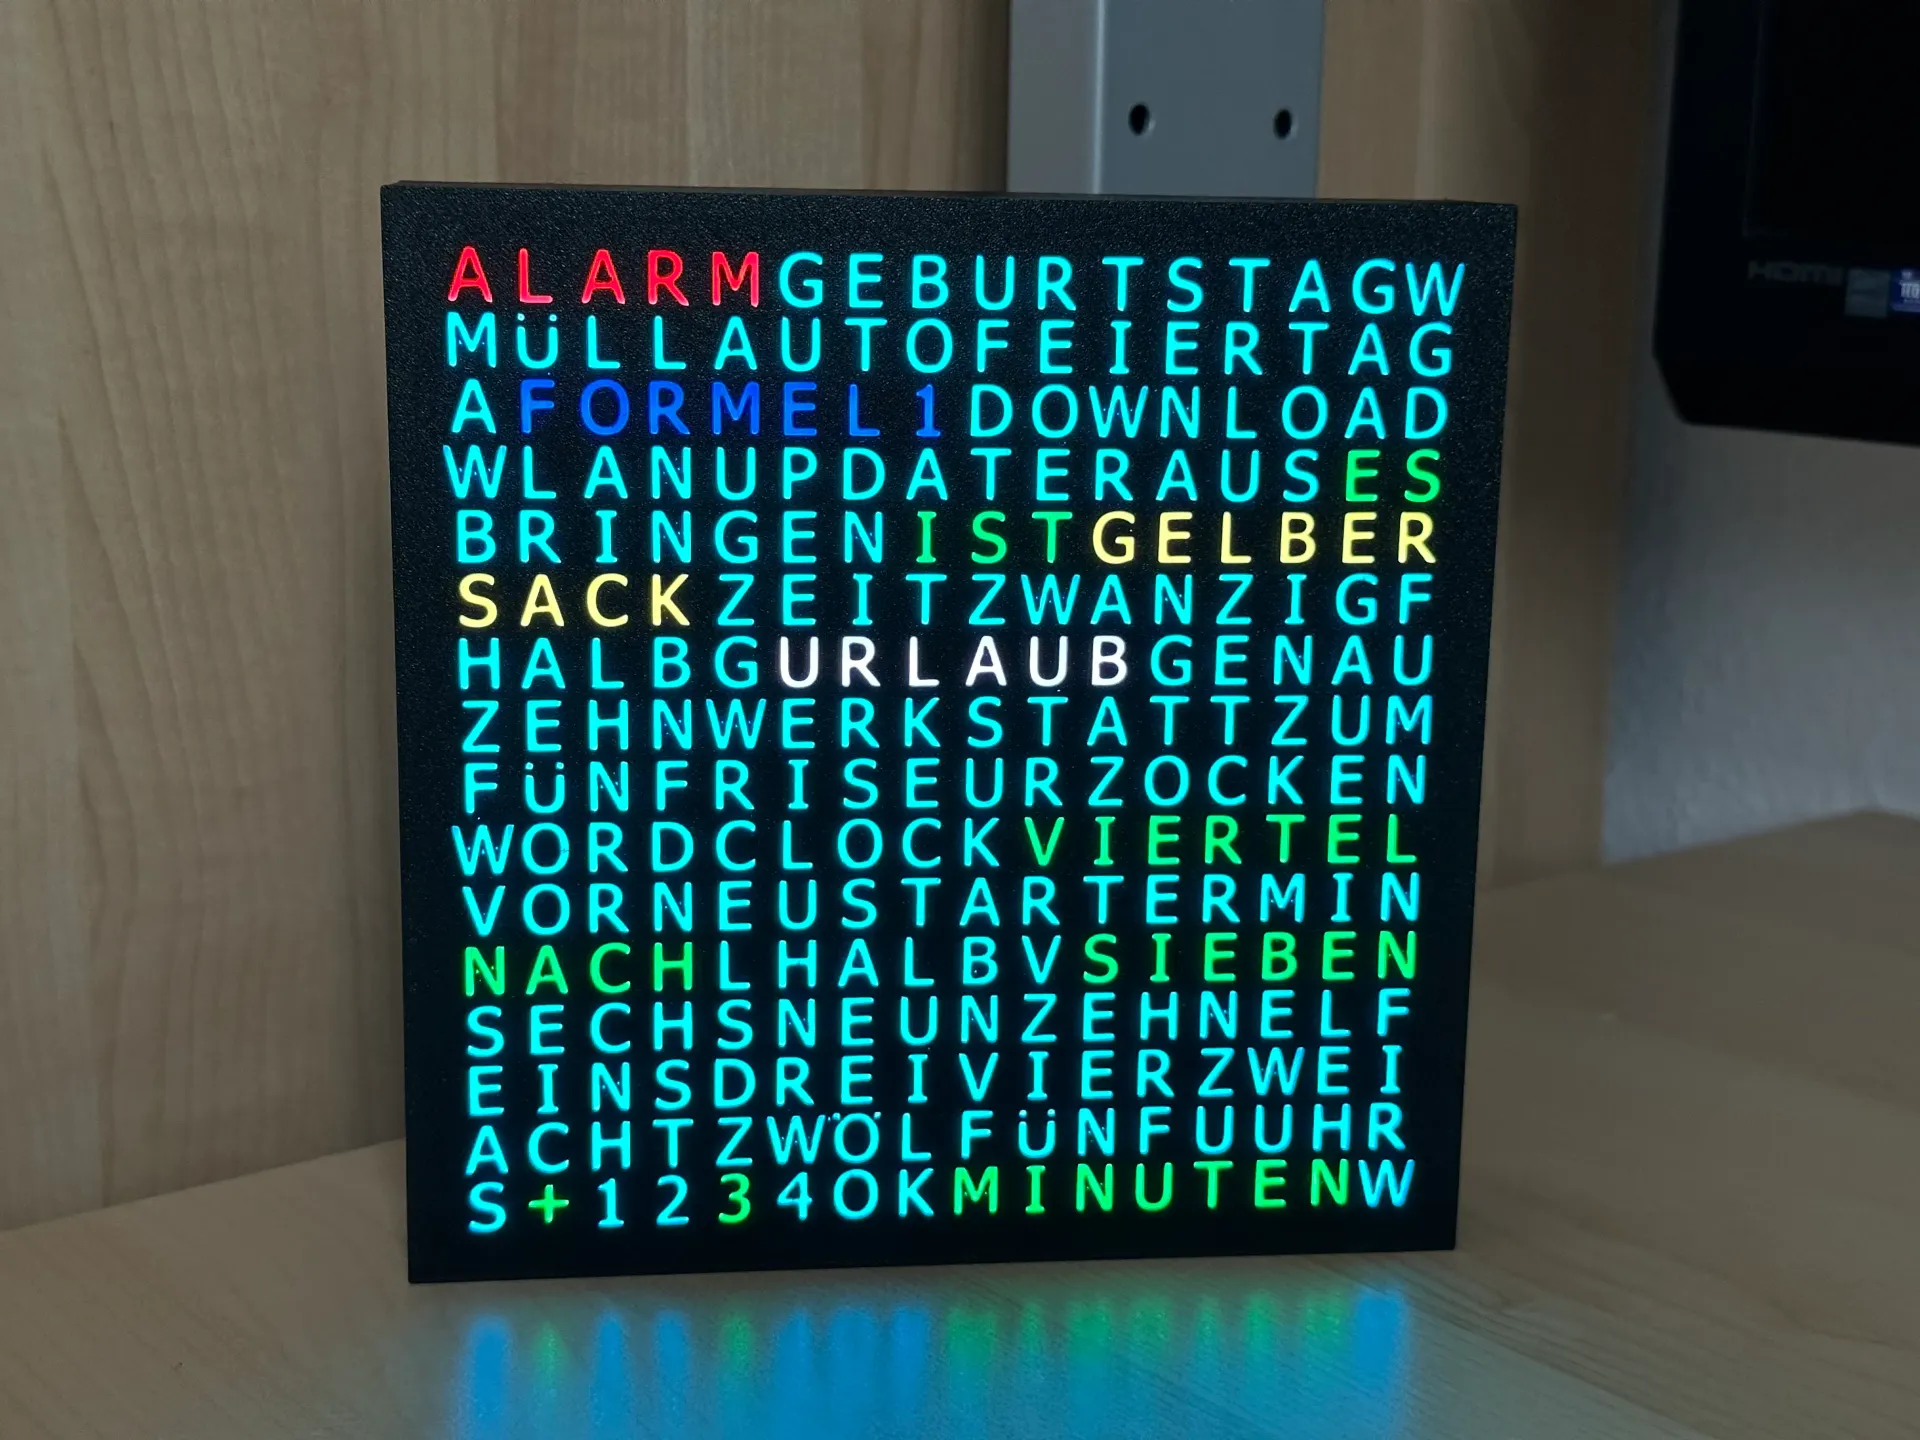
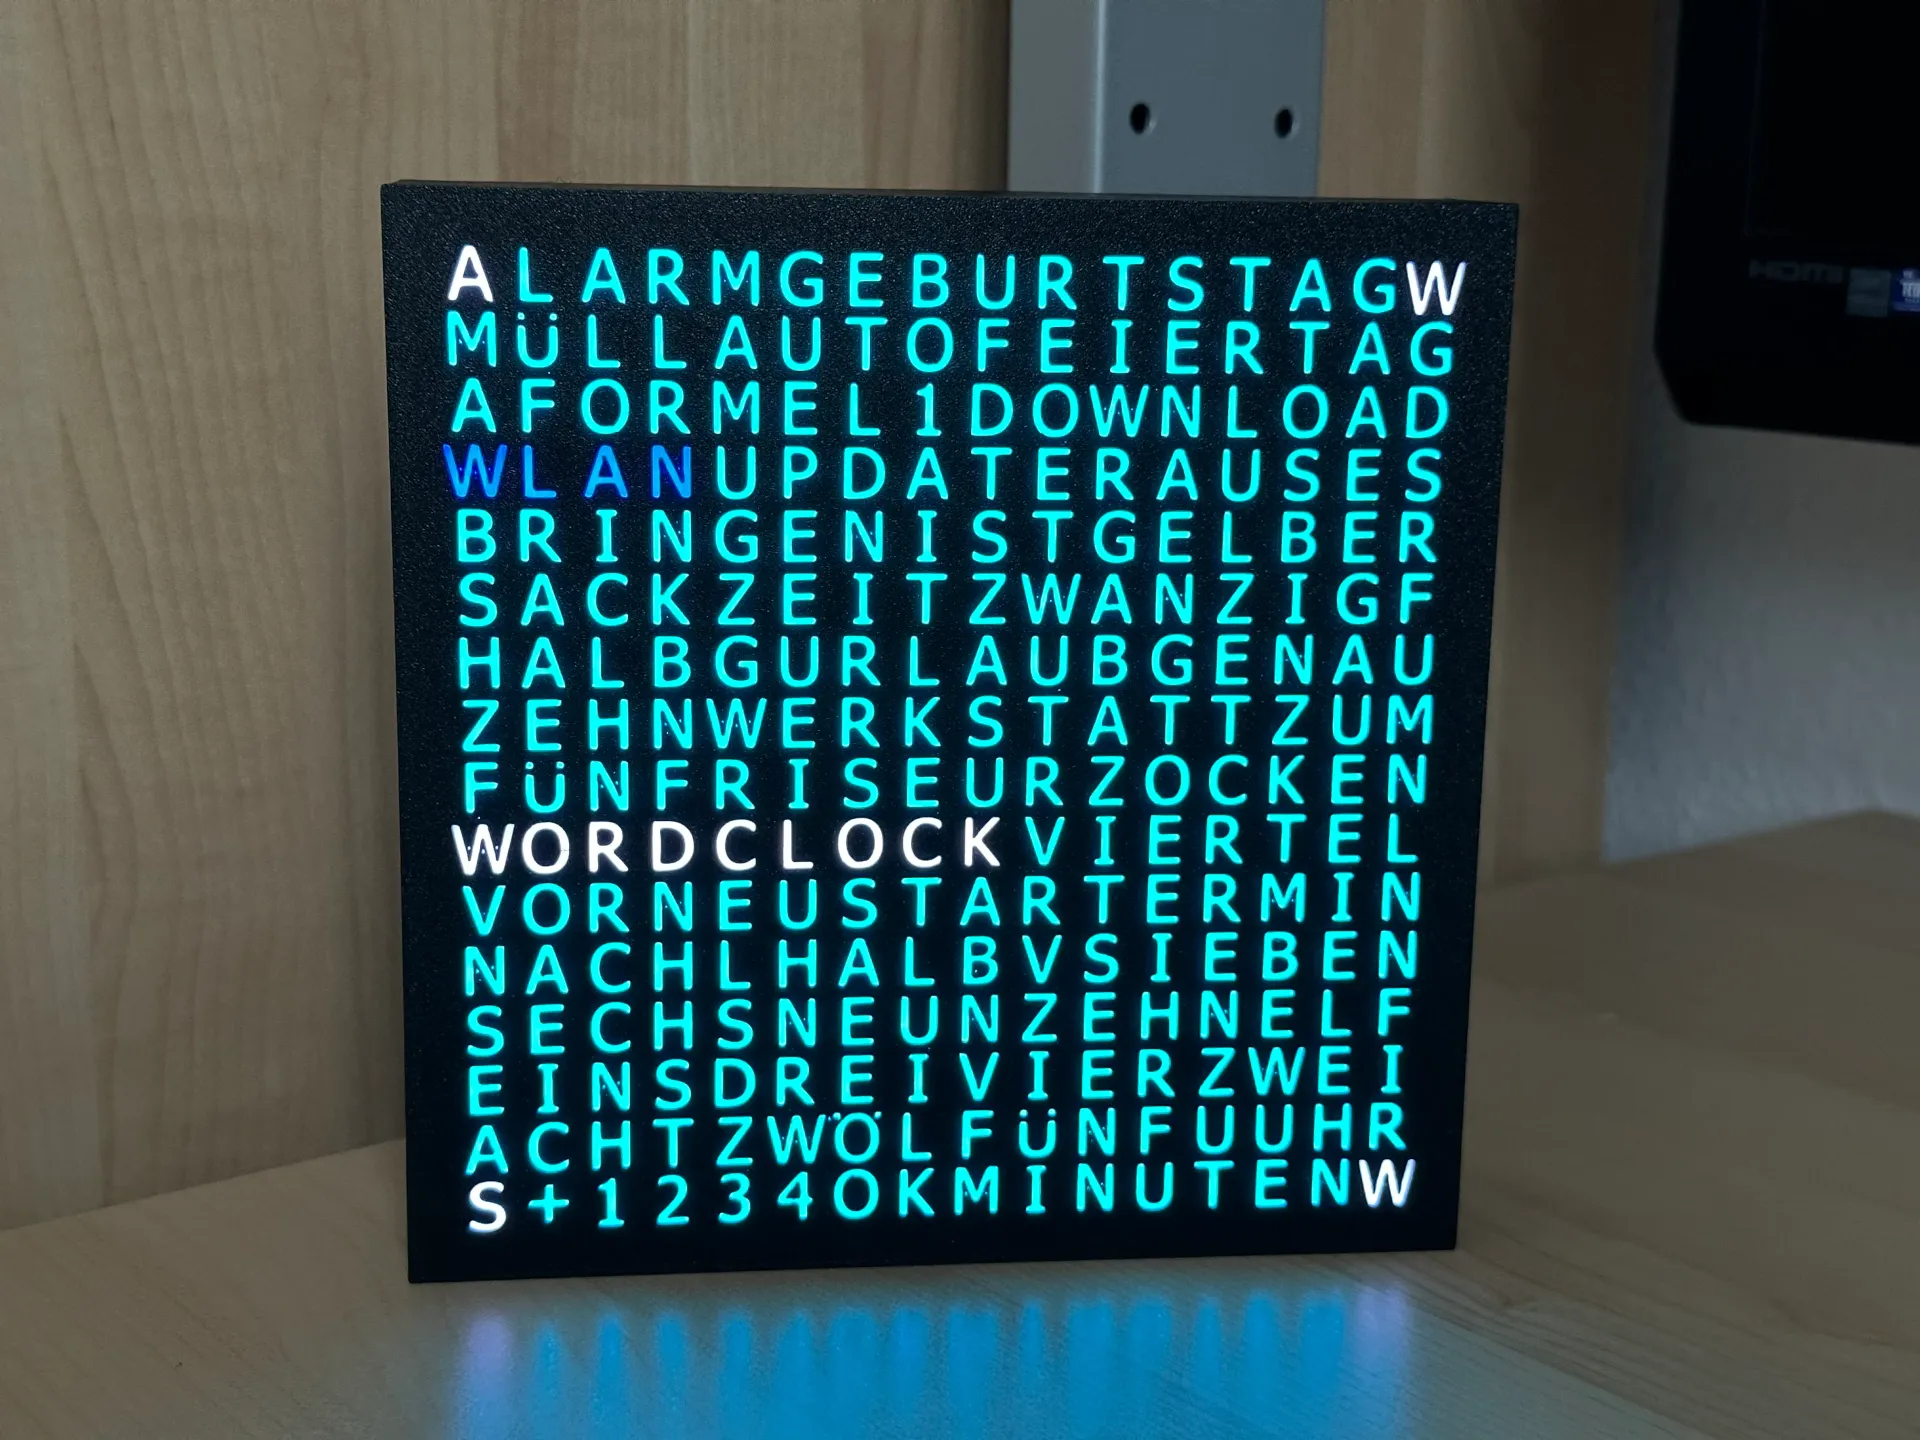
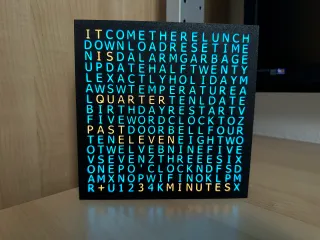
How to read the time (EN):
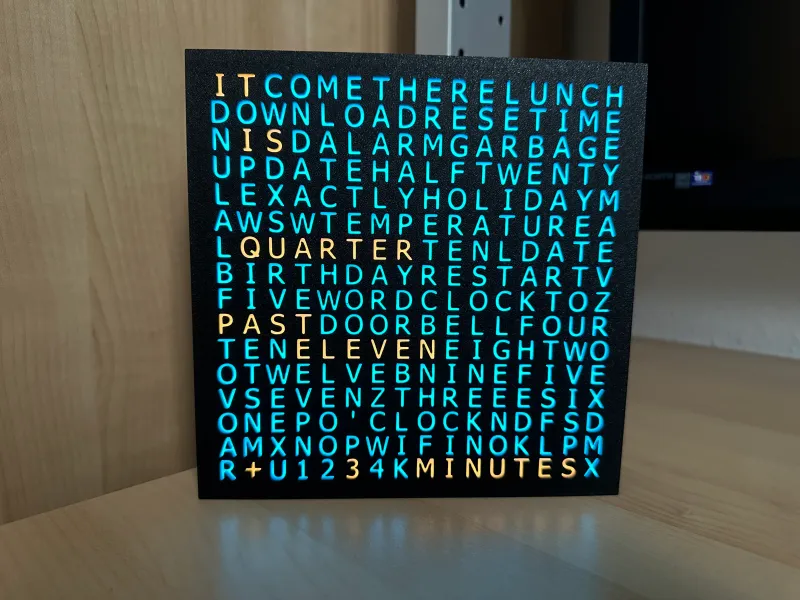
- In this case the color for the time values was set to orange. The background is set to cyan. Actually there are no extra words shown so we can focus on reading just the time.
- So if you just read the orange words you will get:
- “IT IS QUARTER PAST ELEVEN + 3 MINUTES”
- So the time is here “11:18“ or “23:18” o’clock.
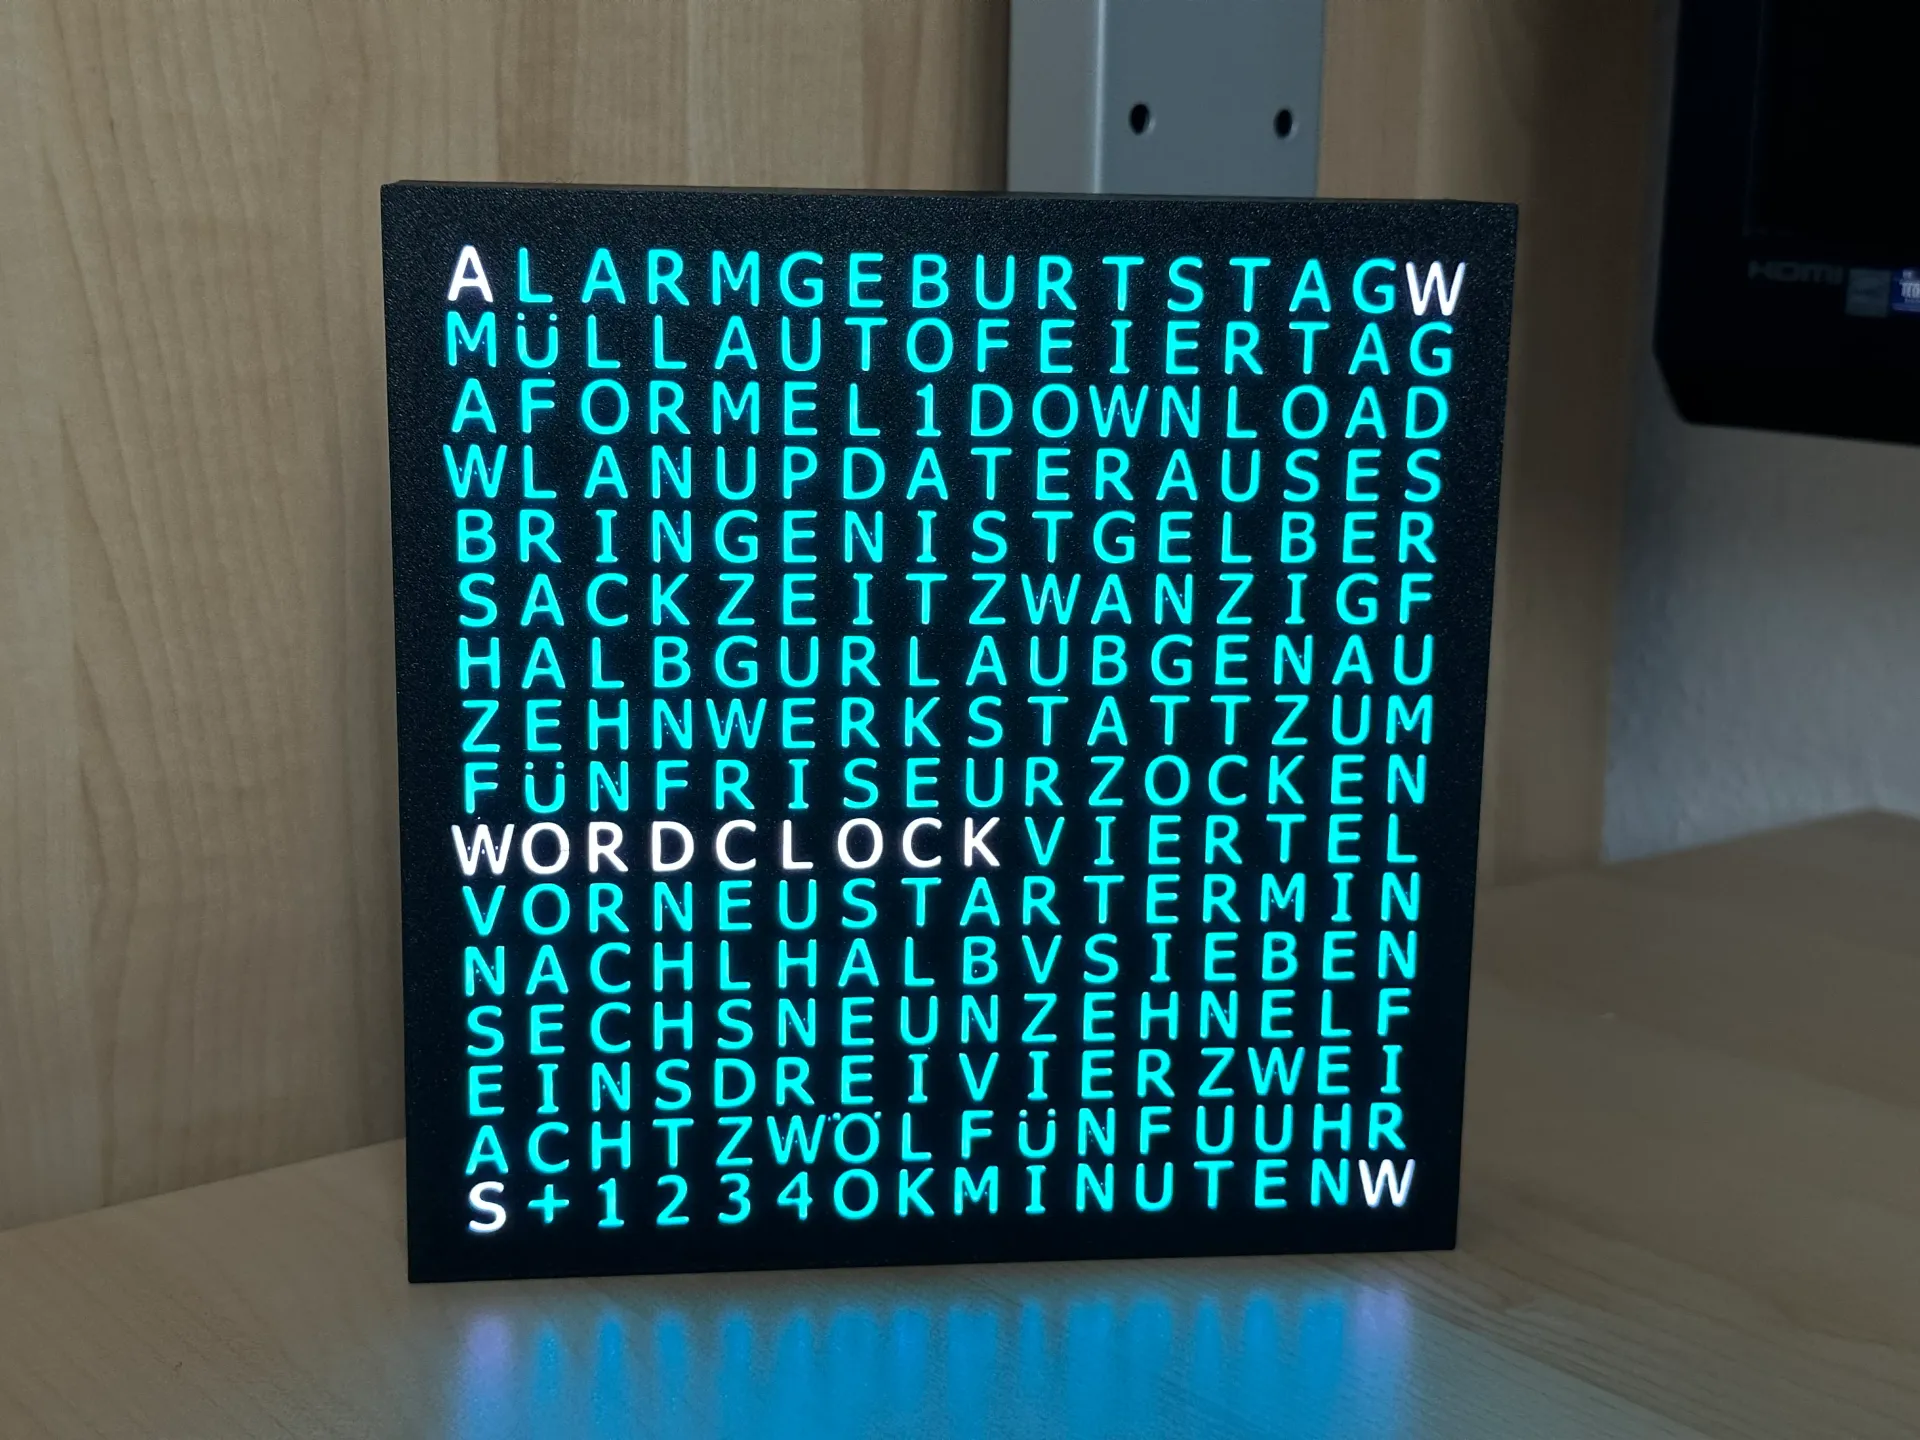
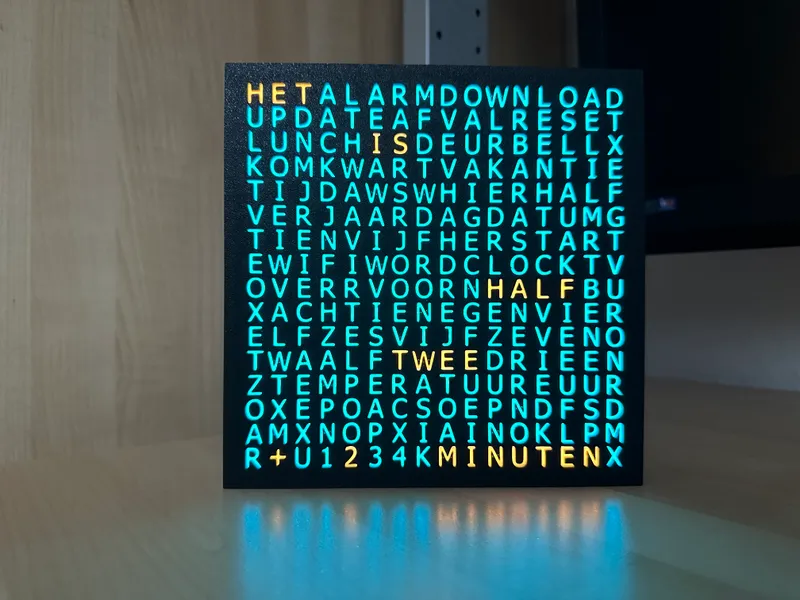
How to read the time (DE):

- In this case the color for the time values was set to green. The background is set to cyan and all other different coloured words are used for event notification as extra words…
- So if you just read the green words you will get (in german):
- “ES IST VIERTEL NACH SIEBEN + 3 MINUTEN“
- which means in English language:
- ”IT IS A QUARTER PAST SEVEN + 3 MINUTES”.
- So the time is here “07:18“ or “19:18” o’clock.
- Like named for my other (much more simple) WordClock you usually just read the known time coloured words most of the time to get an idea what time it is in 5 minutes steps. If you need to know the exact time you can read the last line too and add the shown minutes value to the already read 5 minutes exact time text…
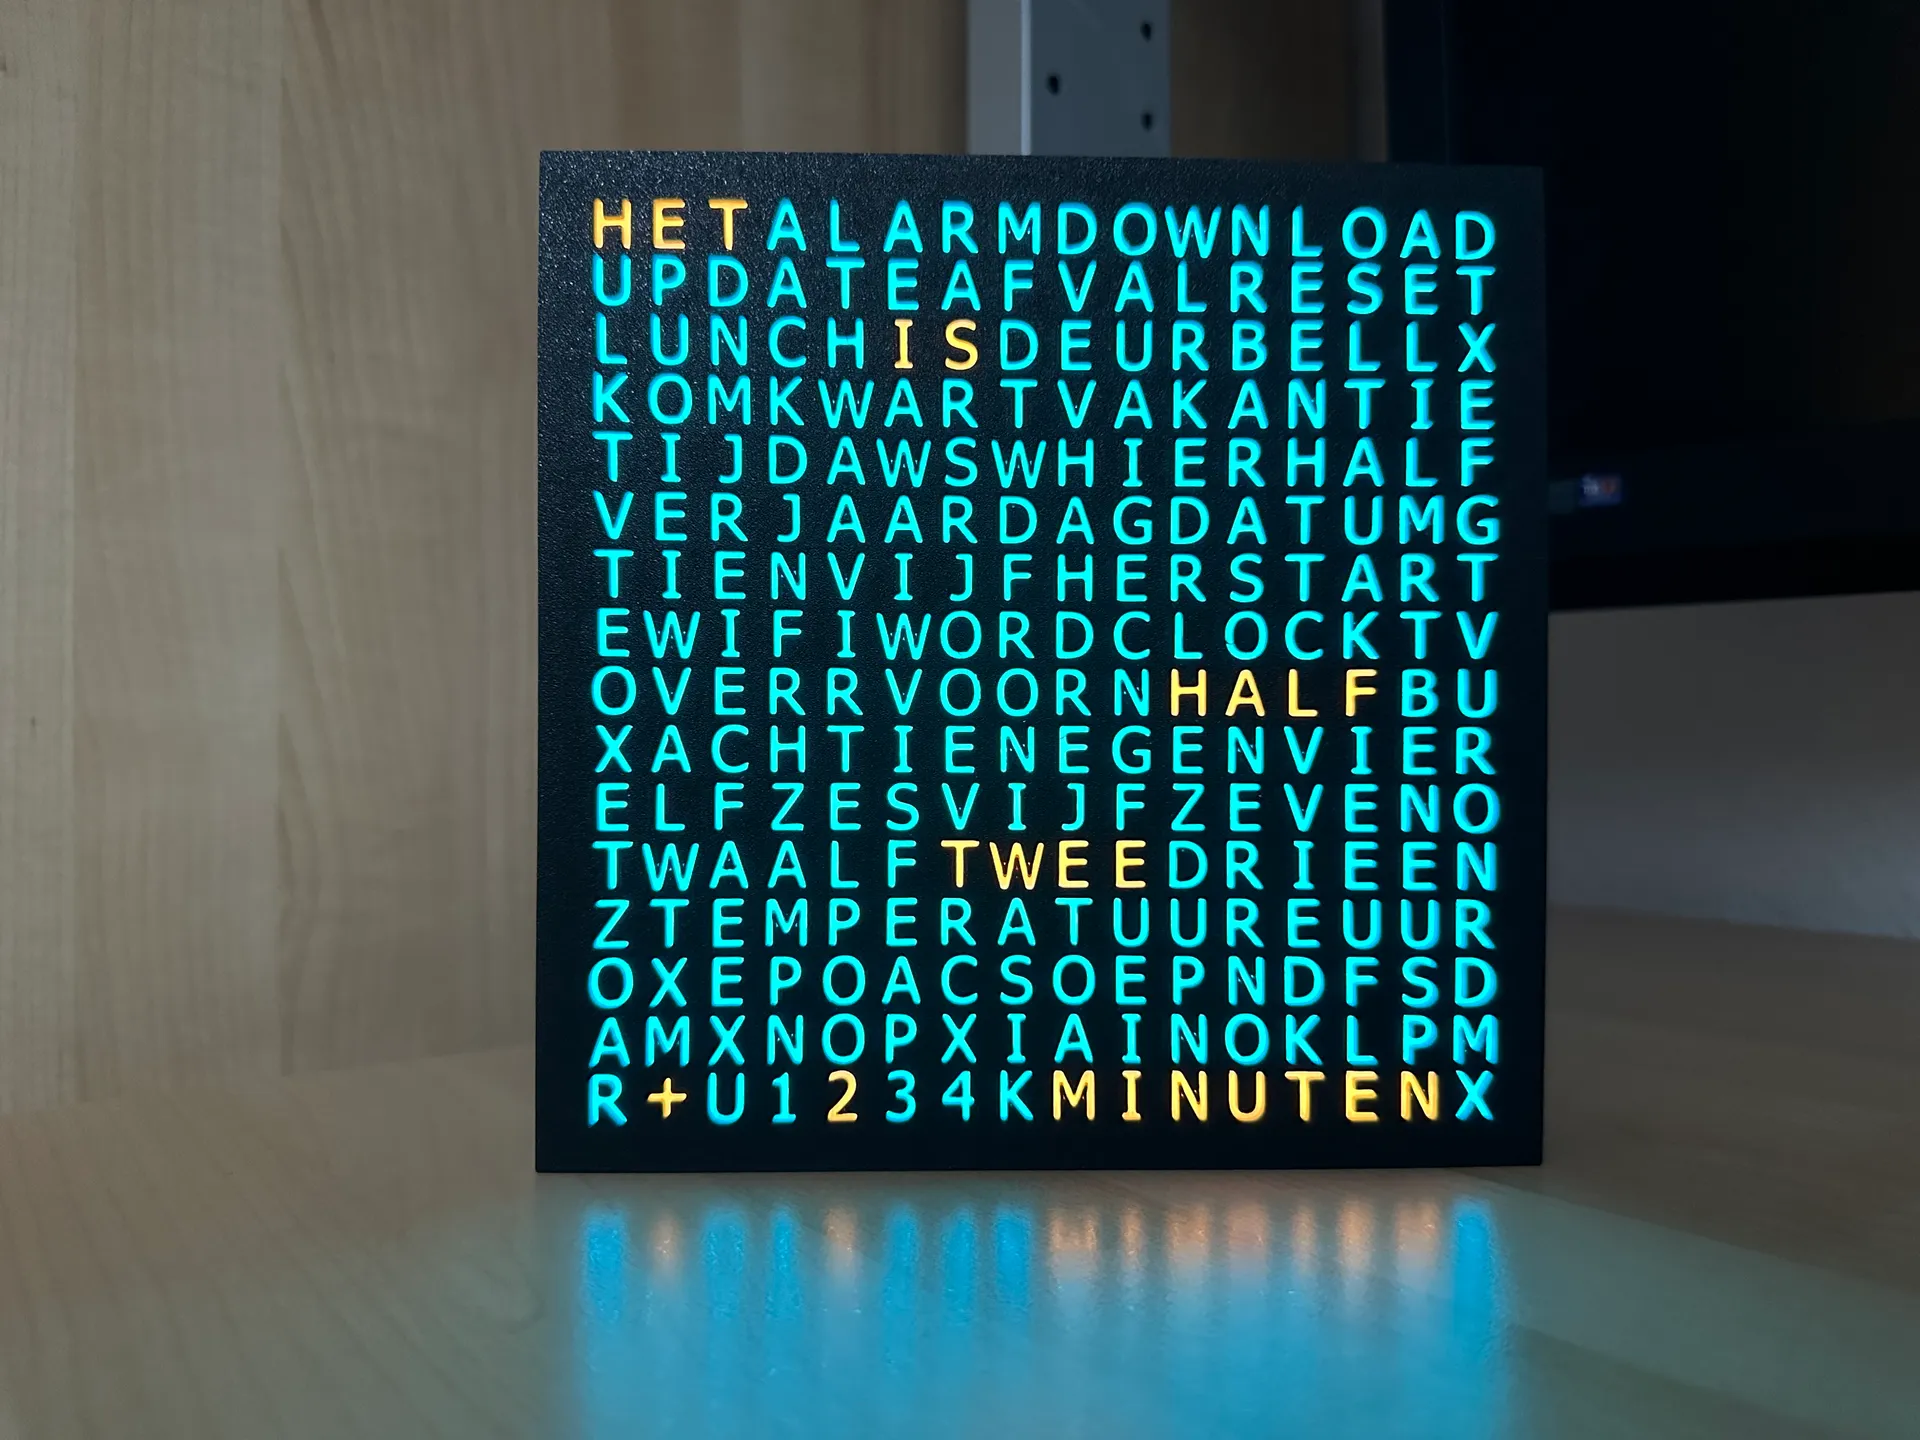
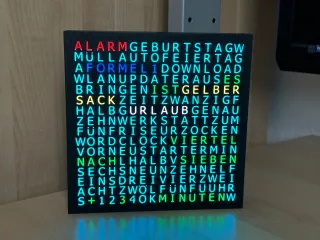
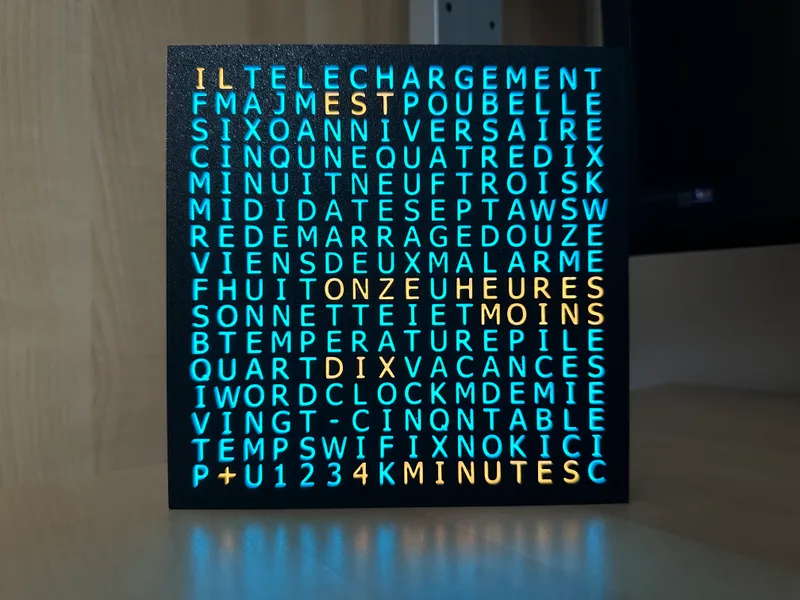
How to read the time DE and EN with extra words:
- In this case the color for the time values was set to orange. The background is set to cyan. Actually there are 2 extra words shown in red and green so we can focus on reading just the orange words to get the time:
- So if you just read the orange words you will get:
- DE: “ES IST FÜNF VOR ZWEI + 4 MINUTEN”
- EN: “IT IS FIVE TO TWO + 4 MINUTES”
- So the time is here “01:59“ or “13:59” o’clock.
Video (DE):
Music credit: Used some free music from Apple iMovie.
Functions:
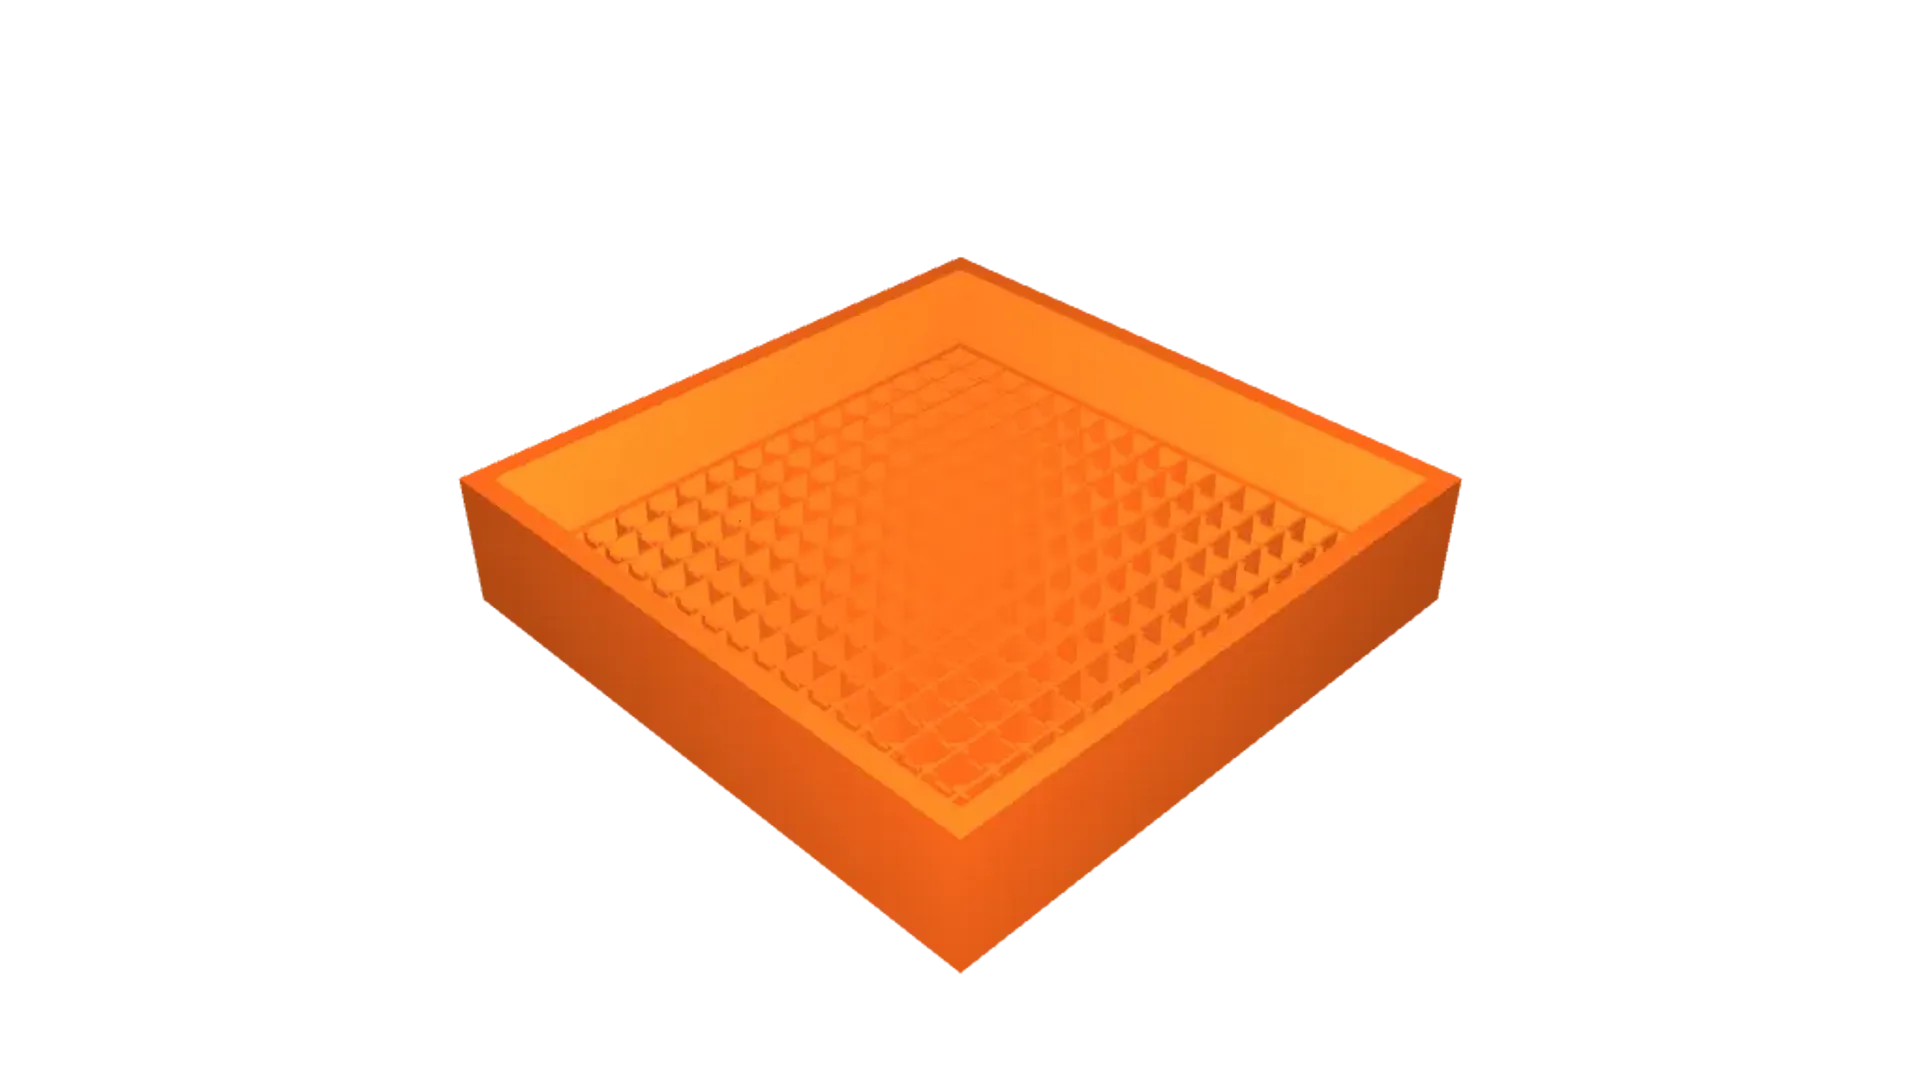
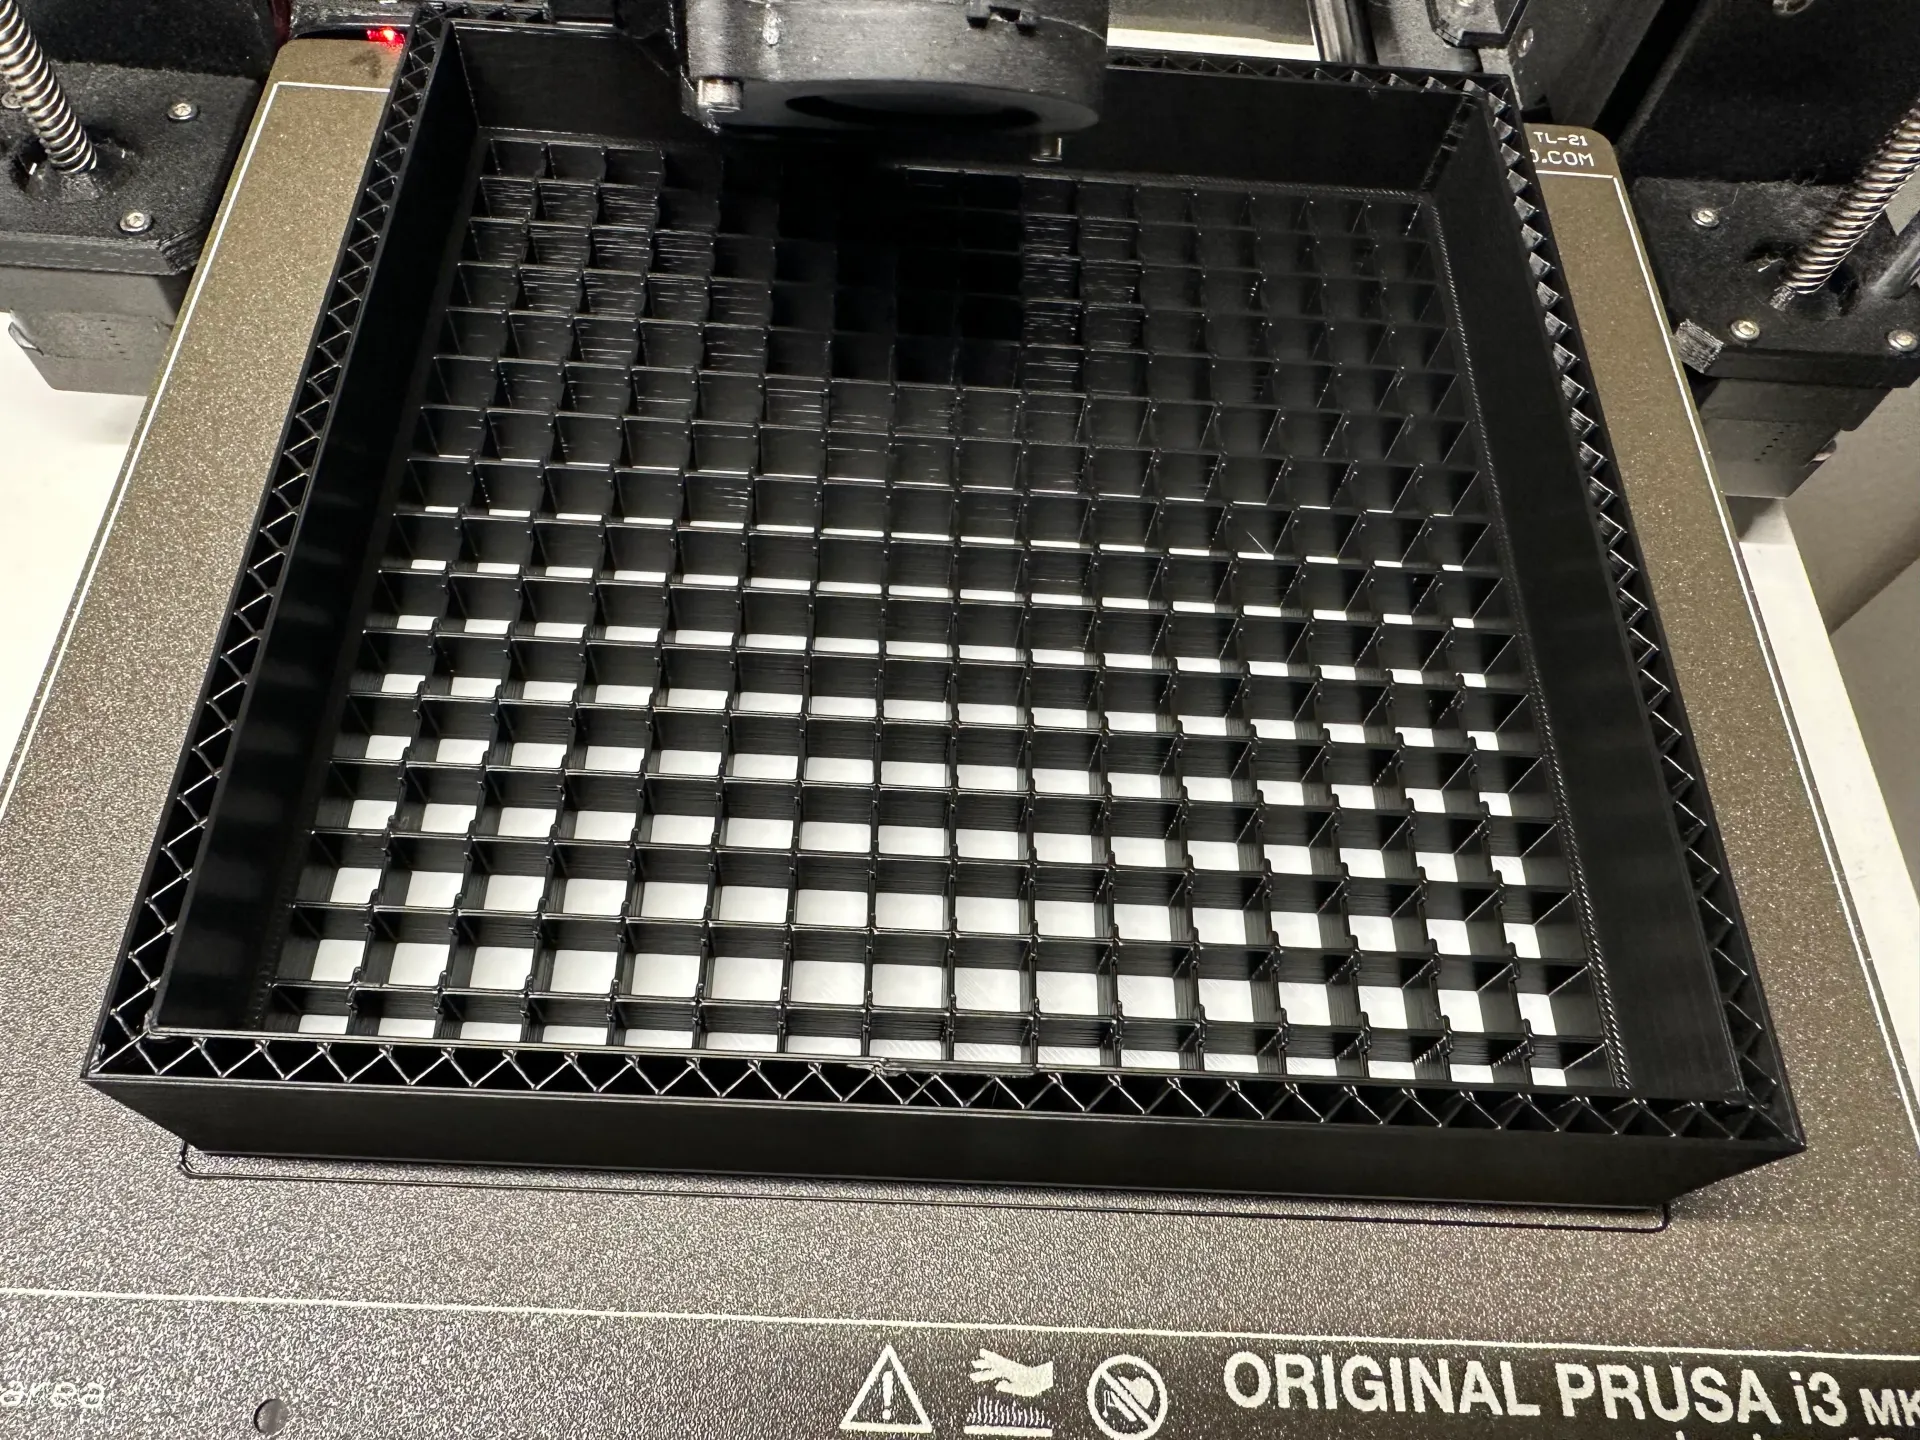
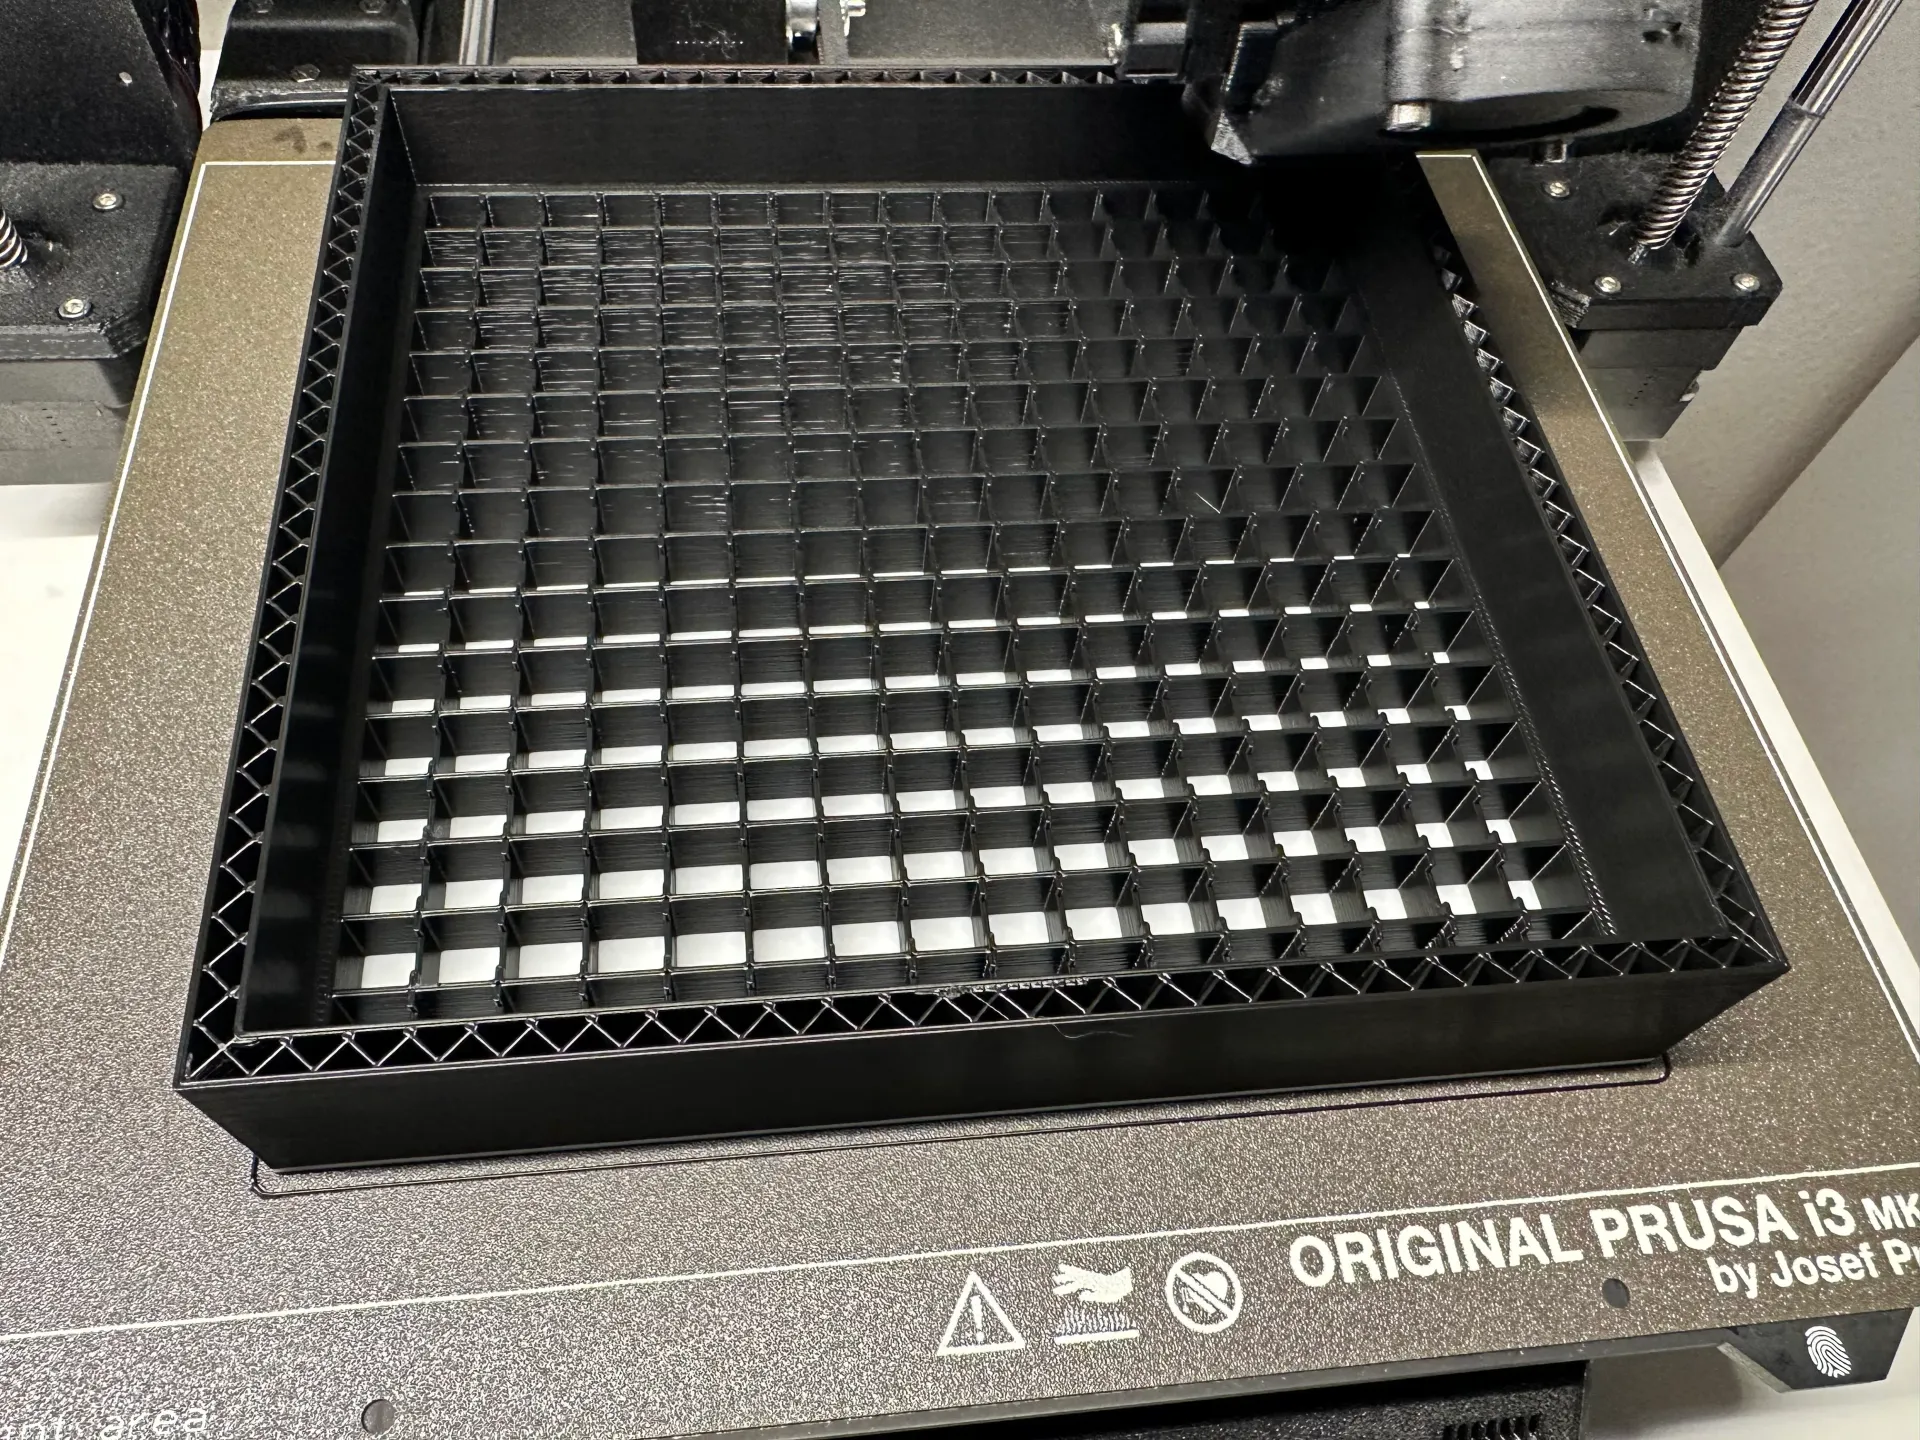
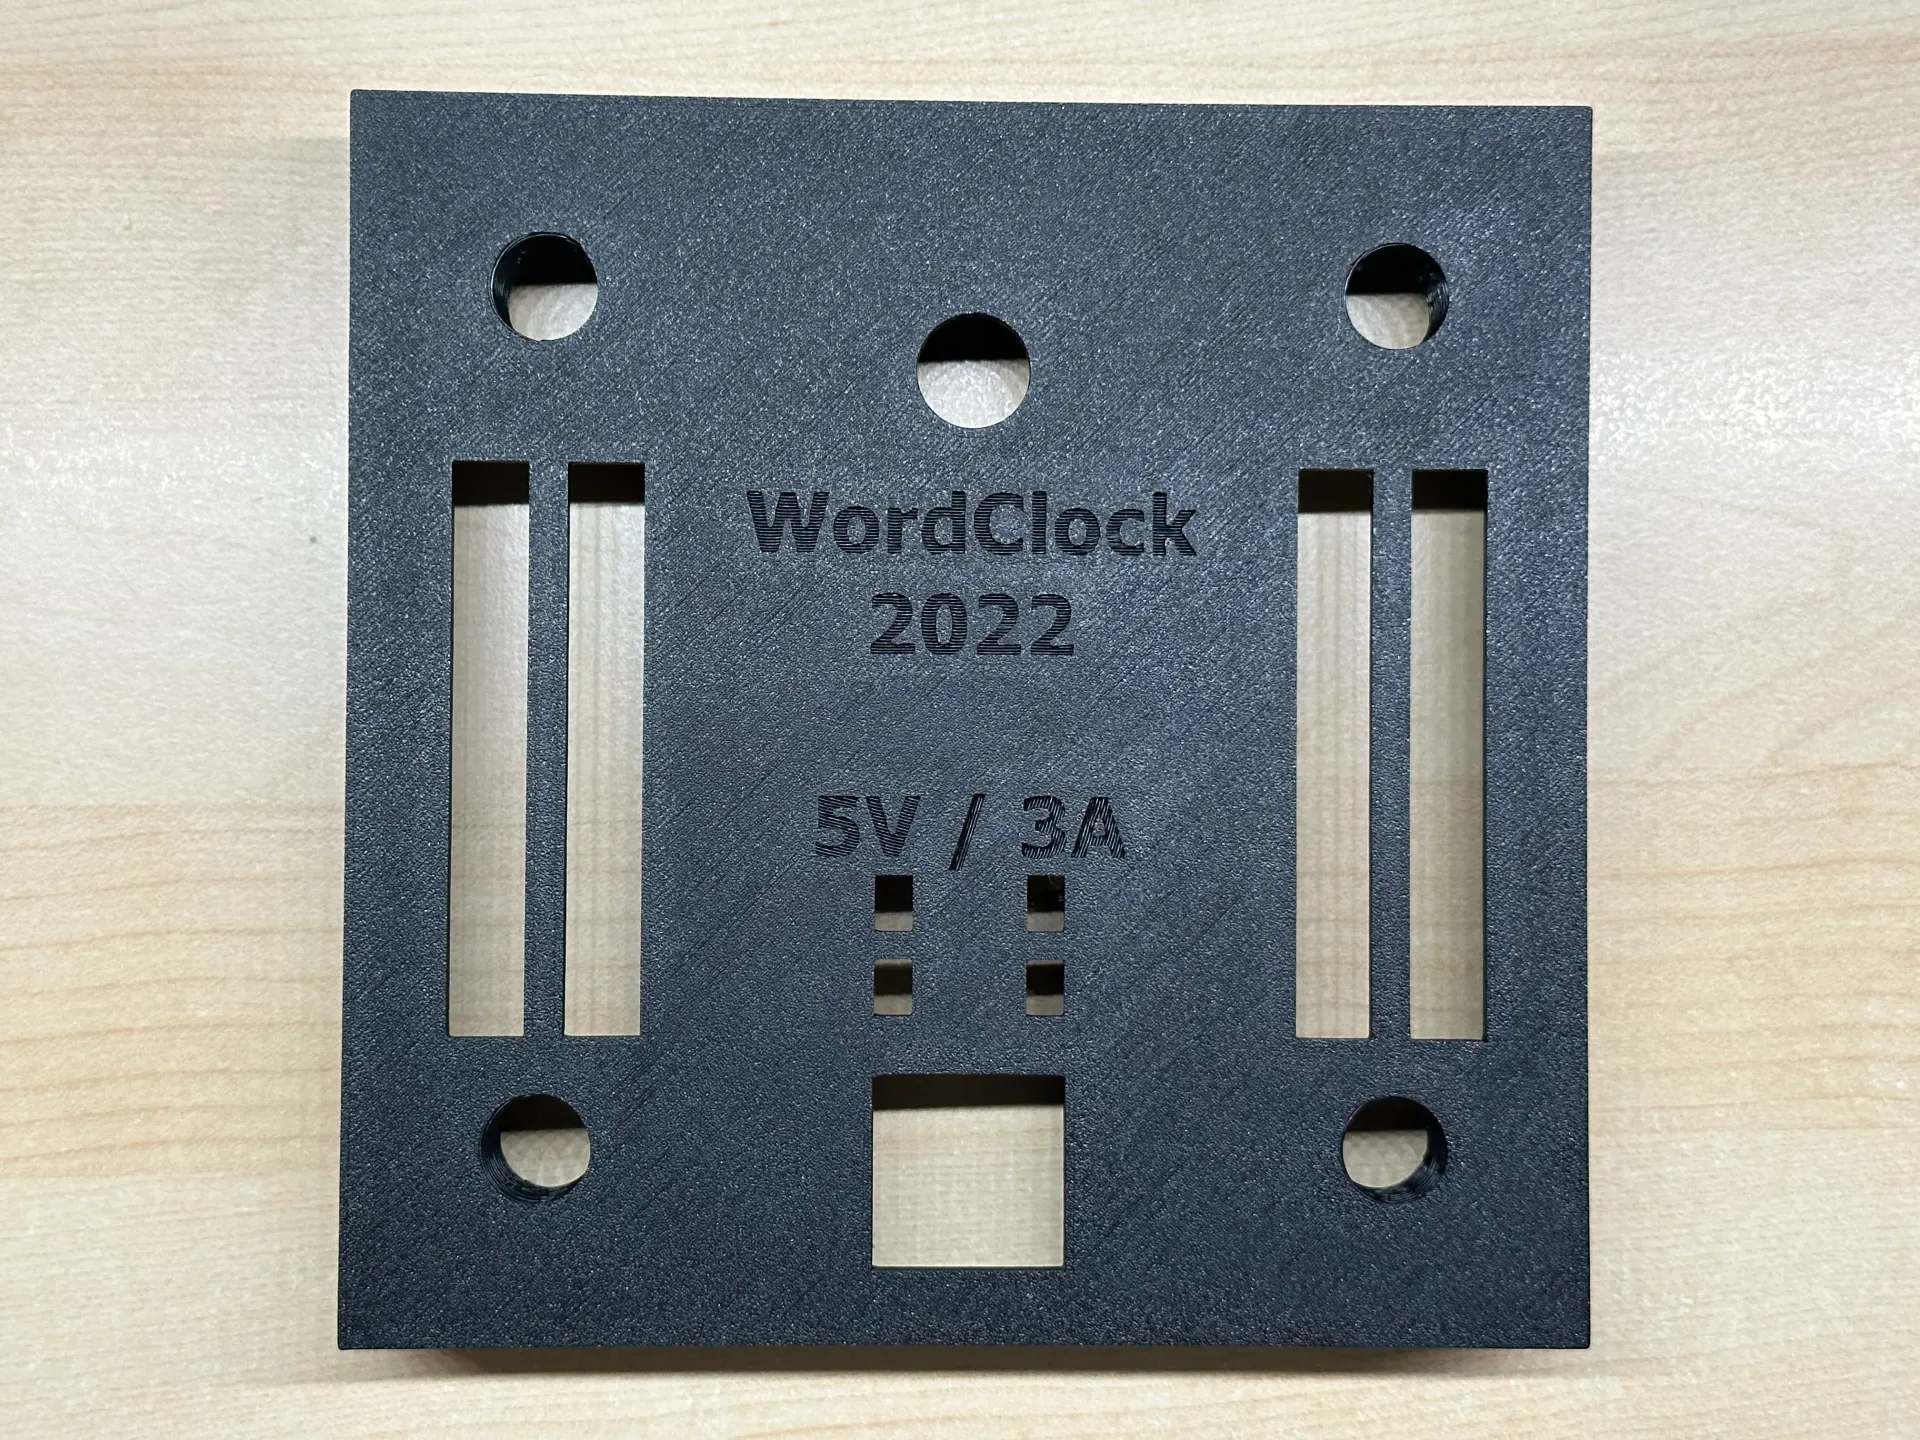
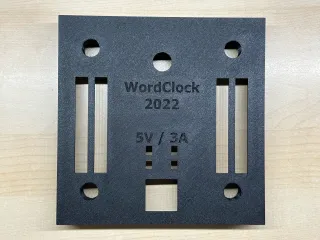
- Small print size to fit well on the MK3S+ or any 200x200mm printer. May even fit on the Prusa MINI. The size is 175.5x175.5mm in height and width. Thickness is 37.5mm without and 45.5mm with the 4 optional screws.
- The case can be placed on a desk without a stand or on your wall. The 4 screws generate a gap between the wall and the case to get the power cable out straight and to get air in the case from the back.
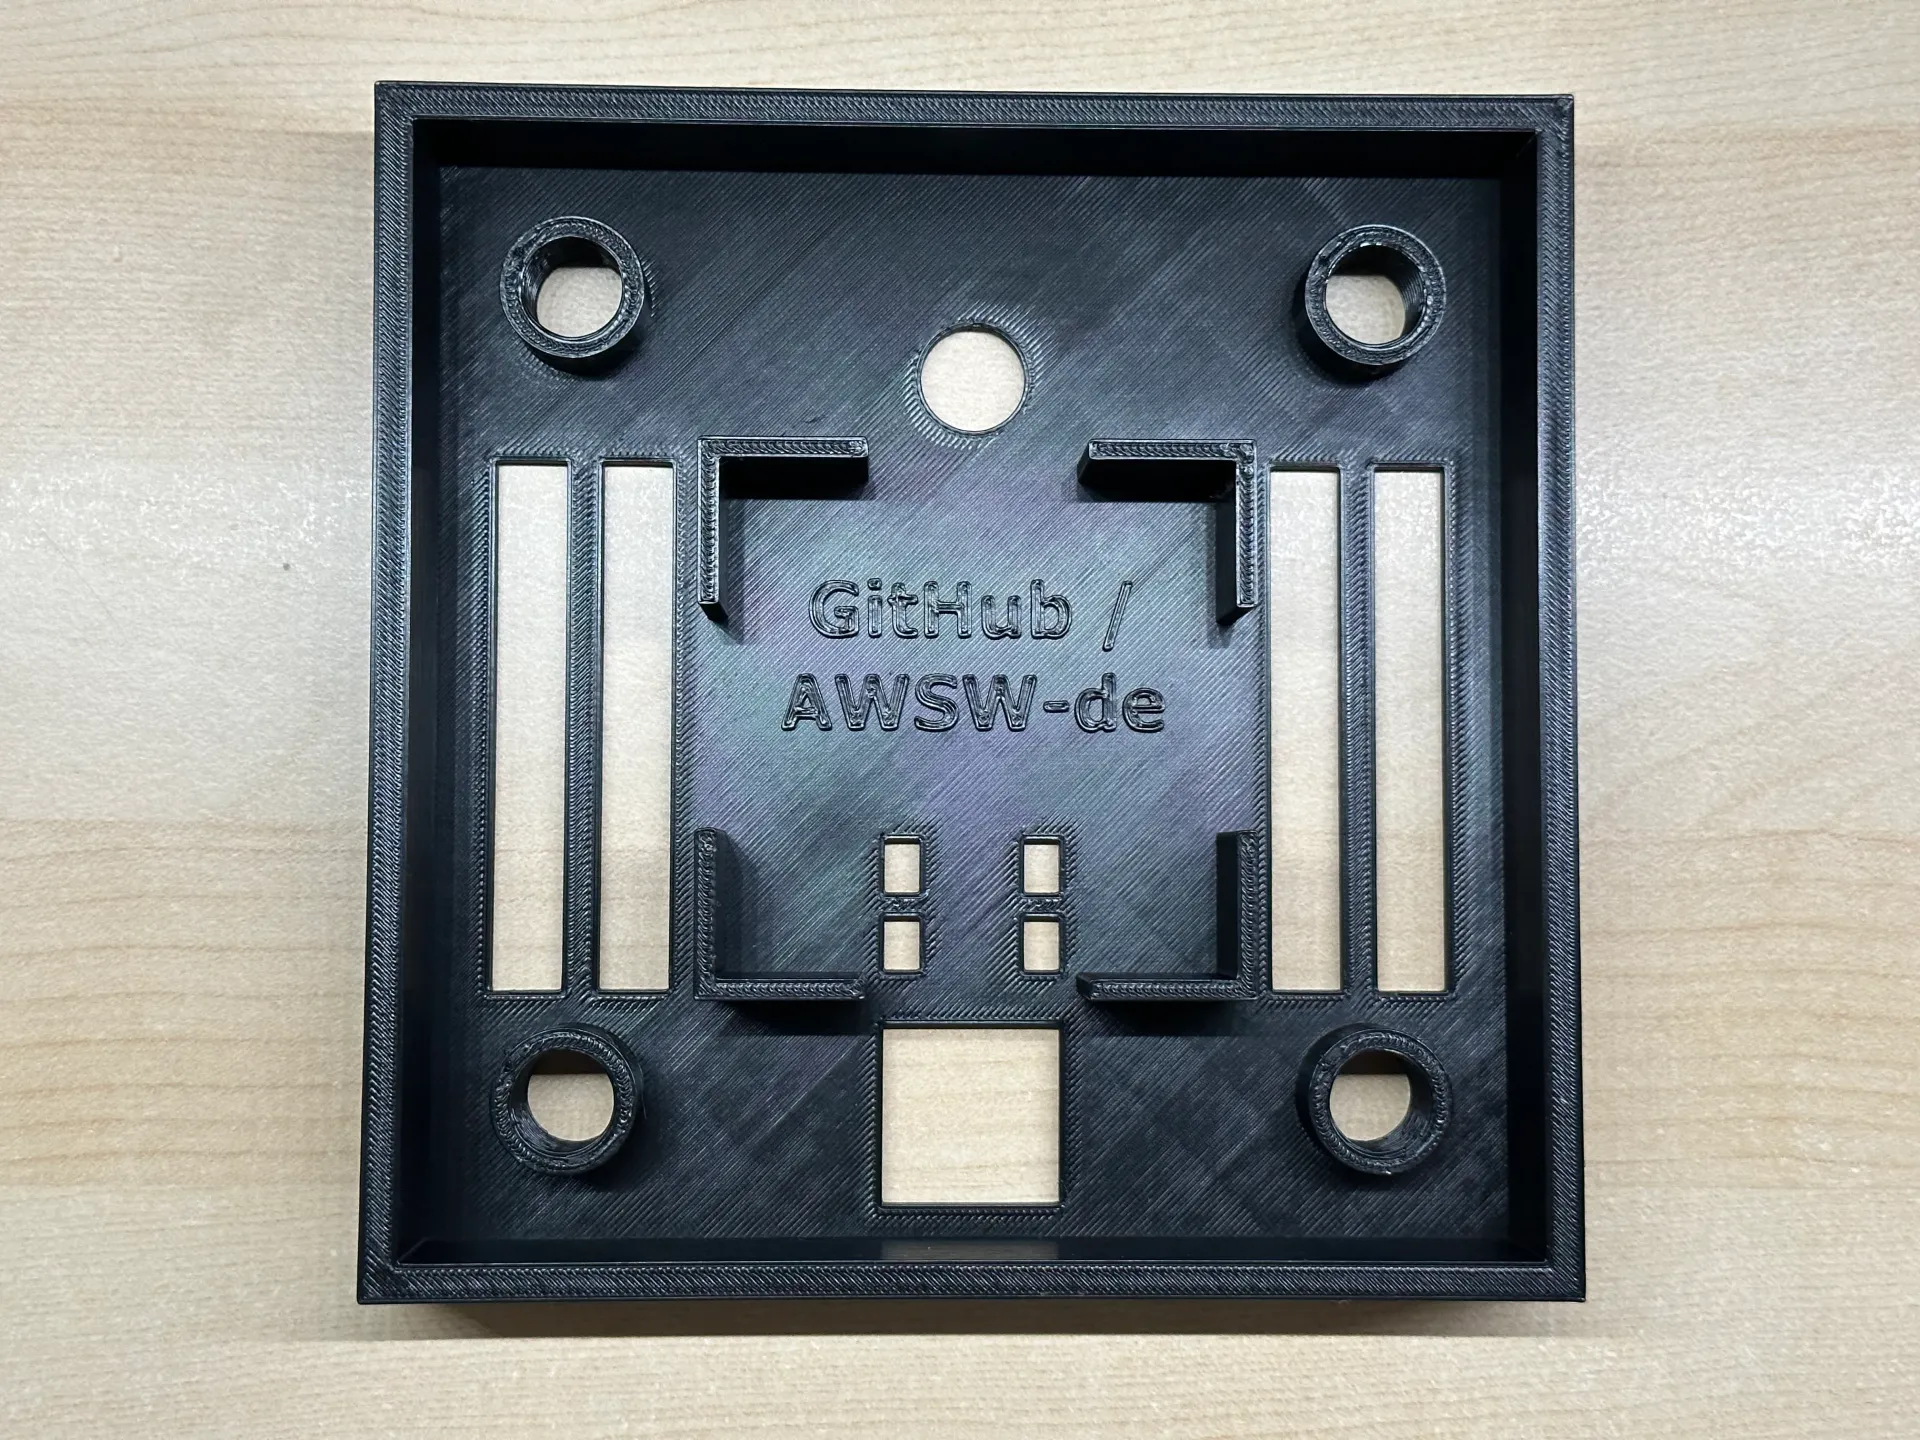
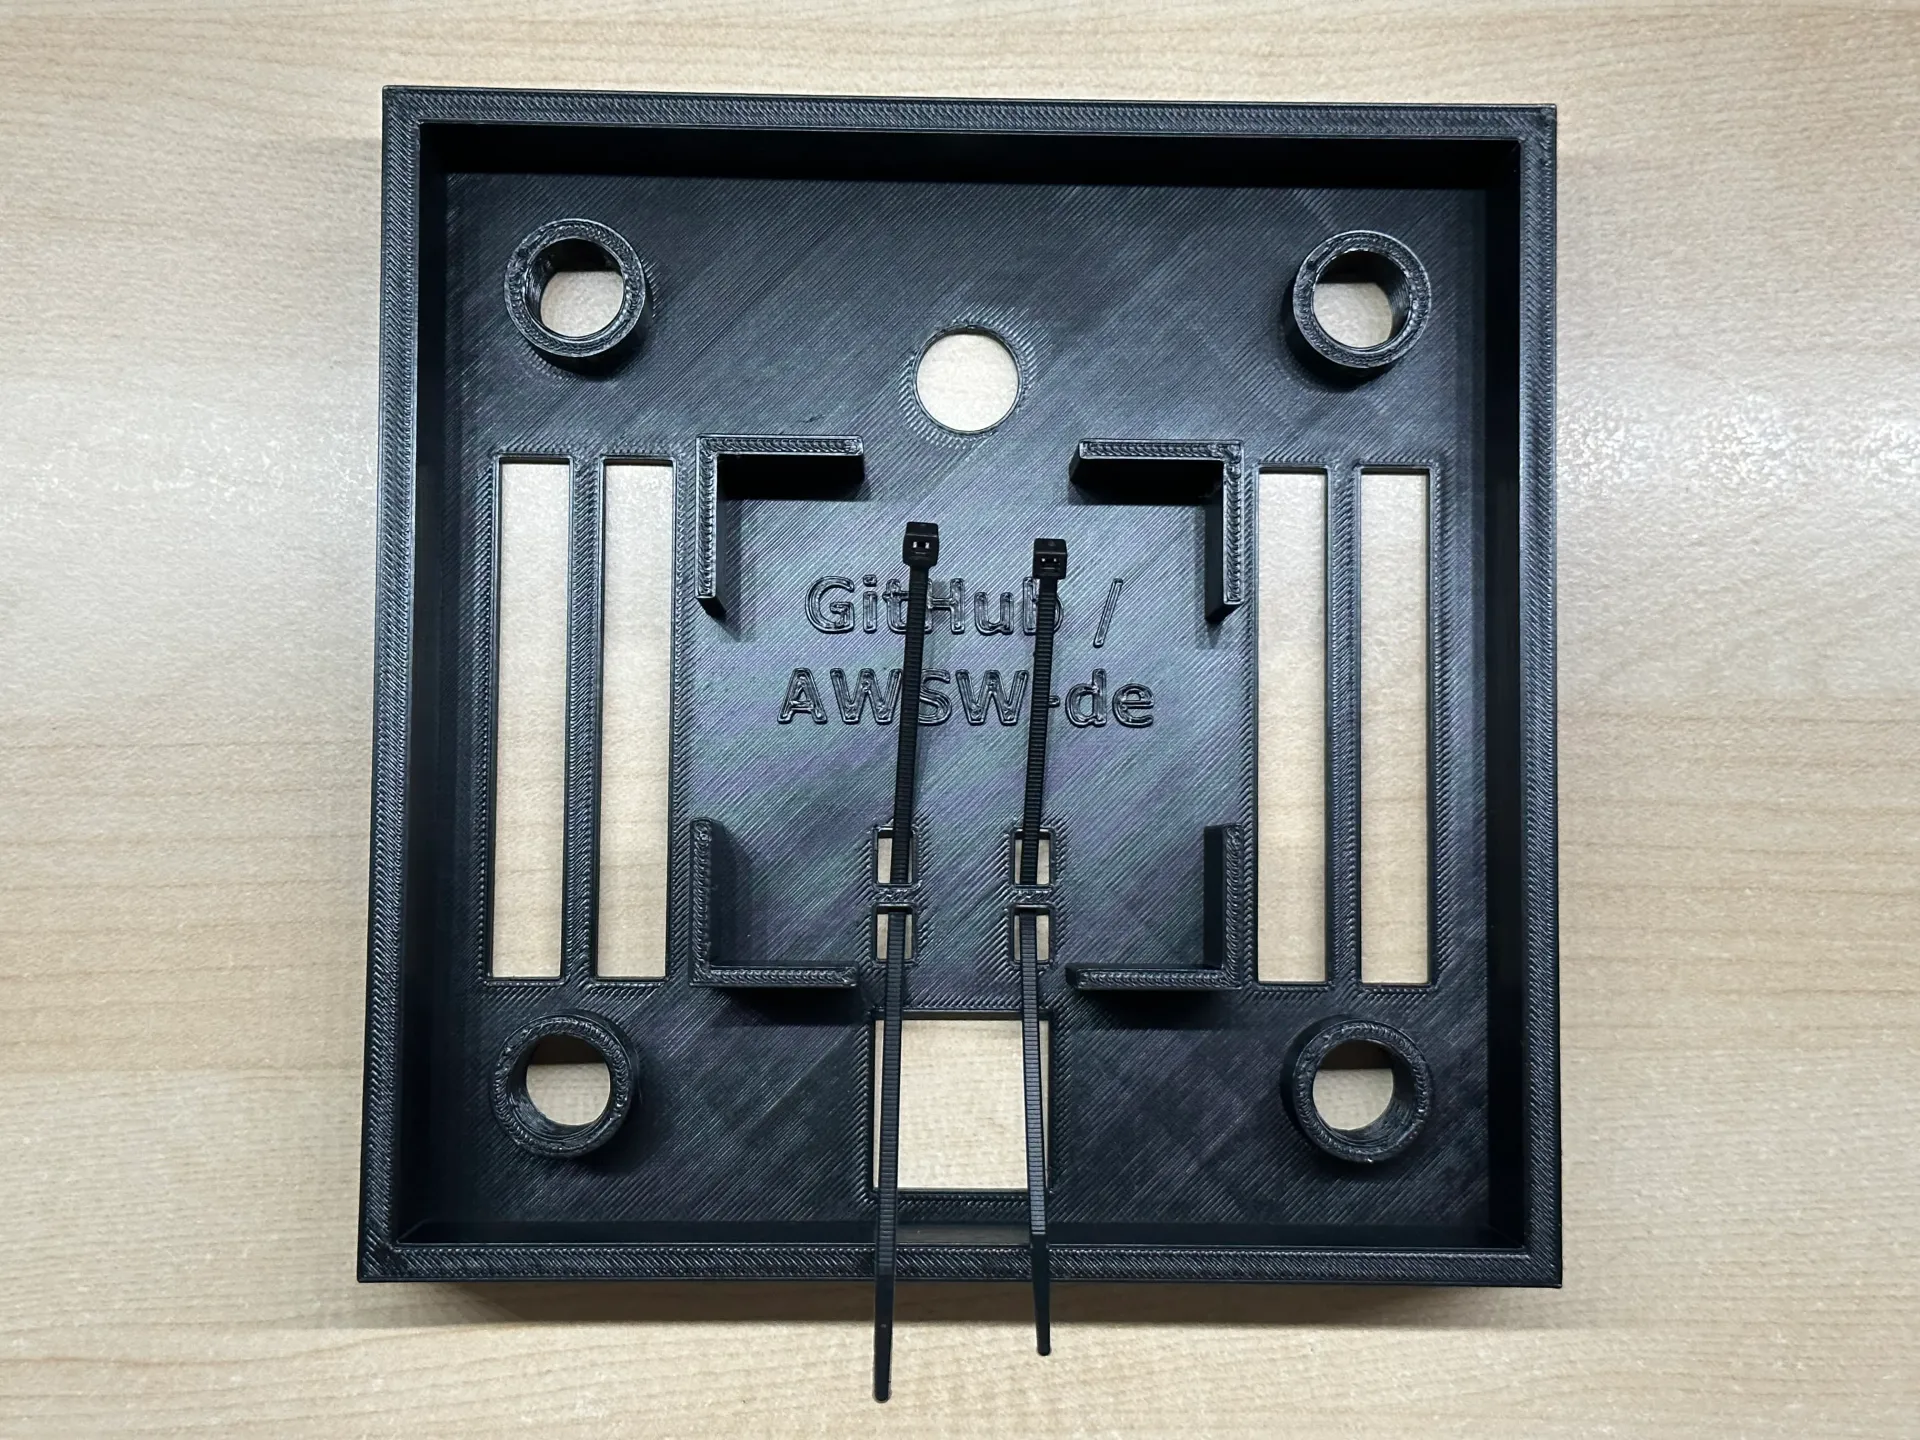
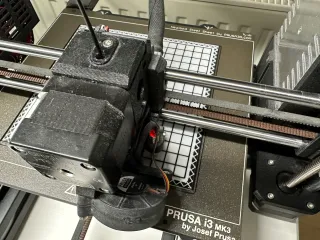
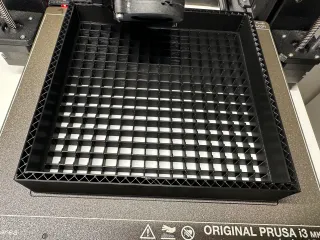
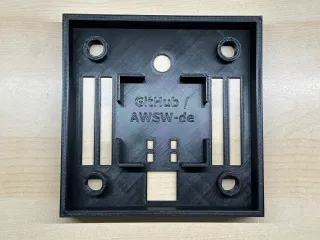
- The case is provided in 2 main parts in general to hold the 16x16 matrix and the ESP32 board inside. The screws are optional.
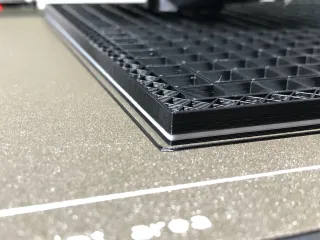
- The diffuser layer to show the LED colours better is printed as well, so no paper cutting, glue or anything else required. This is done by 2 color changes. See printing instructions.
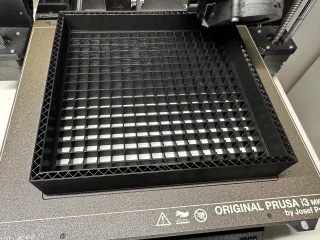
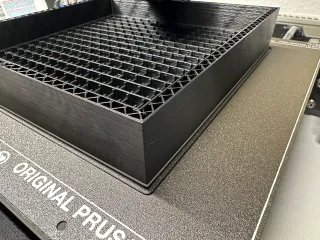
- No supports needed to print the parts. The parts just need to be placed on their flat sides.
- The lid clicks strong in place into the front part and presses the LED matrix into the holes in the front part to separate the light from the individual LEDs.
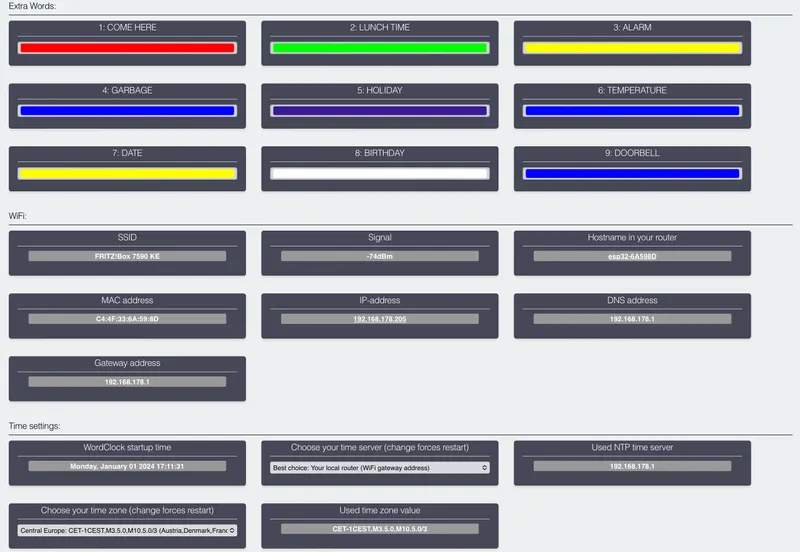
- Web configuration interface to control the WordClock functions.
- Smart home integration: Several additional texts in different colours can be displayed together with the time to notify you about events:
| DE: | Other languages: |
| Geburtstag | Birthday |
| Alarm | Alarm |
| Feiertag | Holiday |
| Urlaub | Holiday |
| Müll raus bringen | Garbage day |
| Download | Download |
| Update | Update |
| Neustart | Restart |
| WLAN | WiFi |
| WordClock | WordClock |
| Termin | Date |
| OK | OK |
| Minuten | Minutes |
| Formel1 | - |
| Auto | - |
| Zeit zum Zocken | - |
| Gelber Sack | - |
| Werkstatt | - |
| Friseur | - |
| - | Lunch time |
| - | Come here |
| - | Doorbell |
| - | Reset |
| - | Temperature |
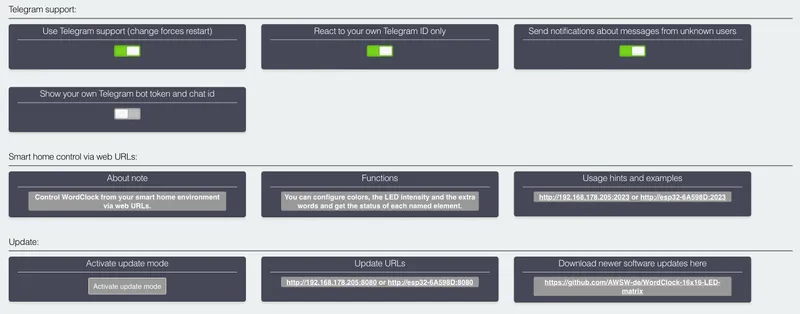
- Telegram functionality to control the extra texts and notify you about events.
- WiFi Manager integration to avoid setting your WiFi credentials manually in the code.
- The from your WiFi router received IP-address can be shown on the display as text to inform you about the current value.
- During startup in default a LED test function is shown to check your wiring and the language layout.
- During startup a text "WLAN" (DE) or "WIFI" (EN/NL/FR) is shown in blue until the WiFi settings were done for the first time or afterwards until the device received a new IP-address then in green color.
- The configuration can be set with an integrated web portal via ip-address like http://192.168.178.50 (depending on your router settings).
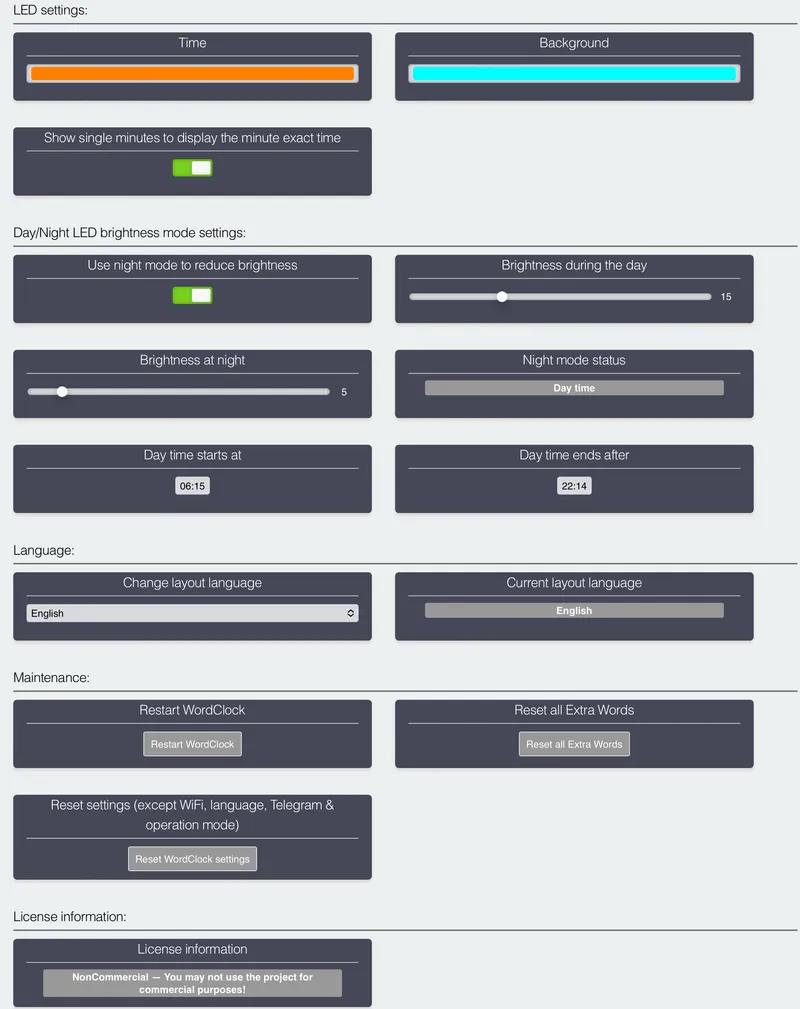
- The LED colours for time and background can be configured to a static value.
- The LED intensity can be set for a day time and optional for a night mode usage. A time span can be selected to turn off the LEDs fully or reduce their intensity for night time usage.
- Updates of the software can be done with the web portal as well to avoid connecting the device to Arduino IDE again.
- During startup you can choose if the following functions should be displayed: IP-address as text.
- The in the internal WifiManager stored WiFi settings can be set to default on request to switch to a new WiFi router afterwards.
- The WordClock settings can be set to default as well. WiFi settings will be kept.
- In case the WiFi is no longer available the device will reset the WiFi settings automatically after 240 seconds to avoid flashing with Arduino IDE again.
- You can configure the hostname of the device that will be tried to transfer to your routers DNS configuration to reach the web portal via DNS name too.
- A restart request can be forced with the internal web portal as well.
- The timezone and NTP-Server configuration can be set in the code to fit to your demands.
- Some functions can be started with REST api like links to be able to control the WordClock from your smart home environment as well:
- Display static extra words on the display independent from the time texts. You can use these links to be able to set the extra words from HomeAssistant, HomeBridge and any other smart home system that can call such links.
- The urls can be used together with the Telegram function in any order.
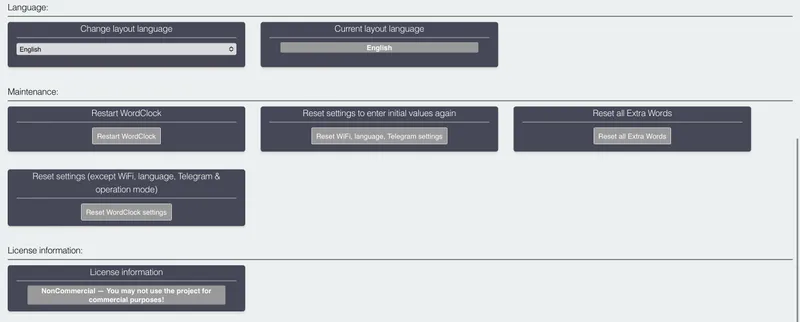
- Language support for german and english language in the web interface. REST command texts always written in english language. Feel free to add more languages…
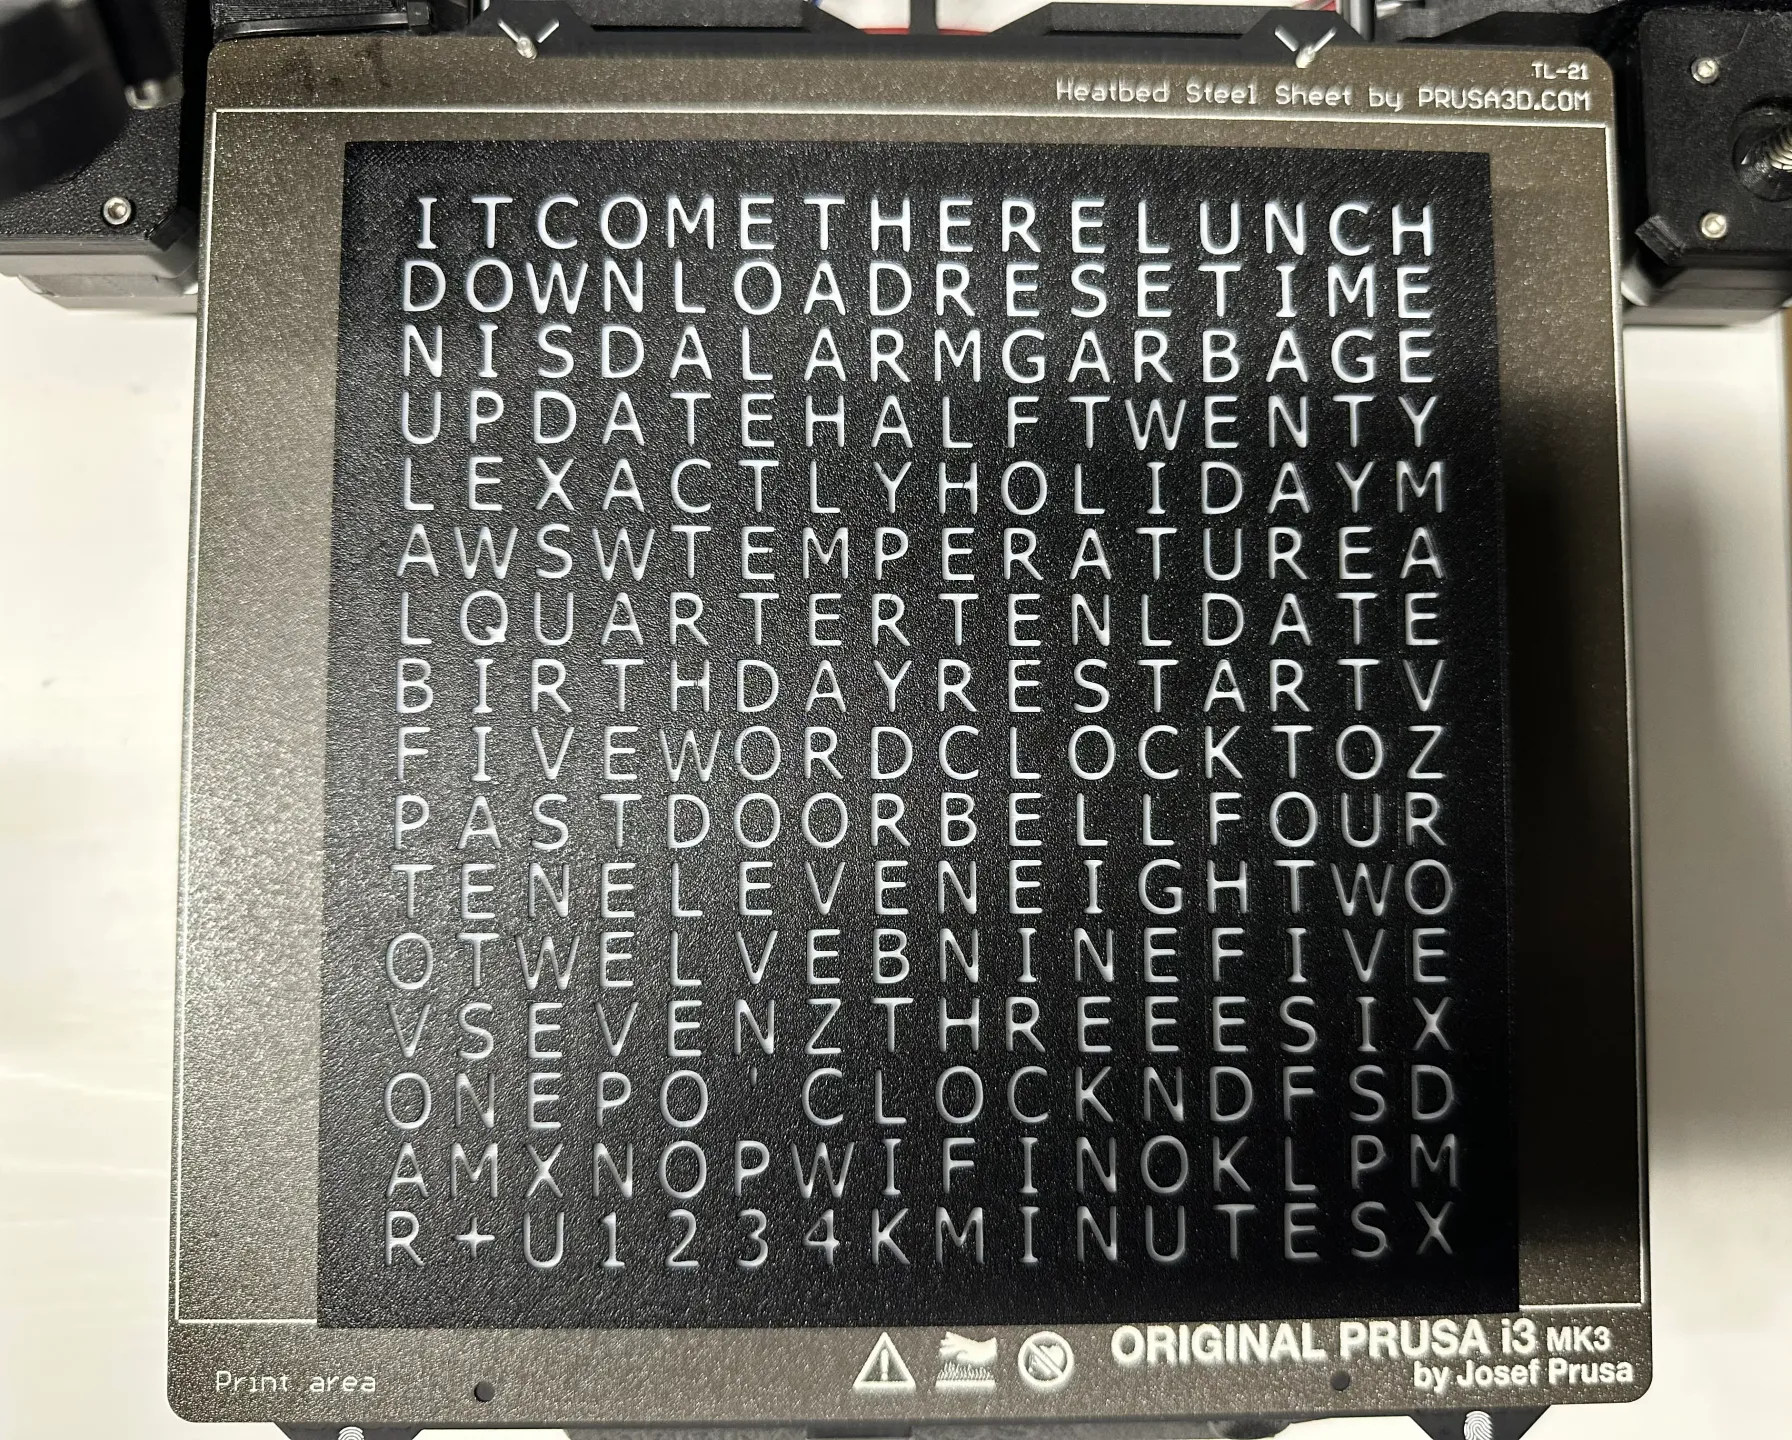
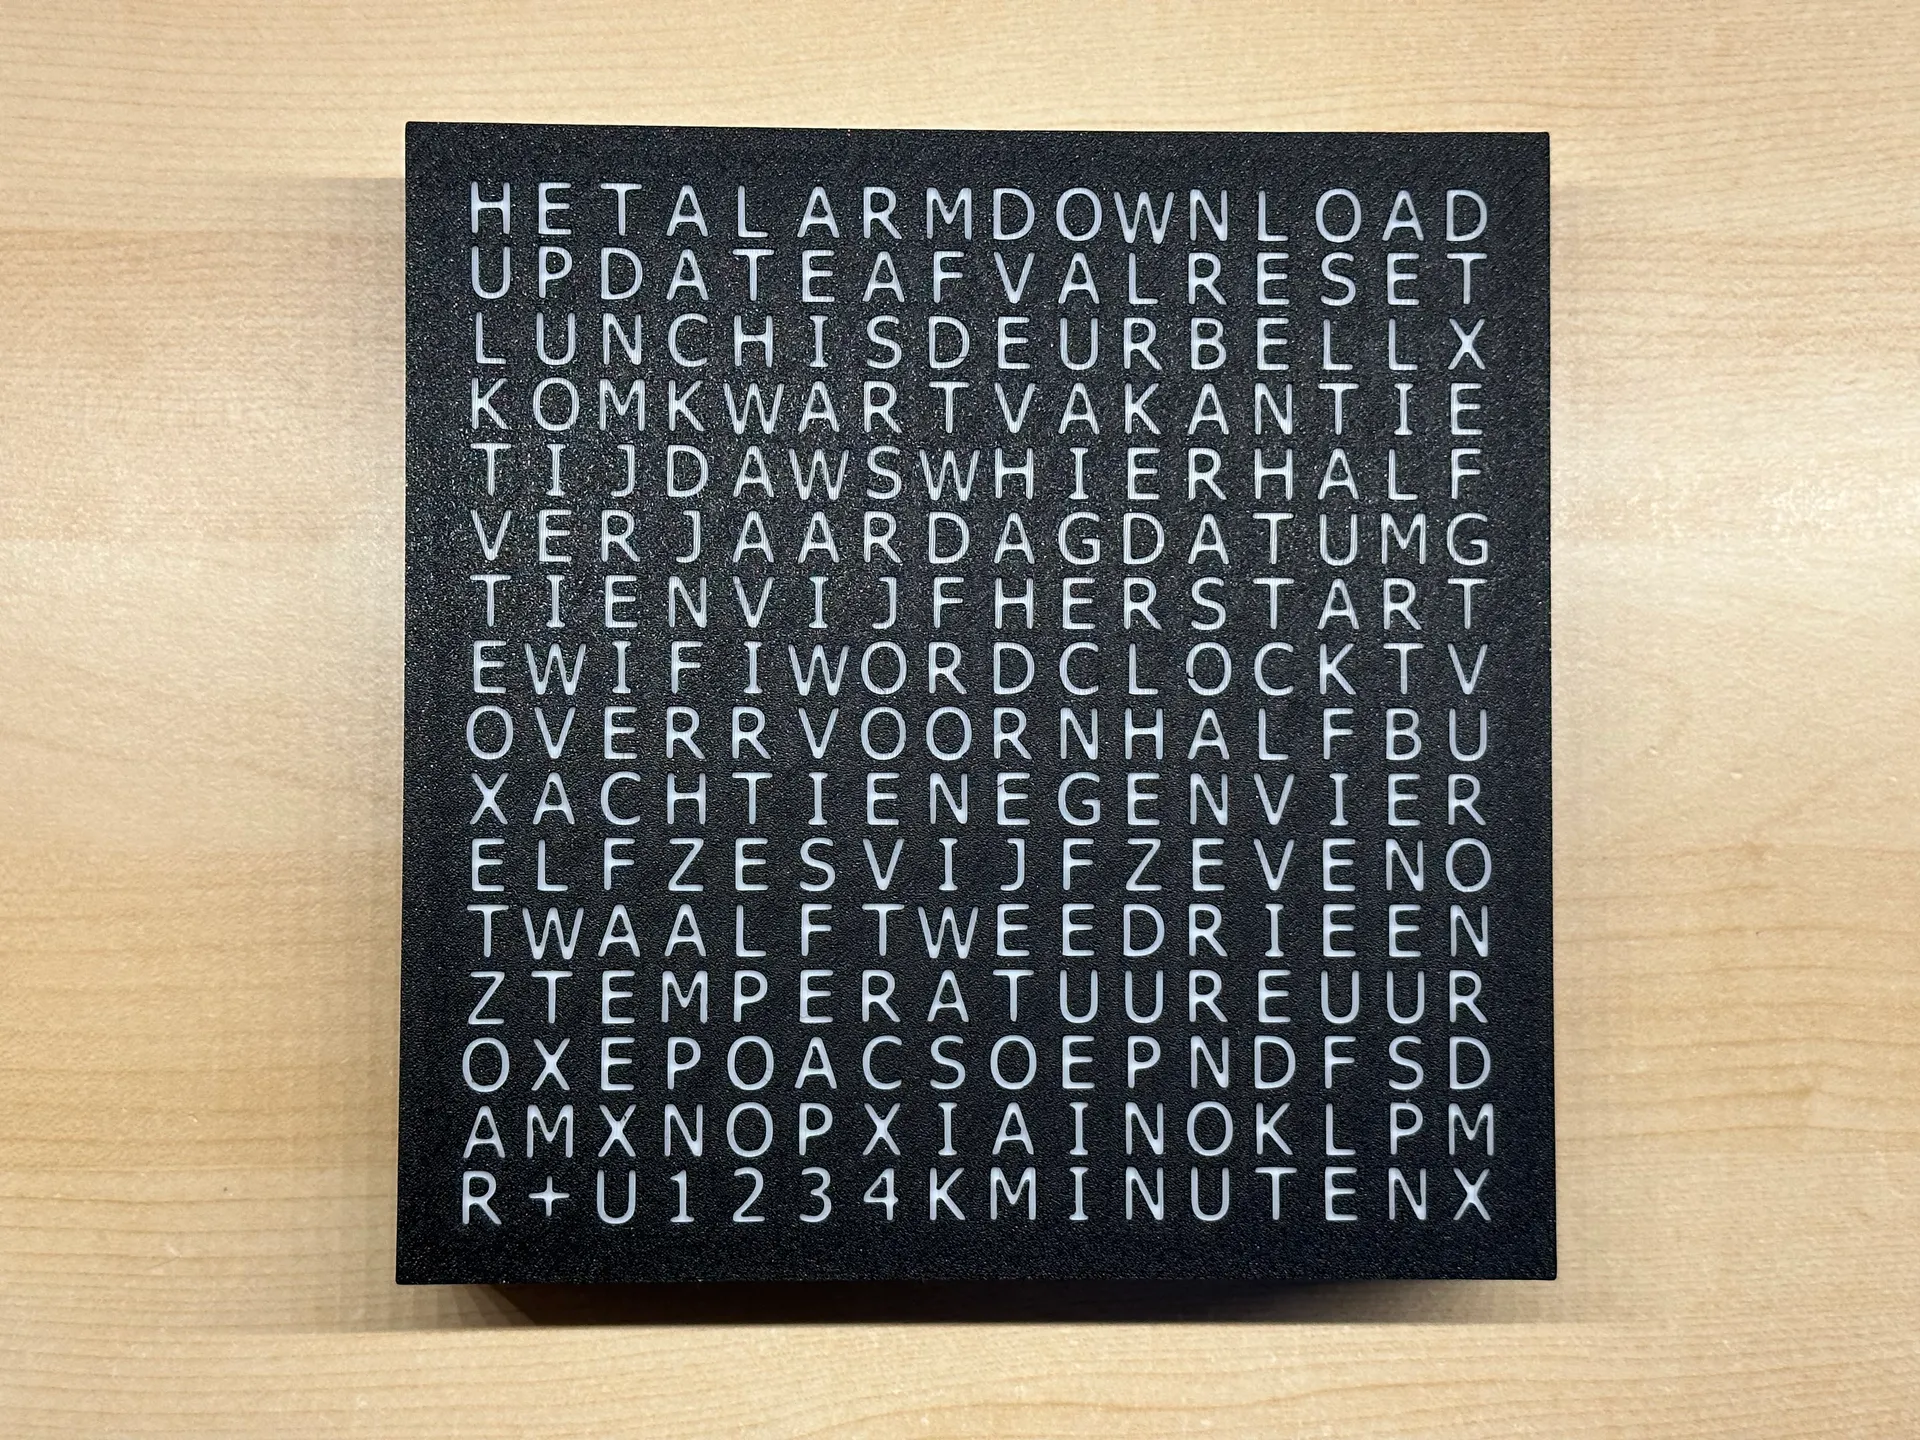
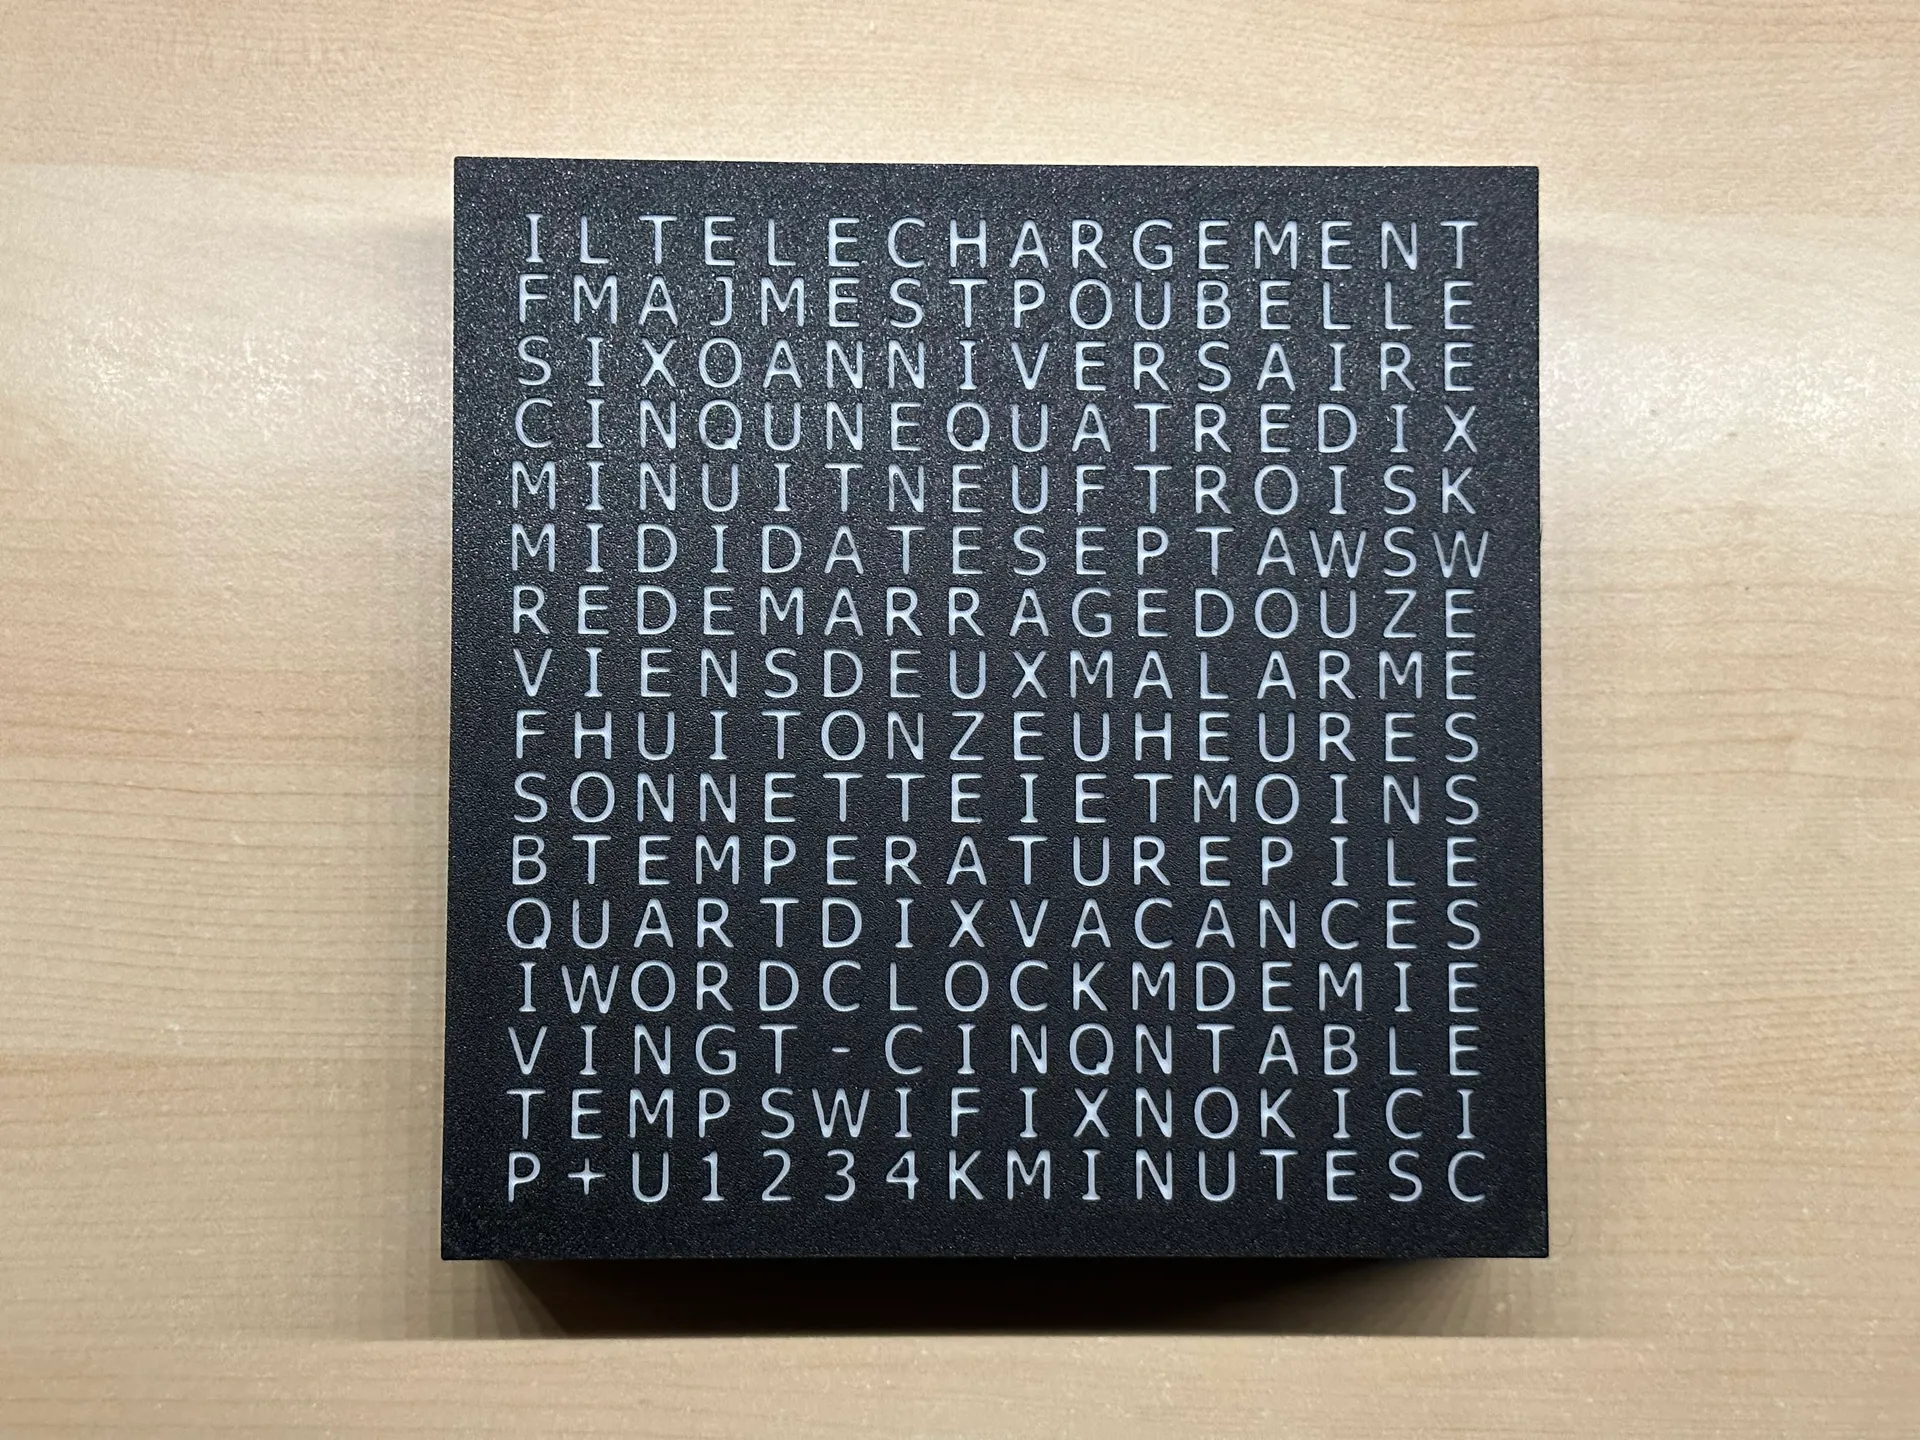
All language variants use the same software: (DE / EN / NL / FR)

Setup the code for the WordClock:
- Follow this video to get used to the usage:
Code Download:
- The script to upload the code can be downloaded from my GitHub repository.
- See the FAQ section too for more details to the code software.
Options:
- If you want to use the Telegram function, follow the link in the web portal
Update the code of a running WordClock:
- Updates can be done “Over The Air” / “OTA” with the internal WordClock web portal.
- You will find a section to get the update without the need of a computer with 2 clicks.
Extra words usage:
- Note: You will find more details to this and to possible smart home integration settings within the article of the WordClock 2024 variant of this model is available too. Click here for details. =)
- Telegram:
- Create the Telegram bot as described step by step here. Simply perform all the named steps from that list and you get the needed values and get the bot created and running.
- In addition you can setup the already preconfigured menu list in Telegram to help you with the usage of the bot.
- Add the in the generated Telegram bot token key and your chat id during the initial setup of the WordClock. So if you already attached WordClock to your WiFi without adding the Telegram setting, you will need to use the “Reset WiFi” button in the web configuration portal and then setup WiFi, your language and the Telegram settings during the initial WordClock setup again.
- Type ”/start“ to get the list of available commands in Telegram.
- With the commands “/ew1”, “/ew2” to “/ew12” (DE) or “/ew9” (all other languages) or use the menu for the bot mentioned above during the Telegram setup to start the same commands via the menu in the Telegram app.
- WordClock internal web server commands to integrate into your smart home:
- http://wordclock:8080/ew1
- http://wordclock:8080/ew2
- to: http://wordclock:8080/ew12 (DE) or
- to: http://wordclock:8080/ew9 (EN/NL/FR)
- Enhanced internal web URL since version V1.4.0:
- Updated usage to be able to set/get the following values from your smart home environment systems that can handle such URLs:
- Change time color
- Change background color
- Change intensity value (0 to the maximum limit set in the settings)
- Set extra words color
- Set extra words on or off
- Get the status of an extra word
- Get the status of all above named values (colors and on/off value) at once
- Examples:
- http://WordClock:2023 → shows some examples how to use the urls. The examples use your own WordClock ip-address to be able to use directly. I set the urls here to WordClock for the sake of simplicity…
- http://WordClock:2023/status → Show the status of all extra words and the color for the background and time texts
- http://WordClock:2023/config?R-Time=0&G-Time=0&B-Time=255&R-Back=255&G-Back=0&B-Back=0&INTENSITY=25&INTENSITYviaWEB=1 --> Configures time texts to blue and the background to red. Intensity is set to 25 and sets this intensity value as master setting
- http://WordClock:2023/config?R-Time=0&G-Time=0&B-Time=255 --> Configures time texts to blue
- http://WordClock:2023/config?R-Back=255&G-Back=0&B-Back=0&INTENSITY=5&INTENSITYviaWEB=1 --> Configures the background to red. Intensity is set to 5 and sets this intensity value as master setting
- http://WordClock:2023/ew/?ew9=1 --> Turns extra word 9 to on
- http://WordClock:2023/ew/?ew9=0 --> Turns extra word 9 to off
- http://WordClock:2023/ew/?ew3=1&R=0&G=0&B=255 --> Turns extra word 3 on and sets it to blue color
- http://WordClock:2023/ew/?ew1=1&ew2=1&ew3=1&ew4=1&ew5=1&ew6=1&ew7=1&ew8=1&ew9=1&ew10=1&ew11=1&ew12=1 --> Turns ALL extra words to on
- http://WordClock:2023/ew/?ew1=0&ew2=0&ew3=0&ew4=0&ew5=0&ew6=0&ew7=0&ew8=0&ew9=0&ew10=0&ew11=0&ew12=0 --> Turns ALL extra words to off
- http://WordClock:2023/ewstatus/?1 --> Status of extra word 1
- http://WordClock:2023/ewstatus/?3 --> Status of extra word 3
- Manual controls on the internal web page will be removed when the web urls are in use to avoid confusion. A note is show on the page to inform you about this. The web url settings are set as primary control of the device. Otherwise the smart home environment might work against the manual set settings….
- On the internal web page a new section with notes to these new web url functions is shown to inform you about the new feature
- The old web server listenting to port 8080 was removed and replaced with this much faster responding one listing on port 2023 (http://WordClock:2023/…).
- Updated usage to be able to set/get the following values from your smart home environment systems that can handle such URLs:
Parts needed:
- 1x 16x16 LED matrix (Use this one. The parts are made to fit to it only.)
- 1x ESP32 micro controller board (No ESP8266 use possible because of its low specs.)
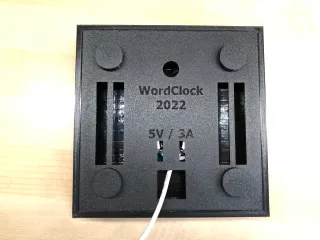
- 1x USB power supply 5V / >=3A
- 1x Micro USB cable 3m
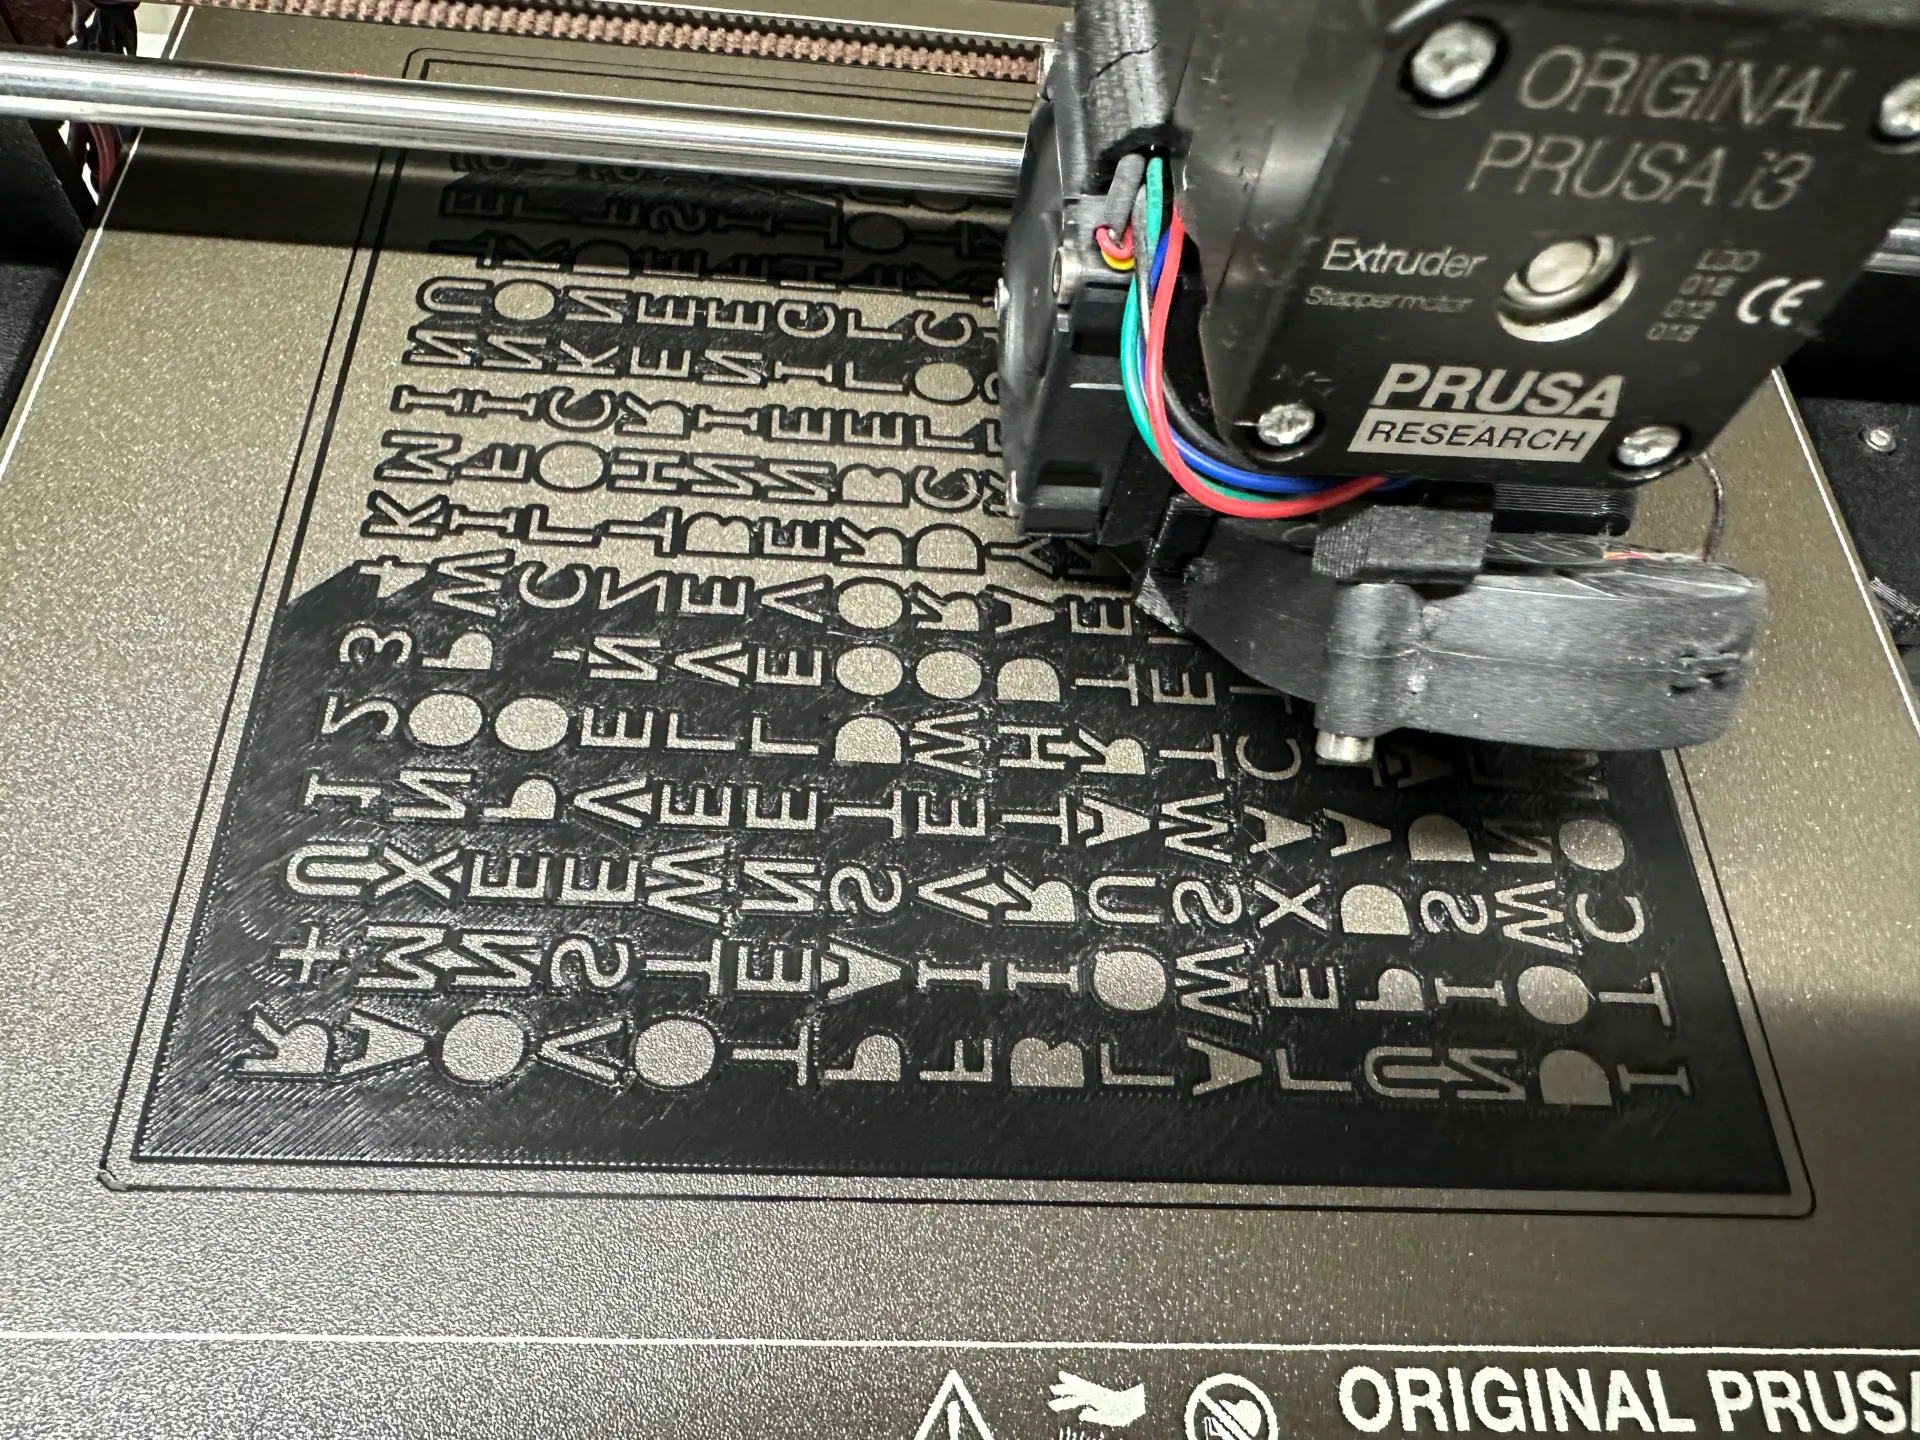
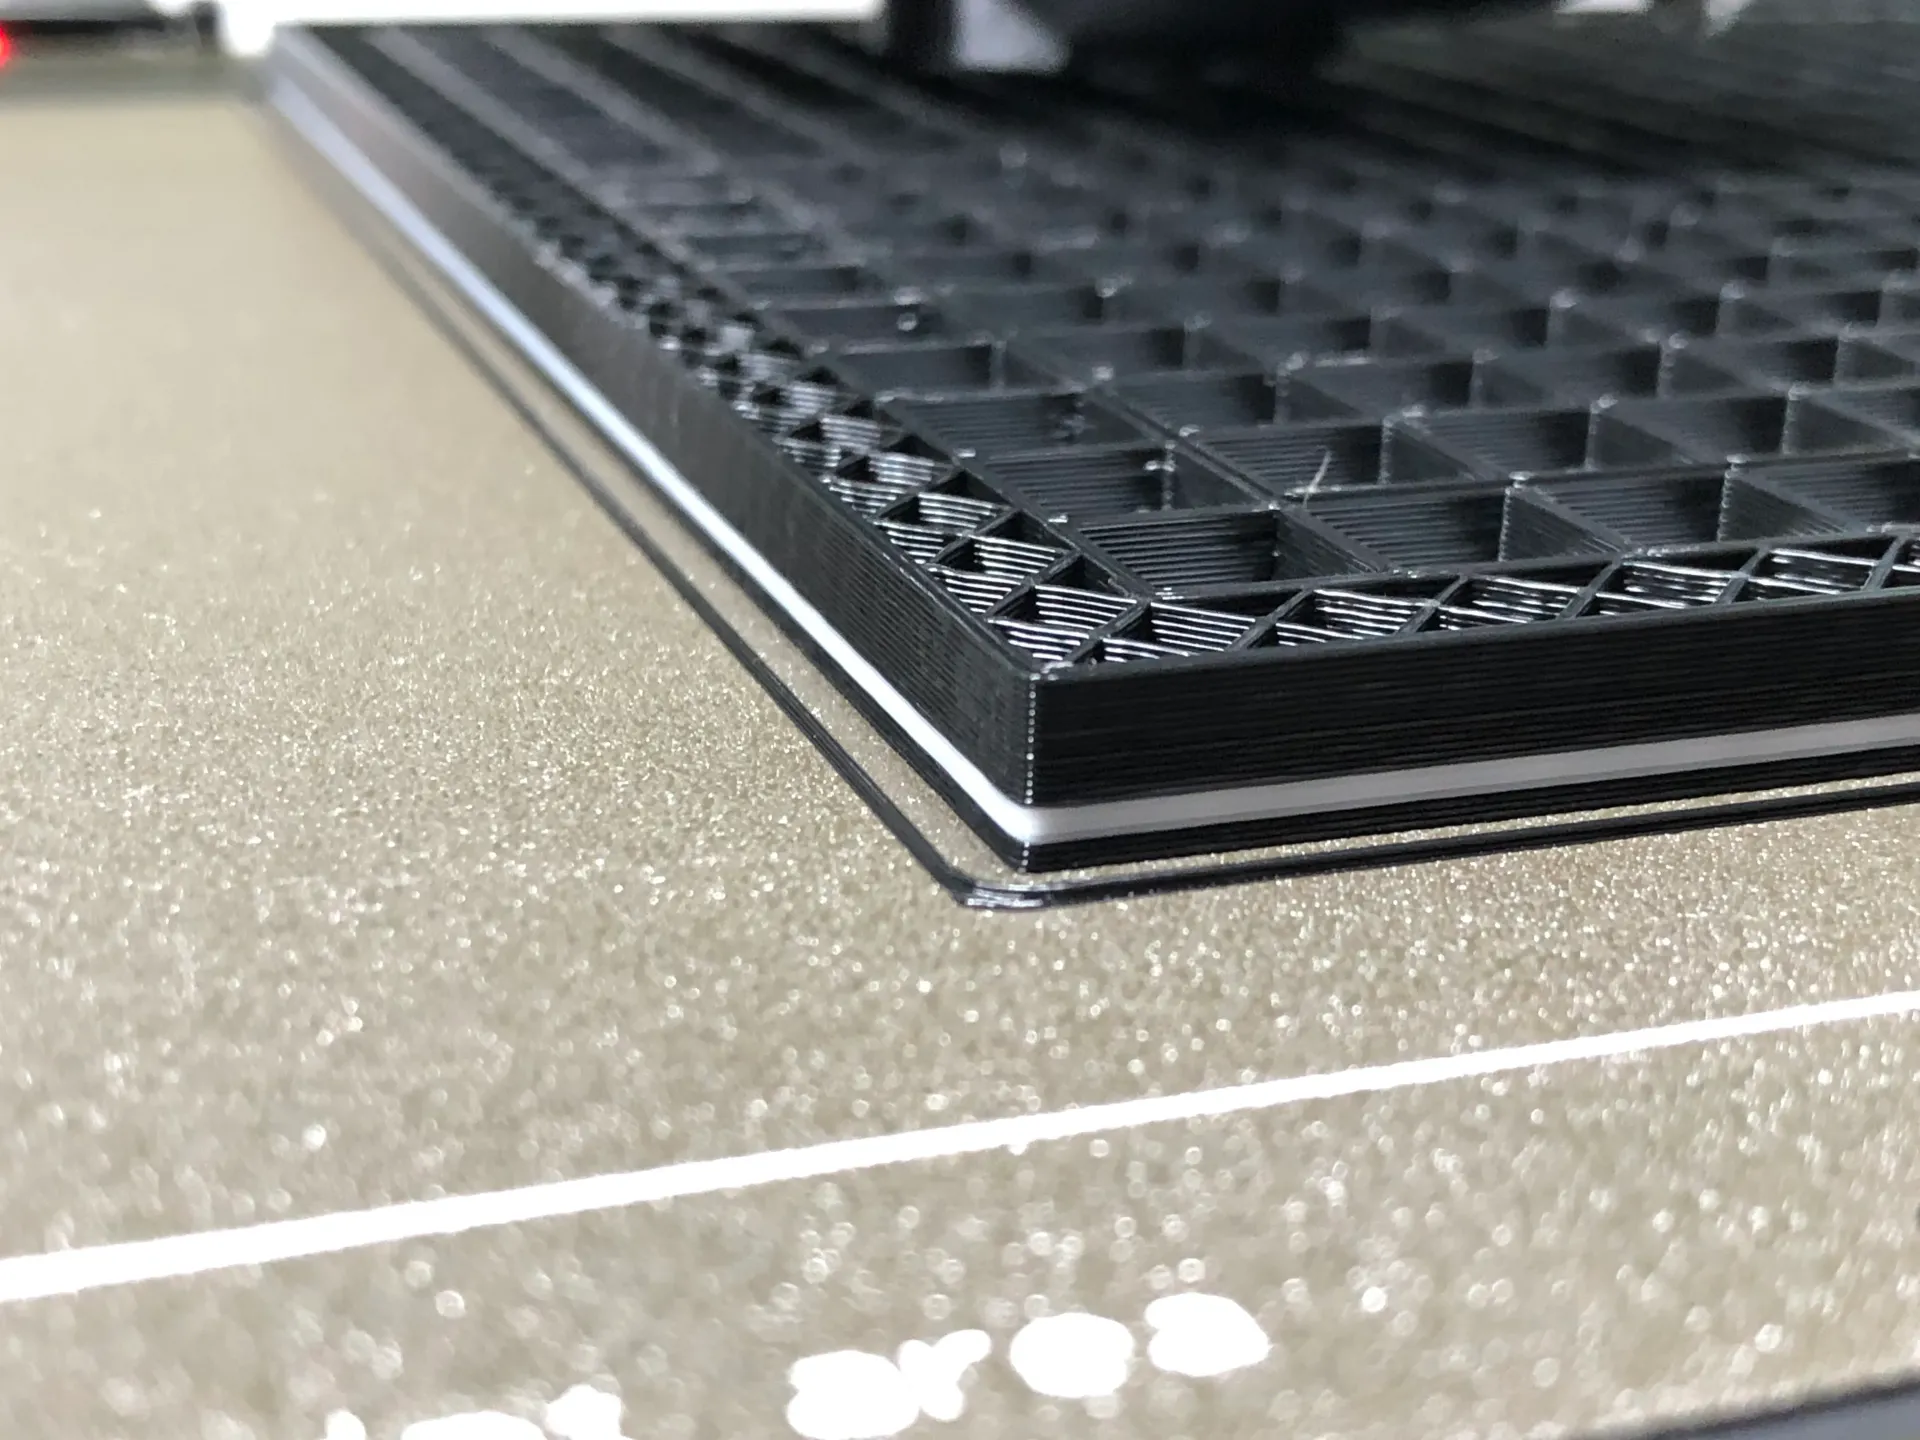
Printing instructions:
- No supports or brim needed for all parts.
- 0.3 draft profile used.
- Textured sheet used. If you use a textured sheet too, let it cool down completely after the print and wait for the part gets loose by itself. Do not pull on it to avoid ripping off the letters! In my case it takes 45-60 minutes after the print has ended and the part just lays loose on the print bed…
- Using a brim was not needed in my tests, because I cleaned my textured sheet with dishwashing liquid carefully with a sponge and then with isopropanol alcohol again on the printer to make the parts stick really good.
- In case you do not want to place the device on your wall you will not need to print the 4 screws. These are needed on walls only as mentioned above.
- Attention: For the “front” part it is important to perform 2 color changes:
- From 0 to 1.2mm height the color is black or whatever darker color you like to use.
- From 1.2mm to 2.4mm height the color is white (mandatory).
- From 2.4 to the top height the color black or whatever darker color you like to use.
- Do not forget these color changes! Otherwise the clock will show nothing!
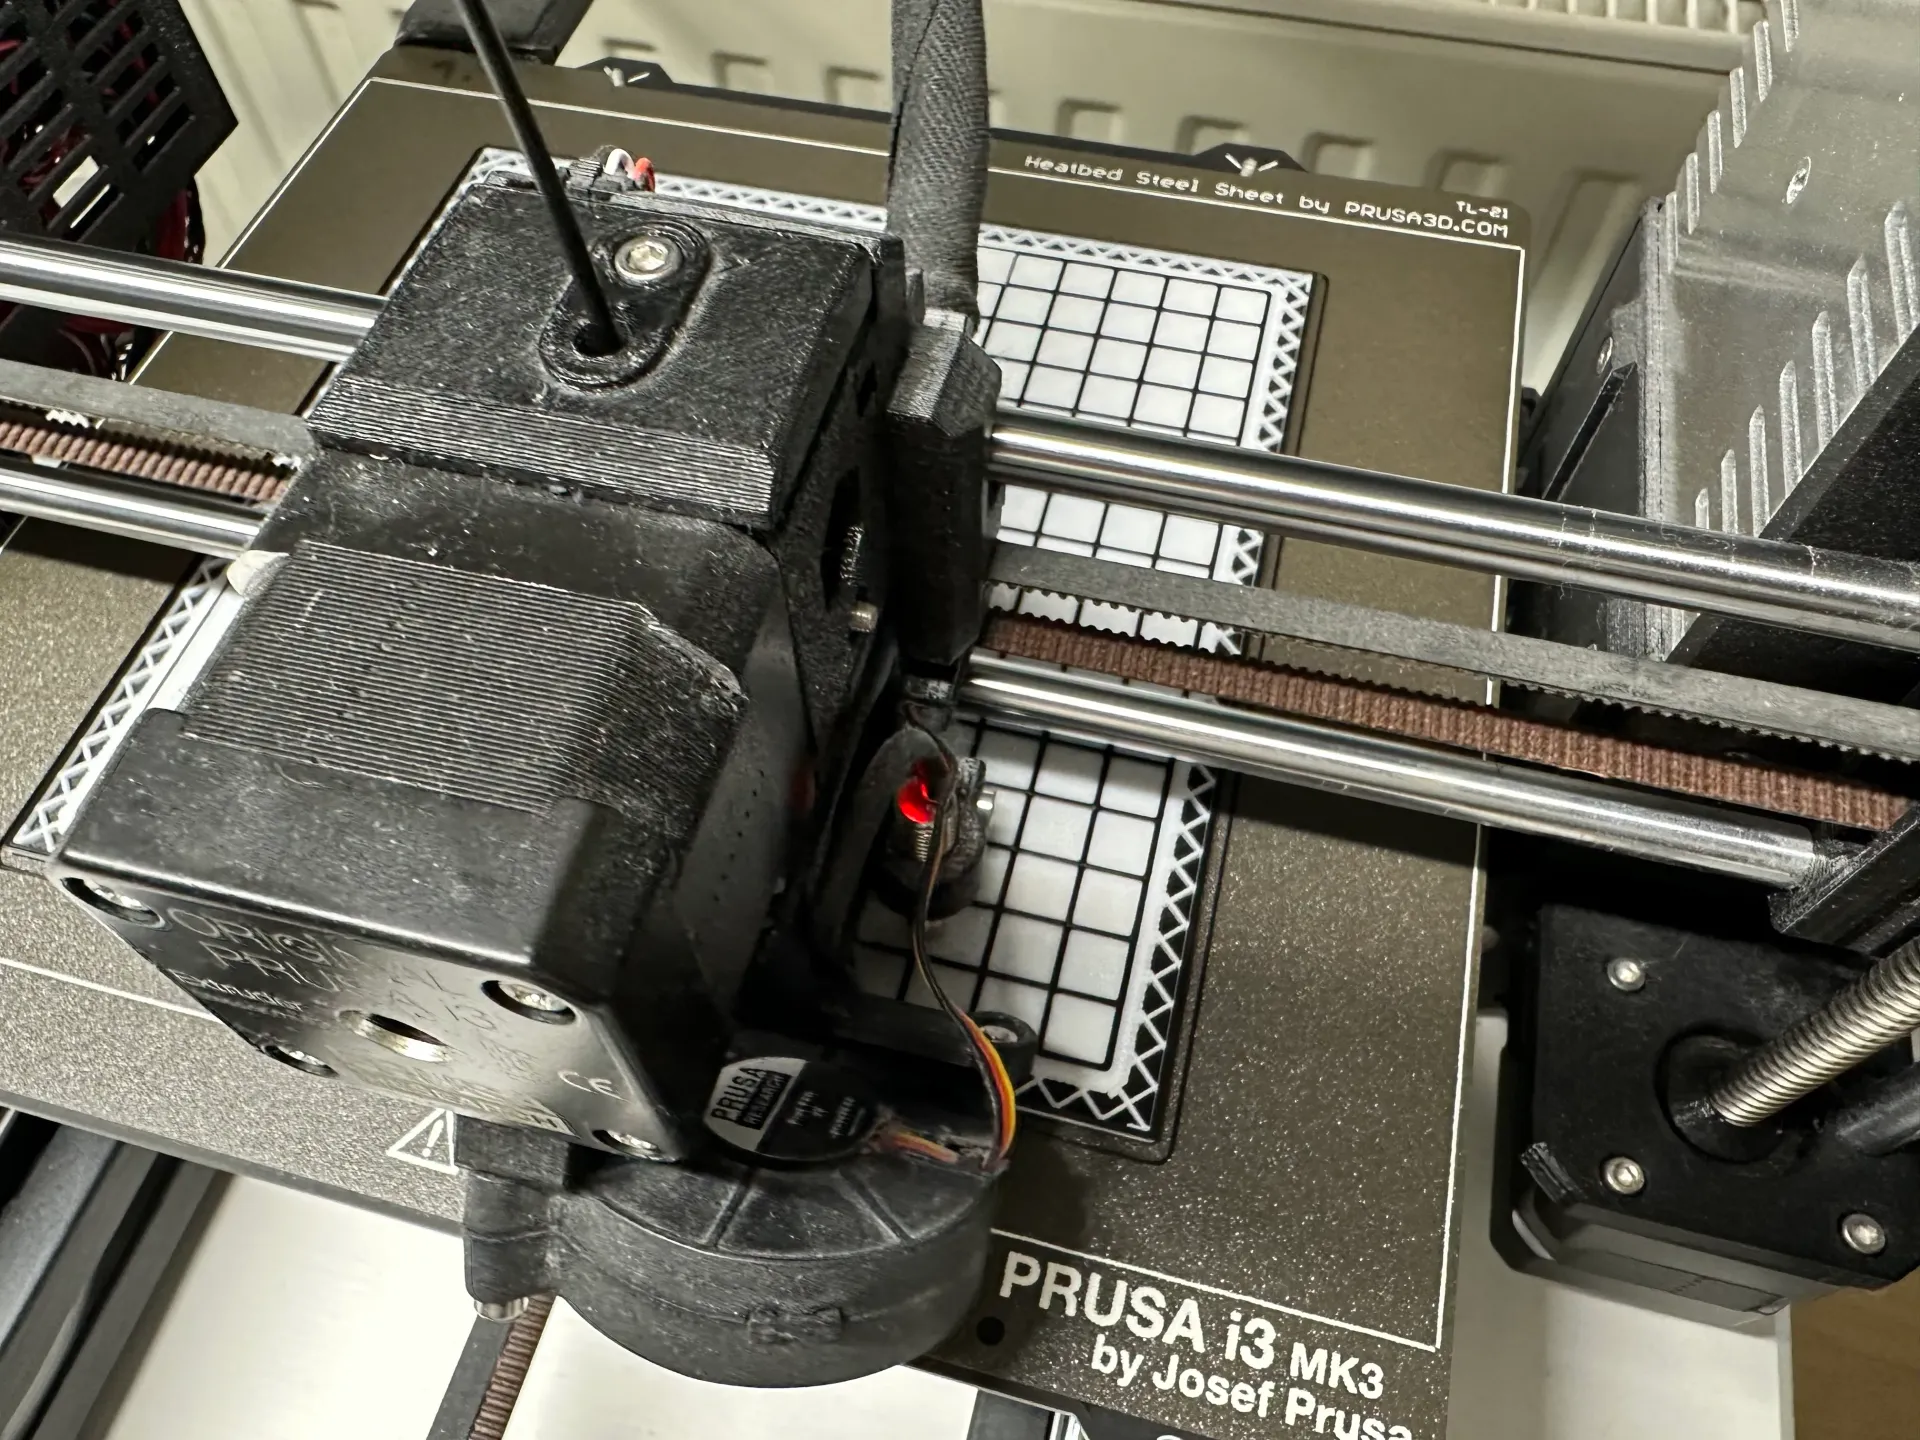
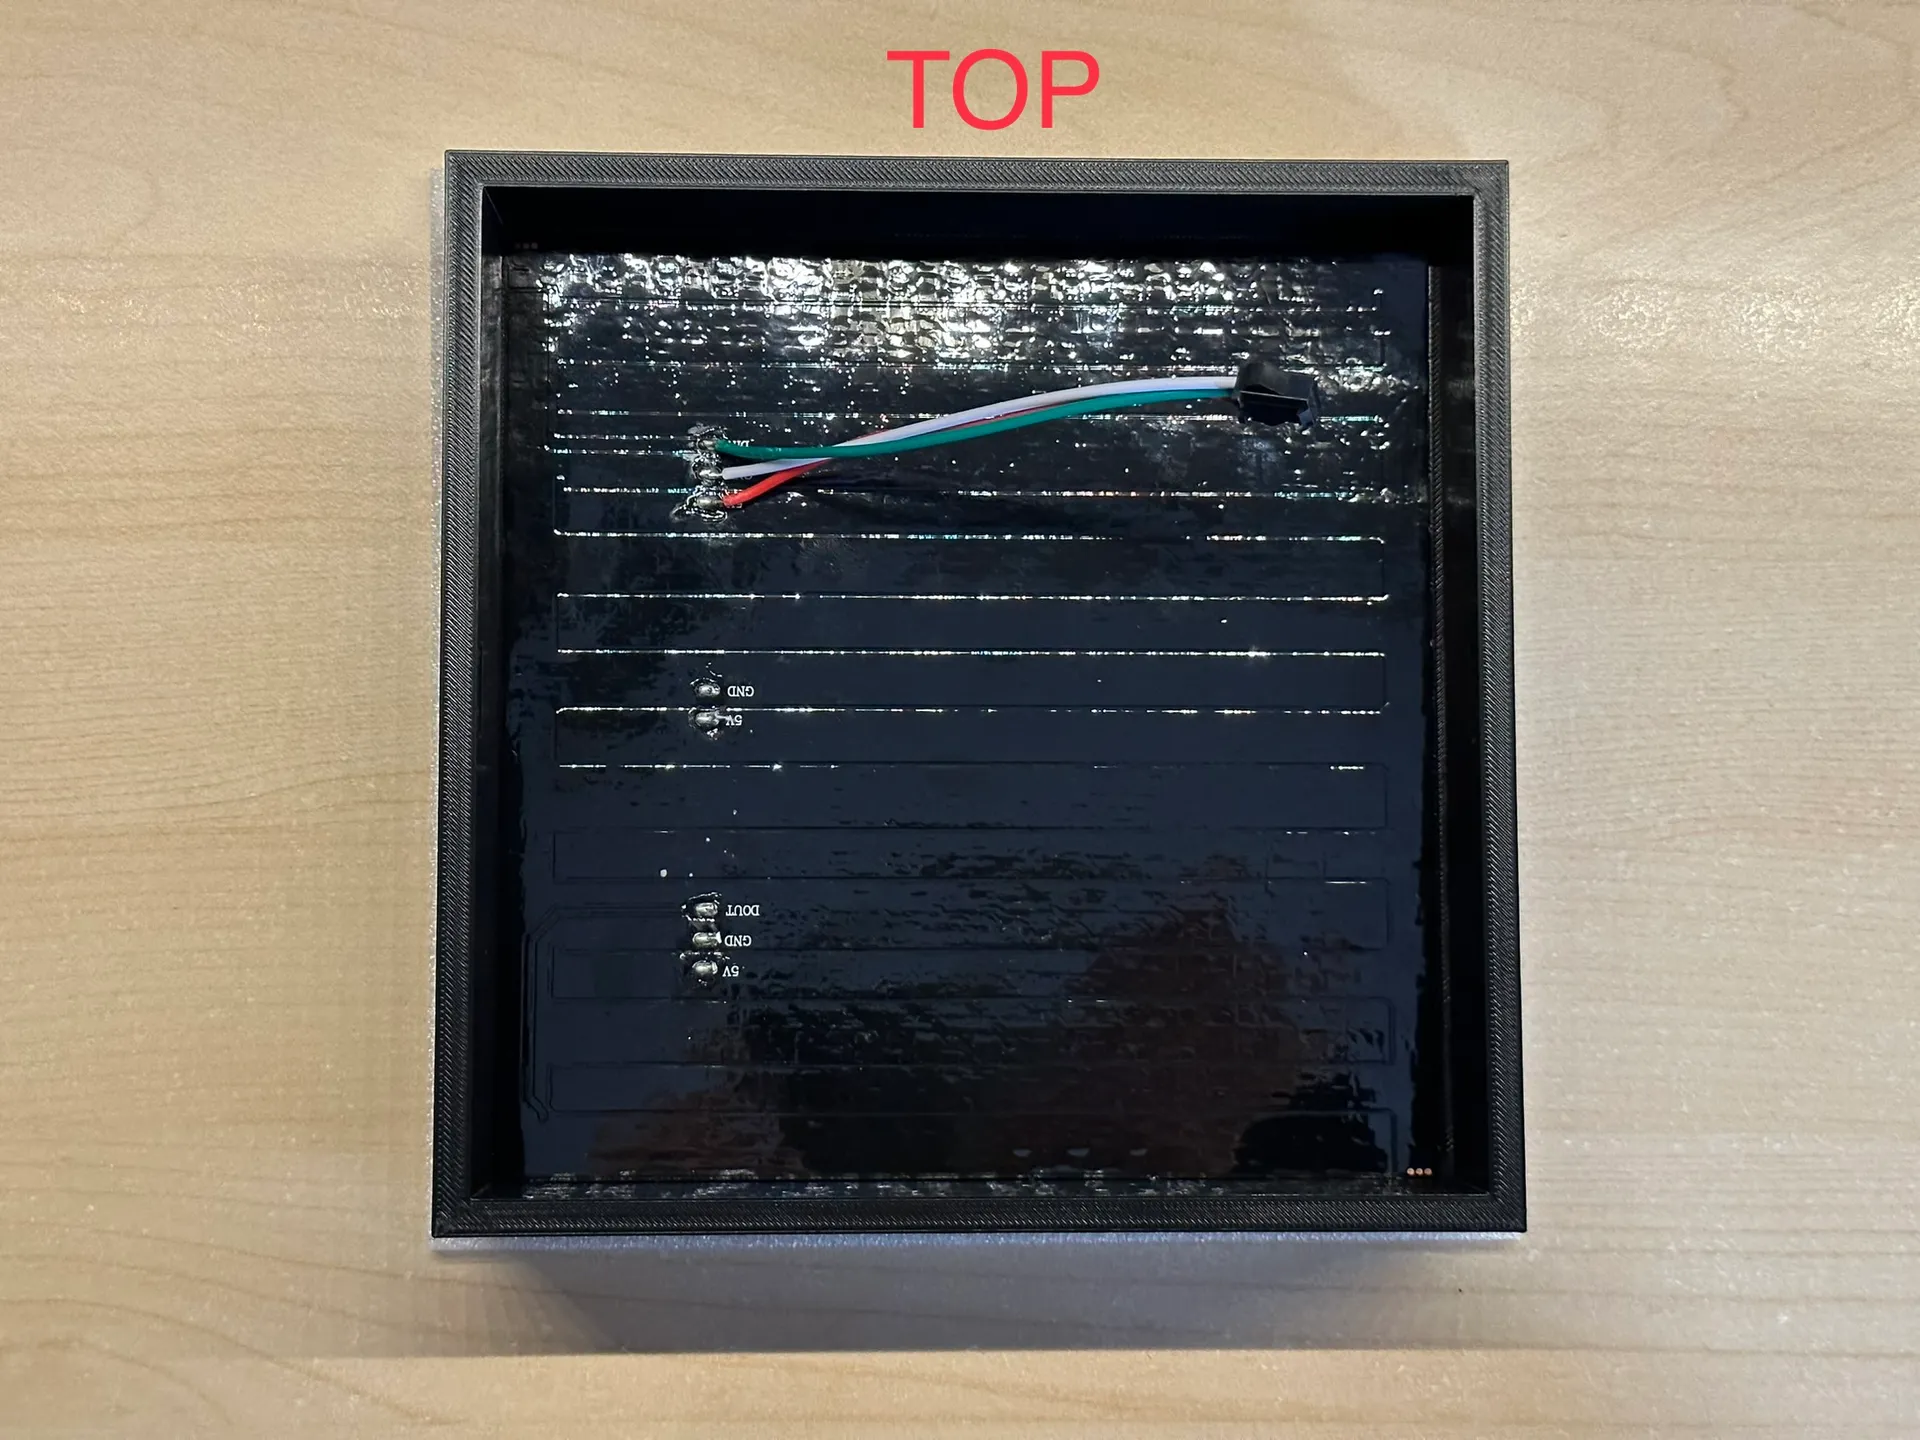
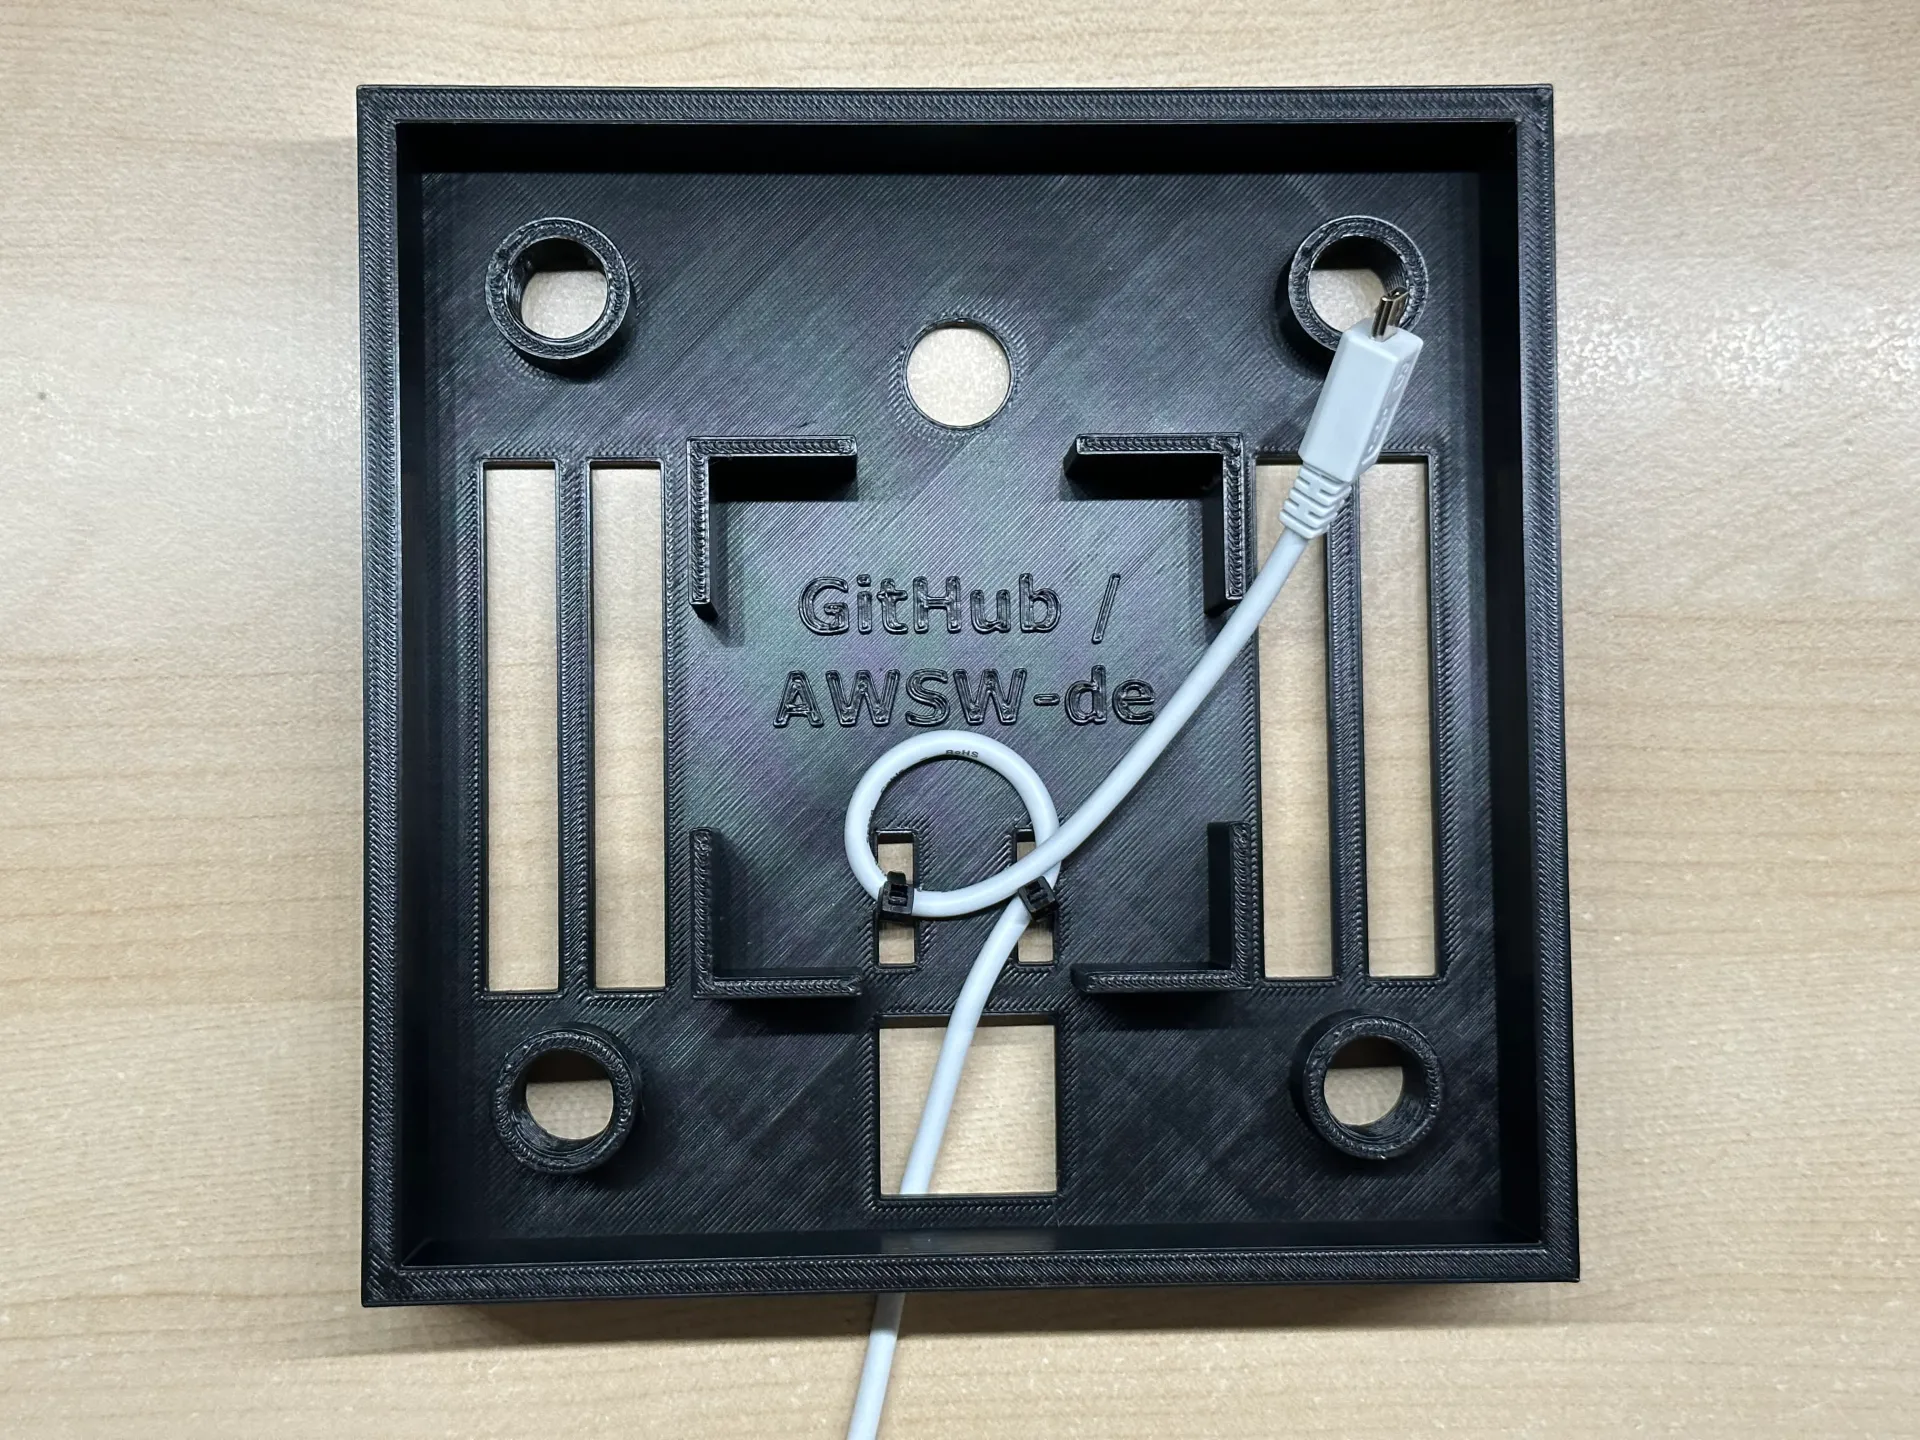
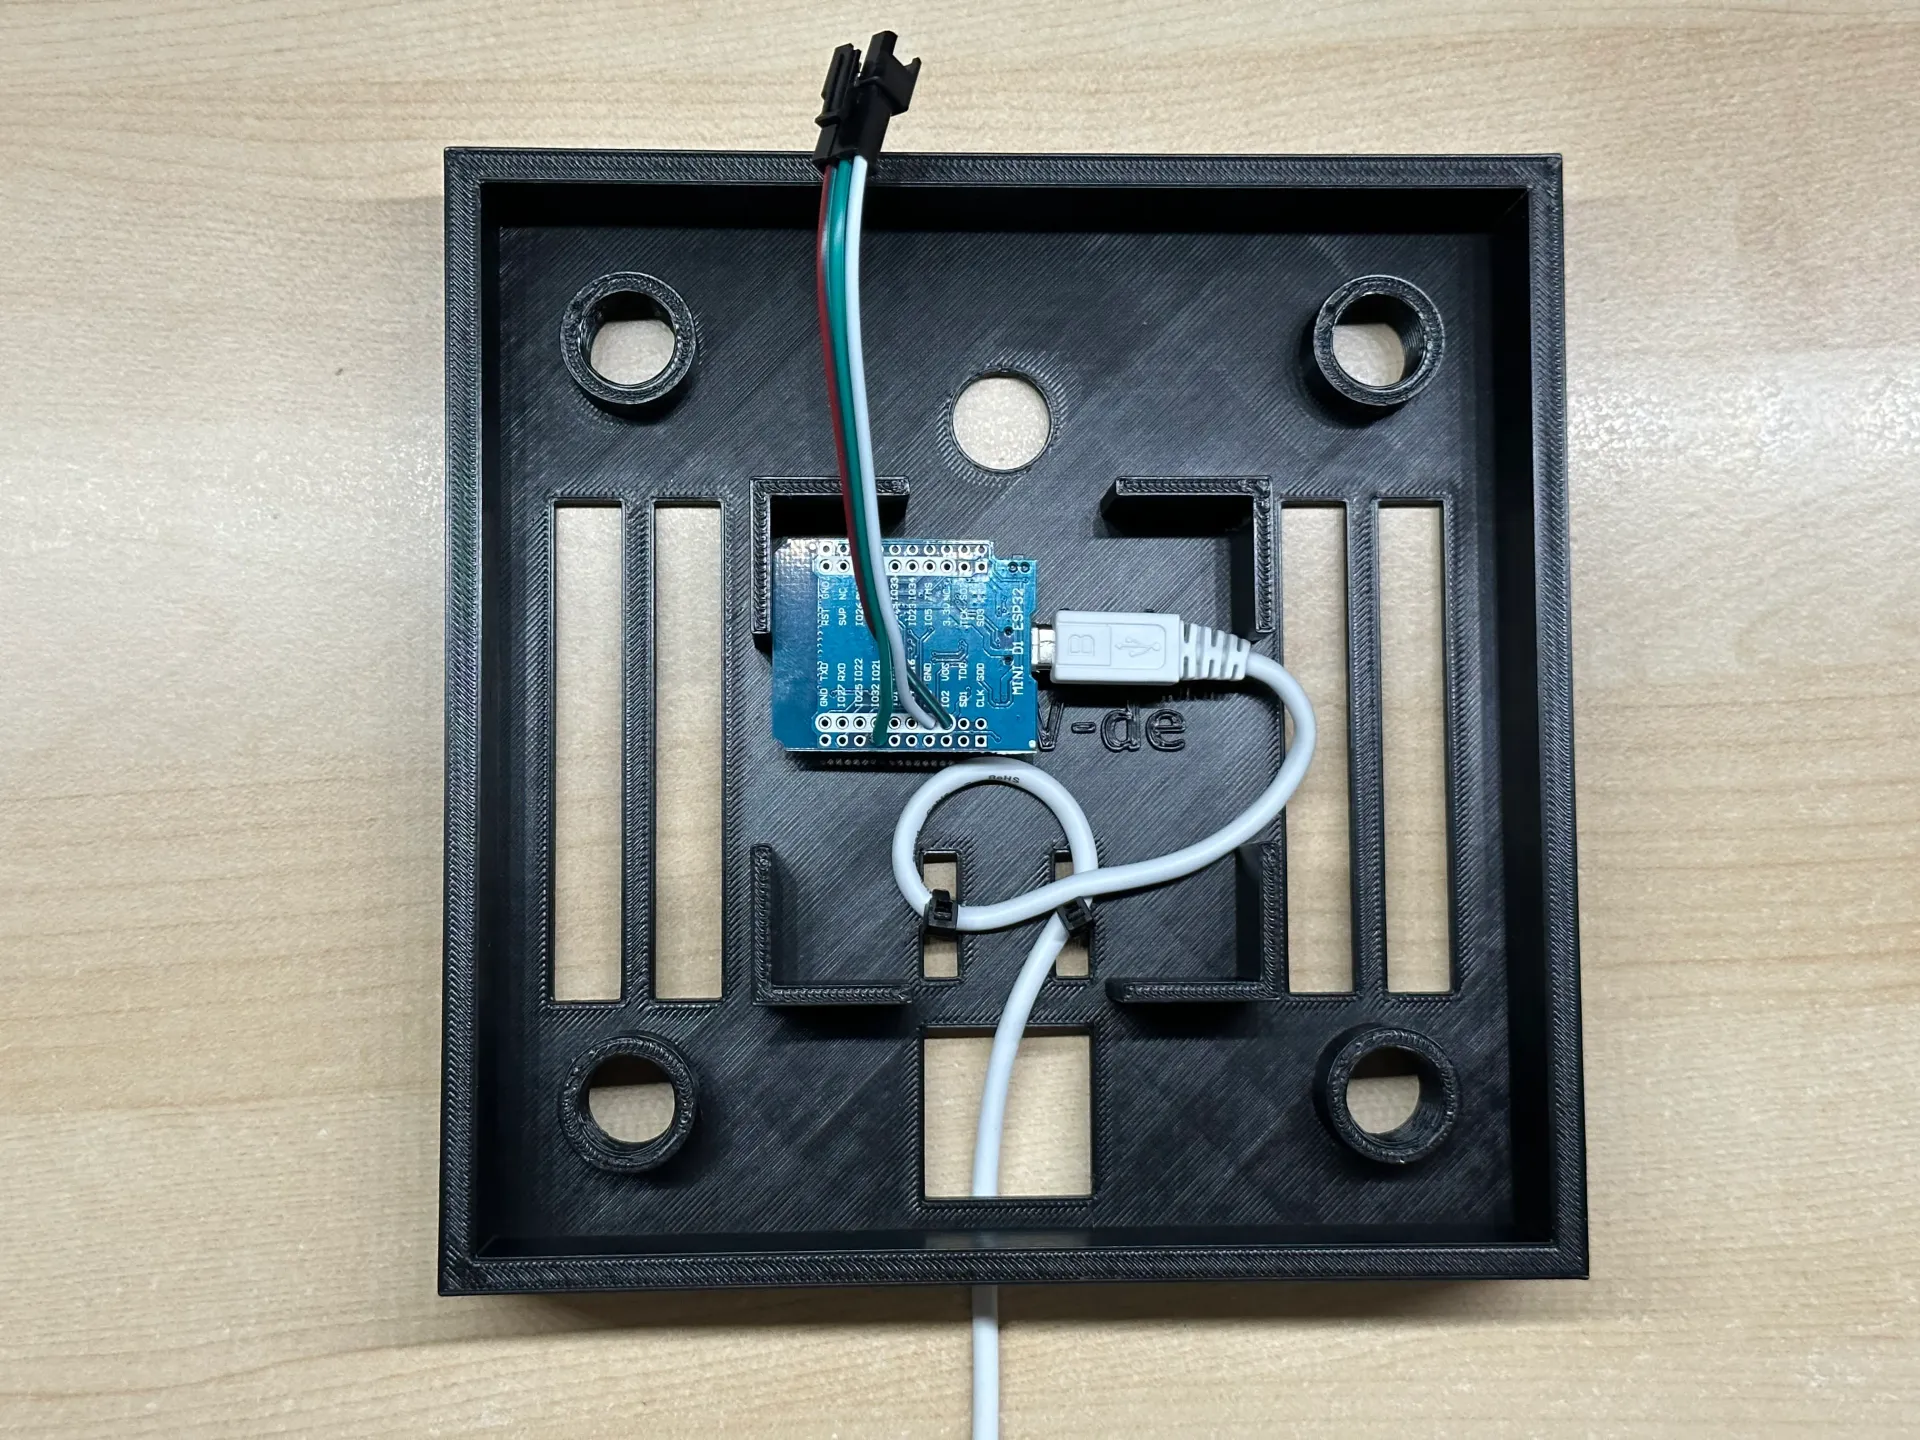
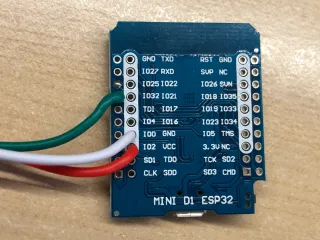
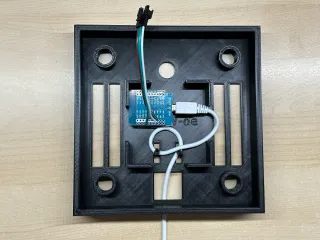
Wiring:
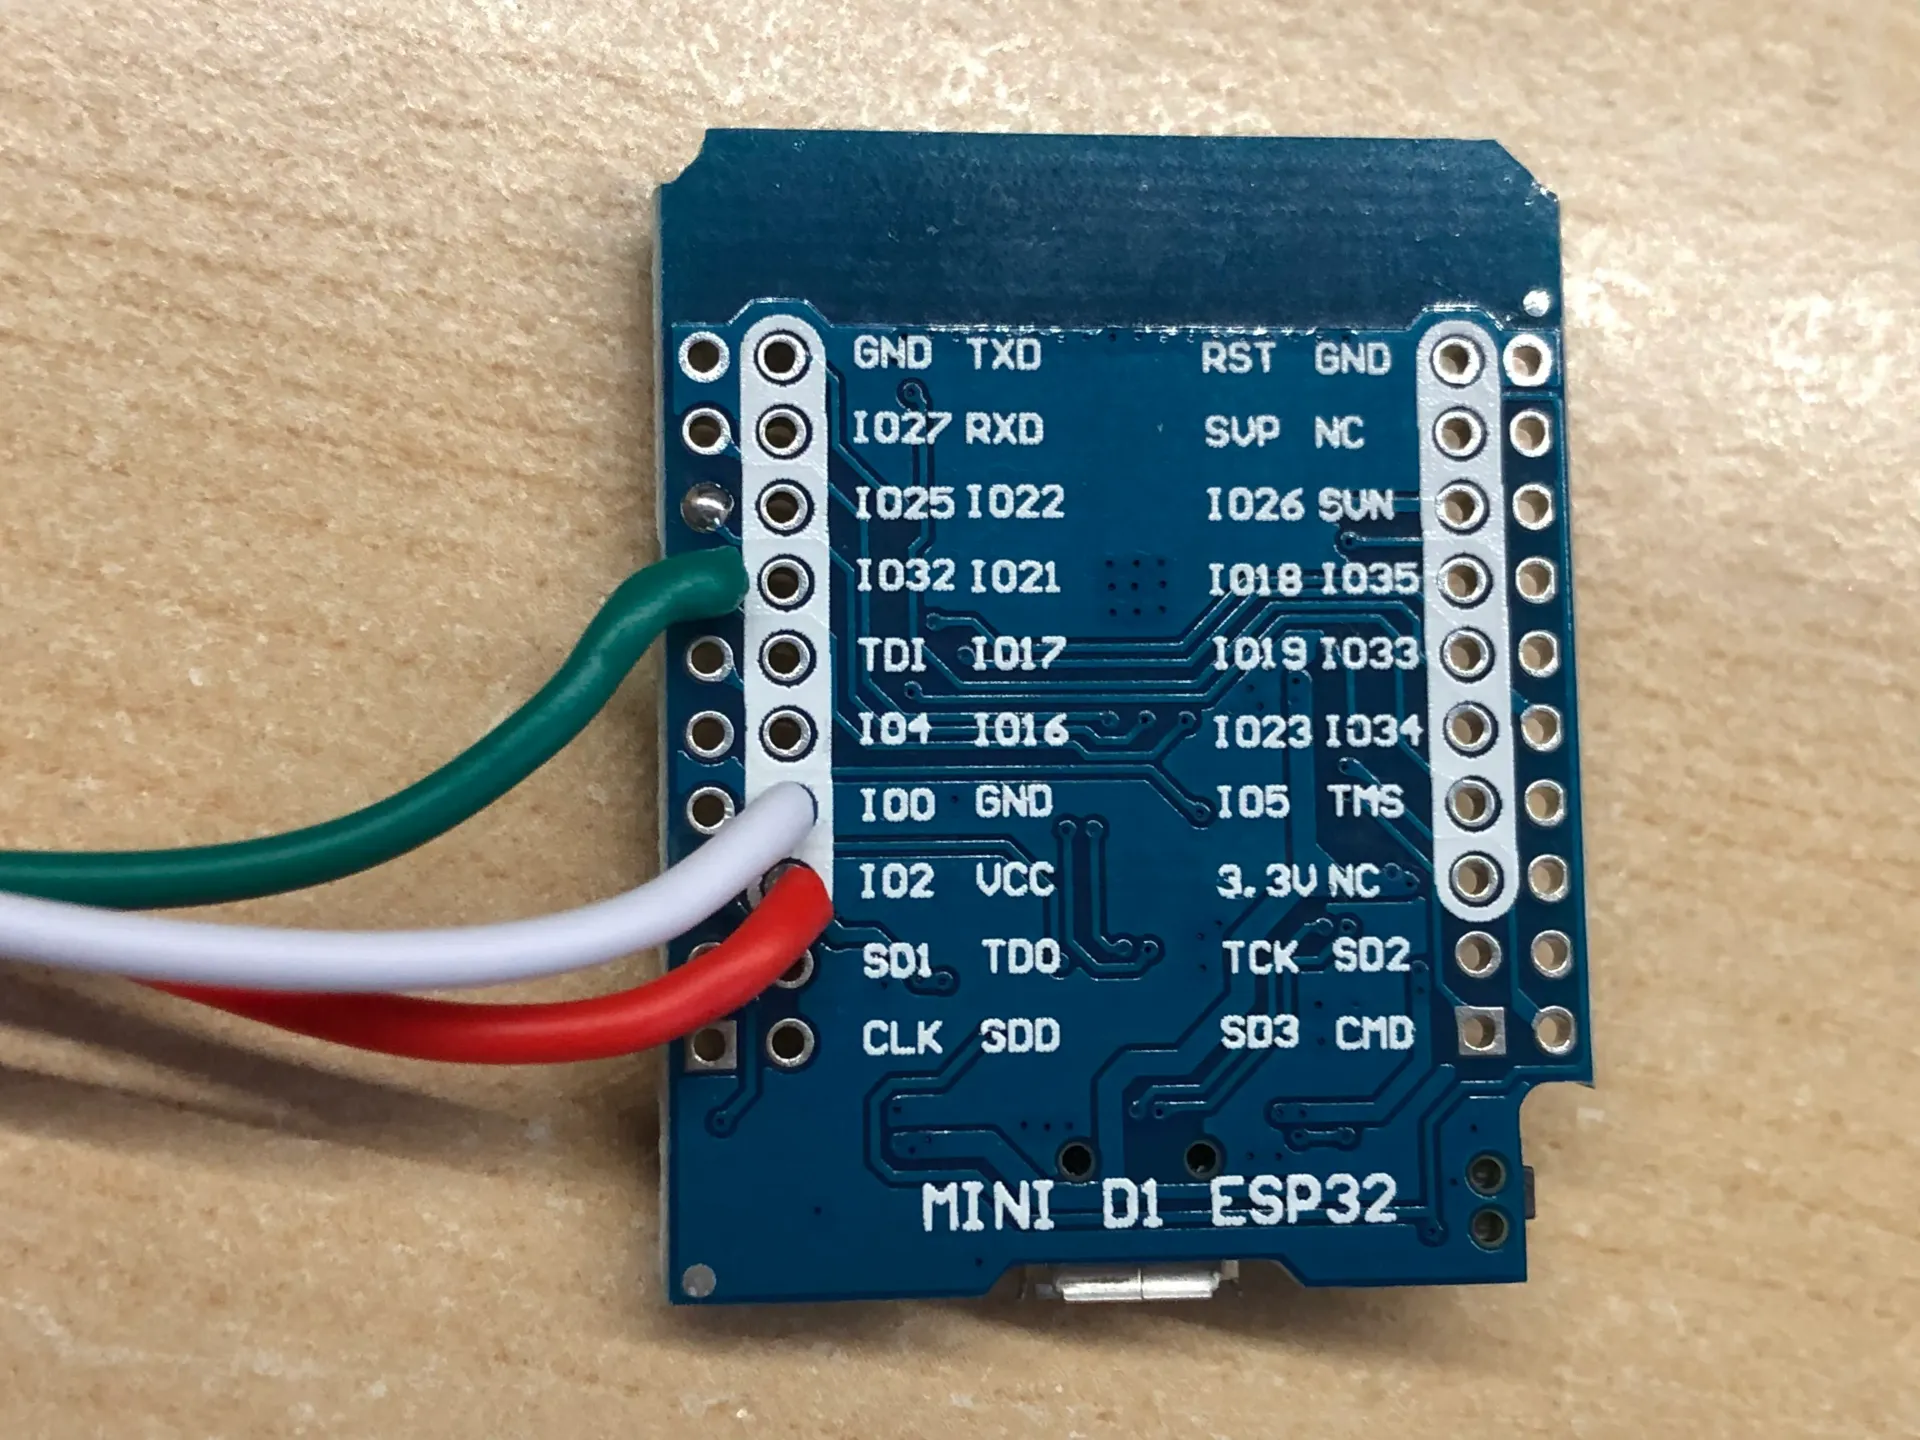
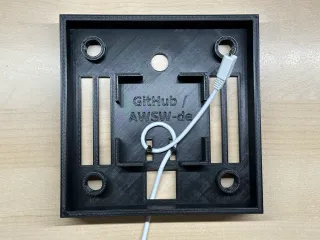
- Connecting the parts for this WordClock is as easy as possible.
- You may need to solder 3 connections only to the ESP32
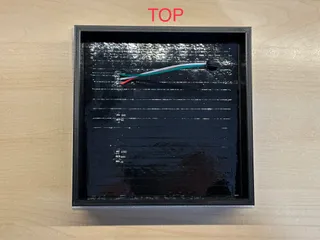
- The 4 small holes in the lid can be used for 2 small cable ties to secure the power cable
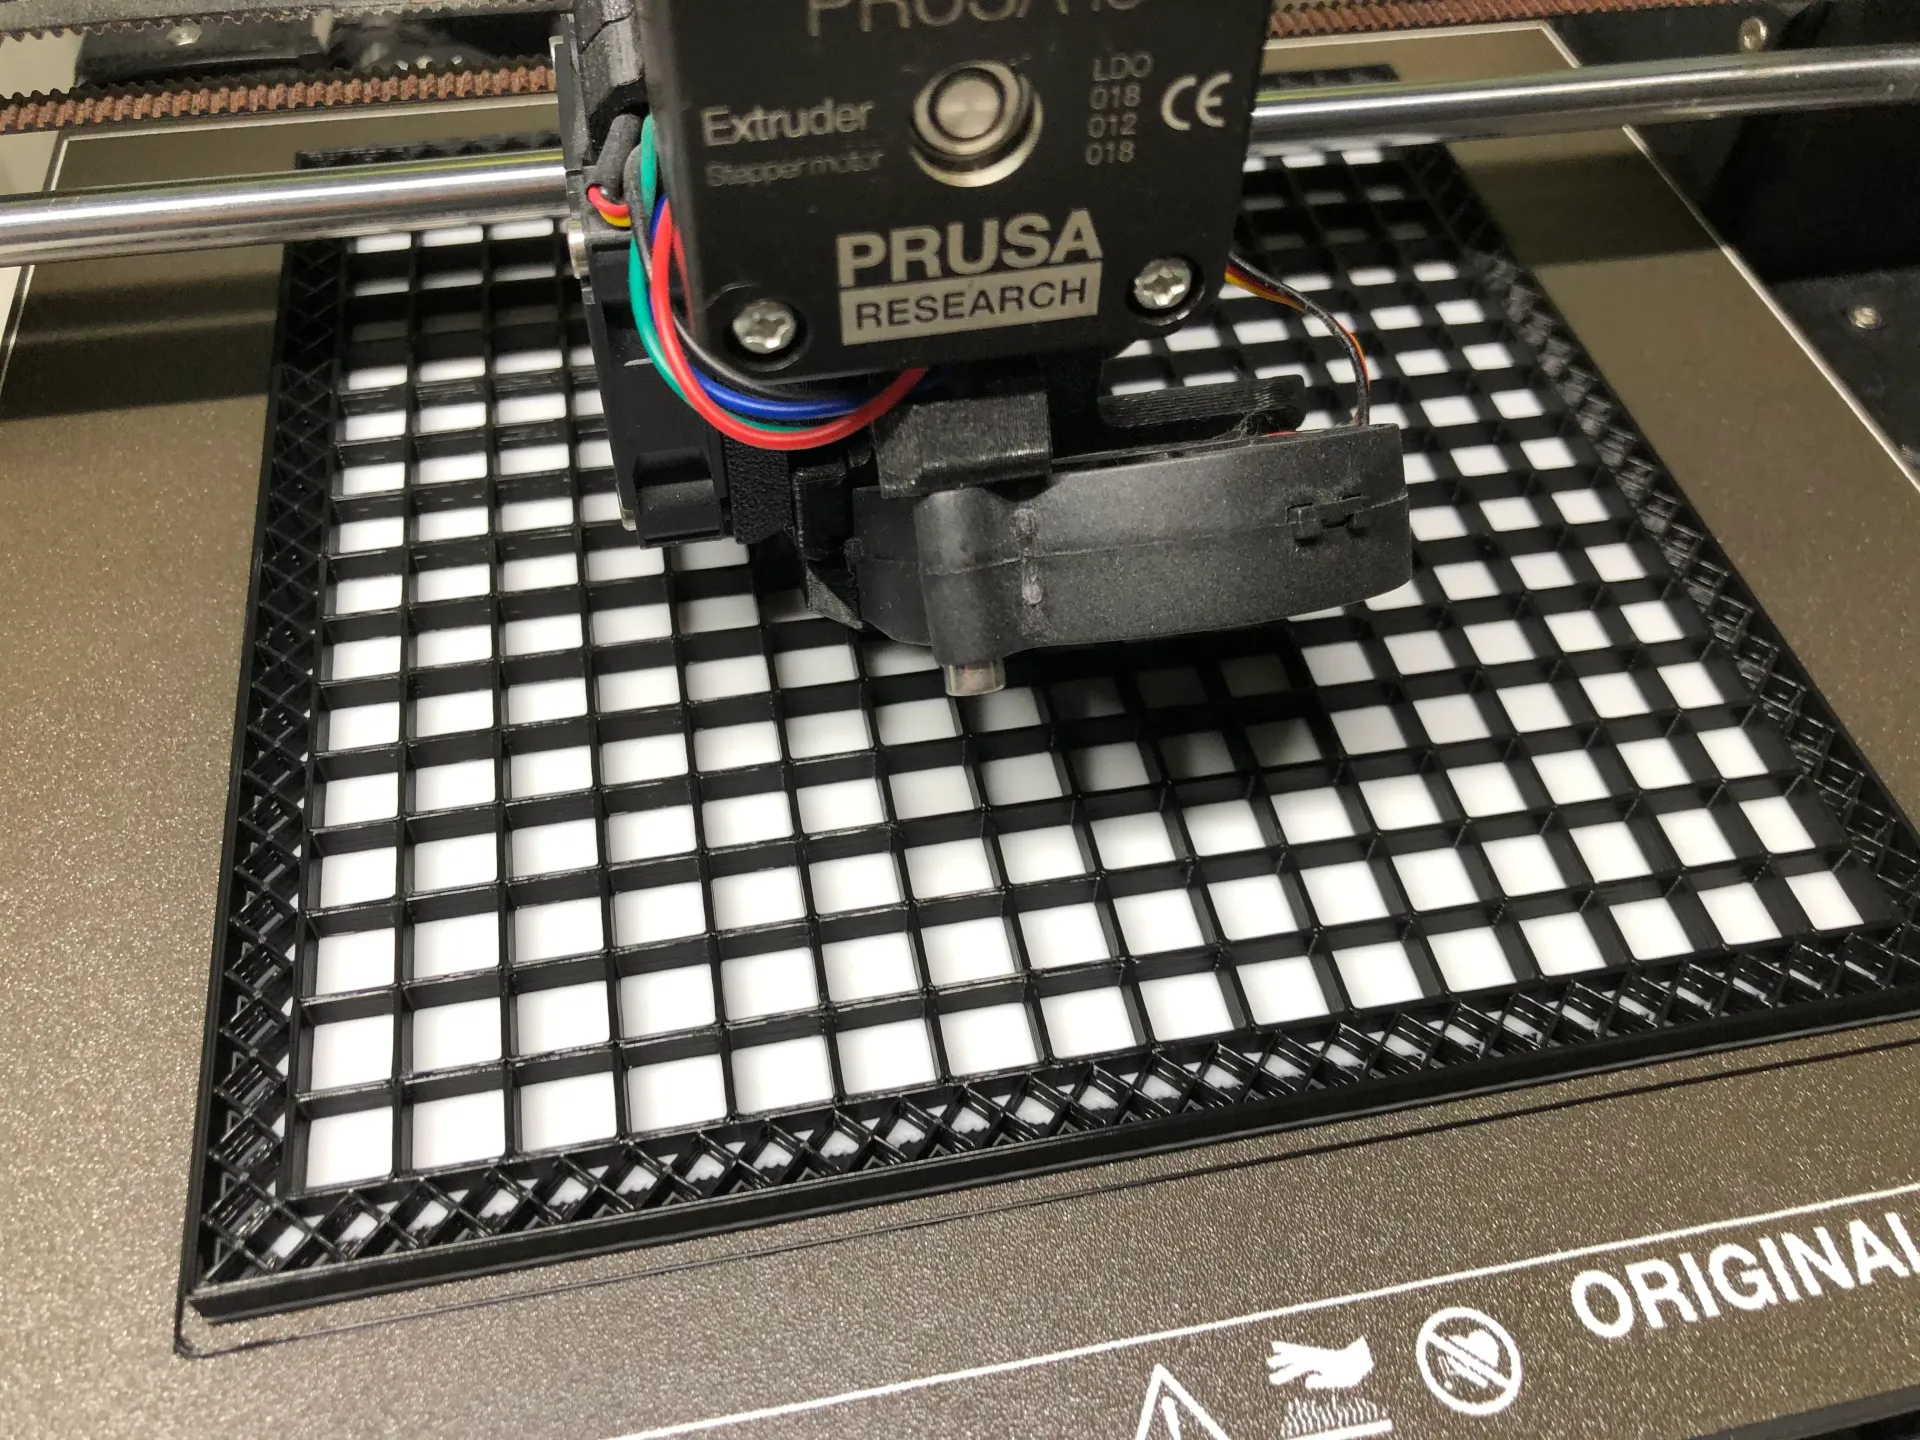
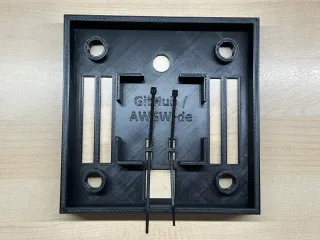
- Have a look into the pictures how to arrange the LED matrix in the front part to ensure that the direction of the LEDs is correct. Upload the code, test it and then close the case!
- Please check the table which pins are connected for the project as well as the pictures:
| ESP32: | LED matrix: | Wire color: |
| VCC | 5V | Red |
| GND | GND | White |
| IO32 | DIN | Green |
FAQ:
- Q: “Why is the software not provided as self to compile code to run in Arduino IDE?”
- A: Although I created scripts for setting up the Arduino IDE, automatically download and install needed libraries and spend a lot of time to give you a setup option as easy as possible, it seems to be still way to complicated for many users. Thats why you have the new script to download and flash the code for you now as precompiled .BIN files now. I had so many messages from users each week that did not (fully) follow the already quiete simple instructions and the only possible way for me is to make this as easy as possible and not provide the more complicated way anymore.
- A: By giving you the precompiled code you can be sure that this is tested and will work with the named components, which should be a big benefit. =)
- A: And YES, i know, that other ESP32 boards might not work with these precompiled code files, but I honestly have to say, that this is a ≤5€ or ≤5$ problem and I perform this here as a hobby and cannot support many different ESP32 variants anyway… I guess you will understand this, that I cannot and will not spent more time on this when it can be fixed with buying such a cheap ESP32 fitting to the project.
- Q: “In Offline Mode the from the device created WiFi access point requires a password, which I don’t know. What is this password and does the configuration page open automatically when connecting to this internal access point?”
- A: “The password is ‘Matrix-16x16’ and in case the configuration page doesn’t open up properly on your device (mostly heard of on Android devices) just connect to the WiFi and then open your browser on ‘http://192.168.4.1’. Once saved to your device the password should be stored and you not need to enter it again anymore. This password was added to make the device more secure for example if you want to use it on your work environment without access to a regular WiFi.”
- A: “The password is ‘Matrix-16x16’ and in case the configuration page doesn’t open up properly on your device (mostly heard of on Android devices) just connect to the WiFi and then open your browser on ‘http://192.168.4.1’. Once saved to your device the password should be stored and you not need to enter it again anymore. This password was added to make the device more secure for example if you want to use it on your work environment without access to a regular WiFi.”
Happy printing =)
Older notes:
- 20.12.2022: German and English version available. Code was completely rewritten and will be updated over time. Code for DE and EN layout available with version “V1.0.5”.
- 06.01.2023: Code updated to new version V1.1.0. Please update to this new release. =)
- 08.01.2023: Code version V1.2.0 released with lots of improvements and support for the new Dutch / NL layout.
- 12.01.2023: French / FR layout online.
- 13.01.2023: Fixed an error in the French layout. Please download again if already done. Currently printing this new layout. Code version V1.3.0 should be ready for the French layout but needs to be checked when the print of the layout is done. There are some really special spellings in French time texts… =)
- 14.01.2023: Code version V1.3.0 for French / FR layout is online. =)
- 12.03.2023: Working on version V1.4.0:
- Enhanced internal web URL usage to be able to set/get the following values from your smart home environment systems that can handle such URLs:
- Change time color
- Change background color
- Change intensity value (0 to the maximum limit set in the settings)
- Set extra words color
- Set extra words on or off
- Get the status of an extra word
- Get the status of all above named values (colors and on/off value) at once
- Examples:
- http://WordClock:2023 → shows some examples how to use the urls. The examples use your own WordClock ip-address to be able to use directly. I set the urls here to WordClock for the sake of simplicity…
- http://WordClock:2023/status → Show the status of all extra words and the color for the background and time texts
- http://WordClock:2023/config?R-Time=0&G-Time=0&B-Time=255&R-Back=255&G-Back=0&B-Back=0&INTENSITY=25&INTENSITYviaWEB=1 --> Configures time texts to blue and the background to red. Intensity is set to 25 and sets this intensity value as master setting
- http://WordClock:2023/config?R-Time=0&G-Time=0&B-Time=255 --> Configures time texts to blue
- http://WordClock:2023/config?R-Back=255&G-Back=0&B-Back=0&INTENSITY=5&INTENSITYviaWEB=1 --> Configures the background to red. Intensity is set to 5 and sets this intensity value as master setting
- http://WordClock:2023/ew/?ew9=1 --> Turns extra word 9 to on
- http://WordClock:2023/ew/?ew9=0 --> Turns extra word 9 to off
- http://WordClock:2023/ew/?ew3=1&R=0&G=0&B=255 --> Turns extra word 3 on and sets it to blue color
- http://WordClock:2023/ew/?ew1=1&ew2=1&ew3=1&ew4=1&ew5=1&ew6=1&ew7=1&ew8=1&ew9=1&ew10=1&ew11=1&ew12=1 --> Turns ALL extra words to on
- http://WordClock:2023/ew/?ew1=0&ew2=0&ew3=0&ew4=0&ew5=0&ew6=0&ew7=0&ew8=0&ew9=0&ew10=0&ew11=0&ew12=0 --> Turns ALL extra words to off
- http://WordClock:2023/ewstatus/?1 --> Status of extra word 1
- http://WordClock:2023/ewstatus/?3 --> Status of extra word 3
- Manual controls on the internal web page will be removed when the web urls are in use to avoid confusion. A note is show on the page to inform you about this. The web url settings are set as primary control of the device. Otherwise the smart home environment might work against the manual set settings….
- On the internal web page a new section with notes to these new web url functions is shown to inform you about the new feature
- The old web server listenting to port 8080 was removed and replaced with this much faster responding one listing on port 2023 (http://WordClock:2023/…).
- Enhanced functions for the manual Telegram interactions including enhanced startup message to get faster used to the usage.
- Enhanced startup outputs on the serial monitor for 1st usage
- Tons of code cleanup to optimise the code…
- Currently testing all the new and old functions.
- Enhanced internal web URL usage to be able to set/get the following values from your smart home environment systems that can handle such URLs:
- 15.03.2023: Version V1.4.0 released. See notes from 12.03.2023 for details. Have much fun with it =)
- 30.03.2023: Added two 4K videos to the description that show the complete setup process of the Arduino installation, code upload to the ESP32 board and the WiFi setup on Microsoft Windows 11 and Apple macOS. Hope this will help all of you to setup the project even more easily. =)
- 03.04.2023: Version V1.5.0 online. Updated the language layout handling in the web gui and added a new html querry to check if the WordClock is currently under html web command control. Smaller bug fixes.
- 18.05.2023: The here (still) used WiFi Manager library seems to have a bug in the current on GitHub available version which can lead to not to be able to setup your WiFi credentials and will show “No AP set” only. I have reported this bug to the developers with this issue that they hopefully fix soon: https://github.com/tzapu/WiFiManager/issues/1609 —> Problem solved!
- 04.07.2023: Release of software version V1.8.0:
- Replaced the old WiFi manager library with my own solution already used in the 2023 models to avoid many problems users reported and to have more control.
- This new WiFi and config manager also allows to set the NTP time server, time zone, language of the LED layout and Telegram settings. These values now get stored in the ESP32 flash and does remove the amount of effort to change the settings with every new update in the settings.h file again and again…
- The old WiFi manager library can be deleted from your libraries list.
- More control and LED output during the setup process.
- New internal web pages for the initial setup and update process.
- New text output function that shows „SET WIFI“ after initial startup.
- Tons of code cleanup and optimisation actions, as well as using some newer functions from the 2023 models...
- IMPORTANT NOTE: After the update to ≥ V1.8.0 you 1x need to add your WiFi credential, set your layout language, NTP time server, time zone and optional your Telegram values again. This is now done within the configuration page and not in the “settings.h” file anymore as written above….
- Download: https://github.com/AWSW-de/WordClock-16x16-LED-matrix
- Hope you will like the new version. This was quite some work…. =)
- 06.07.2023: The BIGGEST update (V2.0.0) yet is online now. =)
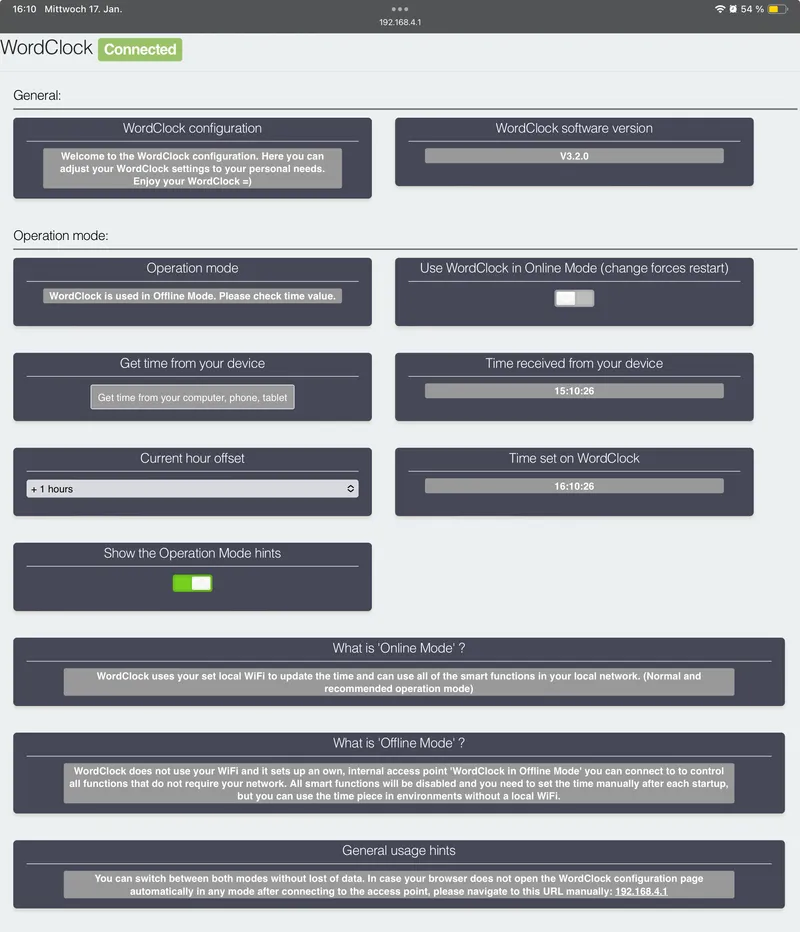
- "Online Mode" vs. "Offline Mode":
- WordClock can still be used in "Online Mode" with all the smart functions controlled via your network environment and otional via Telegram as before…
- WordClock can now also be used in "Offline Mode" where you can use the time piece function only without the need of a local WiFi. All smart functions are disabled because the device is not connected to your local network, e.g. in your environment at work…
- In both operation modes you can configure the device via the shown internal web portal.
- You can switch between both modes without data loss. So please feel free to try it out. =)
- Please see the pictures below for details.
- NOTE: You will need to add 1 more library to Arduino called “ESP32Time” by “fbiego”. Check the top of the “Code.ino” to download the correct one.
- Download: https://github.com/AWSW-de/WordClock-16x16-LED-matrix
- Hope you will like the new version. This was quite some work…. =)
- "Online Mode" vs. "Offline Mode":
- 31.07.2023: Added 3 new internal web server urls to set all extra words manually inactive until 00:00:00 to remove the entries for the current day... Version V2.1.0 now available here: Download.
- 08.10.2023: Next planned functionality is to permanently block unknown Telegram users who send messages to the WordClock bot. The currently implemented function blocks these messages already (if you set it active to do so) and notifies you that your WordClock received messages from an unknown user. In the last weeks I got some notifications that some unknown users wrote to my WordClock bot and these messages were blocked which is OK, I think. Maybe it was one of you guys testing the functionality, but I think it might make sense to block unknown users permanently as an option…
- 17.01.2024: The first update in 2024 is available. Please see the video for details. The code is available for download in my GitHub repository. Enjoy =)
- 05.05.2024: Release of software version V3.7.0 adding new functions:
- Active WiFi reconnect in case the WiFi connection got lost during runtime.
- During initial setup of the WordClock the available WiFi networks are listed now in a dropdown selection field too to be able to select the SSID name to reduce typing. - 06.10.2024: The automatic script to setup the Arduino IDE and WordClock code made a huge step to make the installation even more easy. All you need to do is choose the WordClock variant 16x8 or 16x16 and the board plus port and hit upload. Check this link and this video for details:
Video of V1.0.4 (DE):
Music credit: Used some free music from Apple iMovie.
Video of V1.2.0 (Testing the Dutch layout and time texts):
Music credit: Used some free music from Apple iMovie.
Video of V1.3.0 (Testing the French layout and time texts):
Music credit: Used some free music from Apple iMovie.
Tags
Model origin
The author marked this model as their own original creation.


