Creality CR6 SE heatbed cable adapter rotate Strain Relief
Description
PDF09.05.21 Added a clip for the hole that the wire comes out of. Angles it up so the wire doesn't catch on the stepper motor. There isn't really a better solution without to route the cable a different way, or replacing the entire cable altogether for more clearance.
Updated the mount so it clears the metal clip next to it.
//----------------------------------------------------------------------------------------------------------//
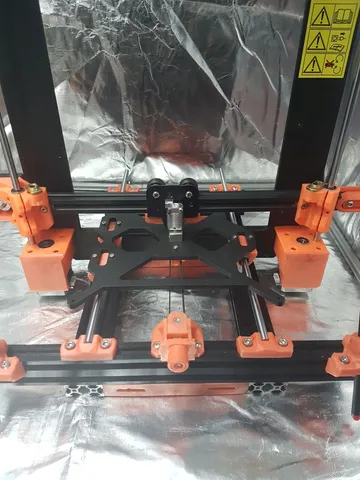
CR6 SE heatbed cable adapter rotator strain relief thing. Makes for more clearance in the back for enclosure or tight space. It's not a direct fit, the cables inside will need to be pulled out a little from the outside sleeve. The heatbed cable is short and may extend just enough to when the bed is all the way forward. It's recommended to inspect the length of the cable from the mainboard, and add additional cable length if needed.
Also, cable may catch on the Y axis stepper motor when fully rotated to 90 degrees. A cover may be needed to let it slide over.
Printing: high temp material petg, abs, nylon.
Full print with 2-3x4x4 walls/top/bottom and 20%- infill.
Remixes are welcome, also suggestions as well.
Also, DO AT YOUR OWN RISK! May cause damage to circuitry, and the early model CR6 se has an issue with the heatbed wiring shorting on the ground cable. Make sure you know what you are doing before adding this mod.
Print Settings
Printer:
CR6
Rafts:
No
Supports:
No
Resolution:
0.16mm
Infill:
20
Filament:
Any PETG, ABS, Nylon
Notes:
Parts Needed:
one M5x7-12mm button top screw, one M5 nylon lock nut.2x M3 nut
2x M3x10mm flat top countersunk screw, 2x M3 nylon lock nut
step 1: remove the 2 screws holding the stock strain relief, then carefully try to pull wires from inside of the hose out a little. Just enough to be able to put the printed adapter under the stock strain relief.
step 2: screw on the middle adapter to the heat bed with the stock m3 screws and insert M3 nuts into the bottom adapter.
step 3: Attach the top adapter onto the middle adapter with the M5 screw and lock nut to secure it. The top adapter is adjustable to allow for how much angle you need, then tighten it down at the position you like it to be in. It can still rotate even after it is assembled afterwards depending on how tighten it is.
step 4: Using M3 flat screws, place underneath the top adapter, and screw it into the stock strain relief with m3 lock nuts.
Category: 3D Printer PartsTags
Model origin
The author marked this model as their own original creation. Imported from Thingiverse.