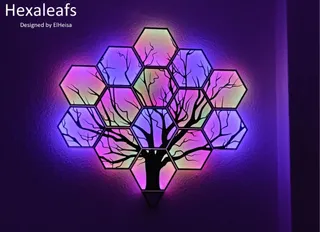
No Soldering Hexaleafs
Description
PDF*I redesigned my own version of the Hexagonal Nanoleafs that doesnt need any soldering.*
If you want to use individually addressable LEDs like WS2812s or have more effects, check out https://thingiverse.com/thing:5154193
Why is this version better than others?
+ no soldering + better light dispersion The panels are homogenous illuminated + cover design Do you want a clean cover or a little more extra? Let your creativity run free. + long time stability LED Strips are held without adhesives that stops sticking after some time + easy connectable Panels are slotted together without glue or extra pieces + clean outside No holes or extra connectors on the outside of your panel arrangement - long print time The panels are intricate and take longer to print than other designs - Do not scale The panels are designed with the thickness and spacing of your LED Strip in mind. Scaling will result in your LED Strip not fitting perfectly - no fancy effects If you want fancy effects check out my other project https://thingiverse.com/thing:5154193
*Instructions*
Step 1: Planning
This design enables the use of a single light strip that will be zigzaged into the Hexagons.
While choosing your LED Strip, you have the choice between 30 and 60 LEDs/m. Both will work perfectly with this design.
If you are handy with a soldering Iron or want to give it a try, I recommend checking out the bit more complicated version https://thingiverse.com/thing:5154193 that enables you to use all kinds of different effects and configure each hexagonal panel individually.
If you want to make a different arrangement of your Panels, you can check out my other project or change the connectors with the provided Fusion360 files.
With this arrangement, you will need8,4m of LED Strip, so a 10m Strip that usually can be cut every 30cm will work perfectly. The design offers a little box to fit the LED controller and IR Sensor in, most controllers should fit, if you choose a extra large one though, it might not.
For thecover you can choose avariety of designs.
I designed my owntree cover (https://thingiverse.com/thing:5025463) andmushroom cover (https://thingiverse.com/thing:5206965), though I also left a file withjust the rim if you don’t want anything special.
I do recommend designing your own or checking out the100Hex Project for a bunch of inspirations (https://thingiverse.com/thing:2477471).
Step 2: Printing
The pieces connect by slotting into each other.
To check the fit, I providedConnector Test Pieces. Print them twice and check how they fit. If they dont fit and you are usingCURA, change the parameter "horizontal Expansion" under "Walls". *Test Prints are never optional!* So please make sure they fit.
I printed my pieces with a 0,4 mm nozzle at 0,2 mm layer height with supports and without any brim or raft. Every piece took about 5 hours to print and weighs about 50 g.
Mark every piece to not lose track of already printed pieces and its position.
I cut out all thediffuser panels frompaper, but you can also use the supplied diffuser file to print them.
Step 2: Assembly
To fit the LED Strips into their position I recommend bending the strips at the corners and then slotting them into position without using their adhesive tape.
I used glue strips to glue the Hexaleaf arrangement onto a piece ofcardboard and made some holes in the cardboard to hang it on the wall. It should be fine without the cardboard, but you also eliminate some light bleed on the wall.
For even better light dispersion, you can glue some aluminium foil/tape onto the cardboard and use it as a mirror.
Print Settings
Printer Brand:
Creality
Printer:
Ender 5
Rafts:
No
Supports:
Yes
Resolution:
0,2
Infill:
20%
Filament: GIANTARM PLA
White
Category: 2D ArtTags
Model origin
The author marked this model as their own original creation. Imported from Thingiverse.

