Toothless grinder v3

Description
PDF- INTRODUCION
Almost five years ago a friend of mine asked me to print him a custom grinder. Since everything you can find on the internet works poorly i had to design my own version from scratch.
This is the third iteration of the design and I think it will be the definitive one. Every previous issue has been fixed and it's incredibly easy to print.
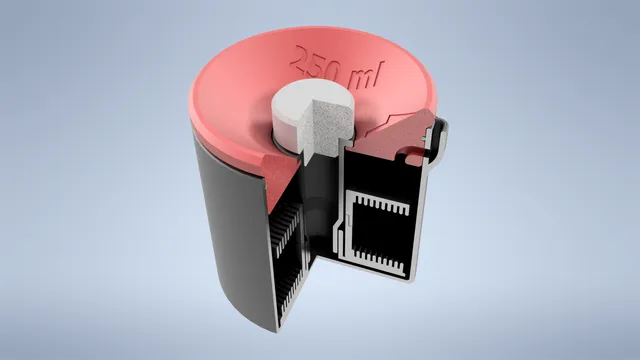
- HOW THIS GRINDER WORKS
There are two things you need form a 3D printed grinder: it needs to grind and it needs to be strong.
My toothless grinder is capable of grinding just by friction, using very small teeh that are therefore subjected to very low flexural forces. This way it is pracrically impossible to break it.
The bottom grinding surface has some 5mm holes to allow the grinded material to fall in the next compartment.
Here there is a metallic mesh (optional) that separates some of the pollen, just like in those high quality grinders you can buy.
The pollen then falls in the bottom compartment were it is stored.
- INSTRUCTIONS
Every body is numbere in order form the bottom to the top, with an excepion for the bottom grinding surface (Component6) and the ring needed to install the metallic mesh (Component7).
You just need to print every piece from Component1 to Component6 and install them following the naming order.
MESH INSTALLATION
To install the mesh I suggest to place a metallic mesh on the build plate and then printing Component7 directly on top of it. This way the plastic fuses with the mesh and it becomes a solid component. Otherwise you could just glue the mesh in place.
MAGNETS
Component6 and Component4 have a slot in the center to fit a couple of 6x3mm magnets. I strongly suggest to use the magnets, otherwise the grinder will fall apart.
Tags
Model origin
The author marked this model as their own original creation.