IKEA LACK enclosure post adjustable and more solid
Description
PDFIKEA LACK enclosure
I modelled an improved IKEA LACK enclosure entirely from scratch, because I was not happy with the designs that I found on the internet.
What to improve
I found the Prusa IKEA LACK enclosure, I printed it and build the enclosure, but I ran into problems like:
- parts were installed with a single screw, this allowed parts to freely rotate and not feel very solid.
- part positions were not adjustable after you screwed it on the wood, which for me caused the plexiglas to bend because I was a few millimiters off.
- there is a few millimeters gap around the entire plexiglas
- the plexiglas holders were exactly as wide as the plexiglas itself, which resulted in them being too tight
About this design
I created my own 3D models from scratch and fixed the problems I was having with the original design. My design uses 4 screws to attach the plastic parts to the table and instead of having only one chance to precisely attach the parts on the right location you can post adjust the parts after you finished constructing it.
The plexiglas holders are designed in such way that the plexiglas touches the legs and the table surface. Being able to post adjust the part positions allows you make a tight fit and prevents gaps around the plexiglas. I incorporated an extra 0.2mm freeplay in the plexiglas holders, this prevents the plexiglas holder from being too tight and allows you to easily slide in the plexiglas. The door handles and hinges have two models, one without freeplay and one with. Because I prefer not to glue the plexiglas to the 3D printed parts, I rely on friction to keep everything together and for these specific parts I prefered to have a tight fit.
The downside of constructing such a tight plexiglas fit is that the doors actually slide against the table surface, which might cause some scratches in the long run. Because the plexiglas holders are open at the top and bottom, the plexiglas is not locked in place. So in theory it could slide out when you remove the top table from the bottom table, but I never had issues with this because there was enough friction to keep the construction together.
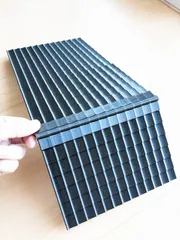
I built this enclosure for my Ender 3 v2, but this printer is actually a few centimeters too tall to fit inside this enclosure. In order to make it fit, you have to cut out a piece from the bottom of the top table surface and remove the cardboard infill that is inside the table (see photo). It may be possible to adjust my design and increase a couple of centimeters to the leg pieces. I did not design it this way because I initially ordered the plexiglas based on the Prusa IKEA LACK table enclosure design and did not feel like spending more money on ordering taller plexiglas.
Construction
You can decide for yourself which side you want to be detachable. Initially I thought about only making the top table surface detachable, but later I decided to make the entire plexiglas enclosure detachable because this gives you easy access to the 3D printer.
I built this enclosure for my Ender 3 v2, but this printer is actually a few centimeters too tall to fit inside this enclosure. In order to make it fit, you have to cut out a piece from the bottom of the top table surface and remove the cardboard infill that is inside the table (see photo). It may be possible to adjust my design and increase a couple of centimeters to the leg pieces. I did not design it this way because I initially ordered the plexiglas based on the Prusa IKEA LACK table enclosure design and did not feel like spending more money on ordering taller plexiglas.
Doors
The plexiglas doors require extra processing. As you can see in the included photo, the doors have indentations for the hinges and door handles. This is because the hinges and door handles, unlike the plexiglas holders, have a closed bottom to prevent the glass from sliding out.
Plexiglas required:
- 3 sides 445x440x3 millimeter
- 2 doors 222x440x3 millimeter
At the time of writing I spend about 45 euro on plexiglas and they cut it on size for me.
Category: 3D Printer Accessories
Tags
Model origin
The author marked this model as their own original creation. Imported from Thingiverse.


