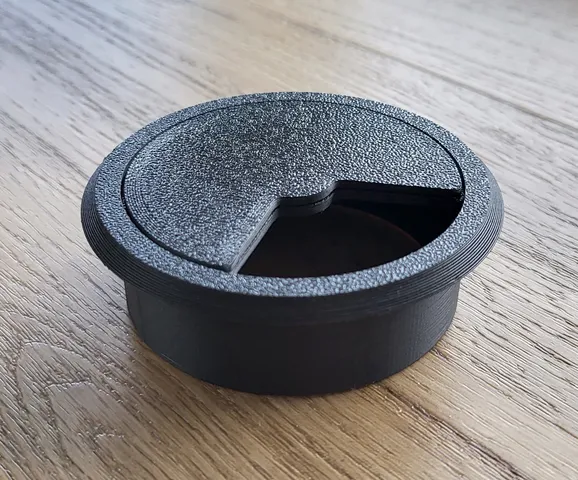
Smart Filament Sensor 45° Adapter for Anycubic Vyper

Description
PDFAllows you to use the BTT Smart Filament Sensor at a 45° angle on an Anycubic Vyper with a top-mounted filament spool. Prints nicely in PLA without supports, just use the default orientation in your slicer. Assembly only takes 15-30 minutes. I can confirm it works with Klipper and also provide instructions on how to set it up. I didn't test it in Marlin though, but you should be able to use it with Marlin as well if you're willing to compile the firmware yourself, BTT offers some instructions on what you need to do there in the GitHub repository of the filament sensor. Conveniently, even though the stock filament sensor only uses 2 pins, the socket it is plugged in has 3 pins we can use without having to repin the cable provided with the smart filament sensor!
If you like what I'm doing, please give it a like 👍 consider joining my club or buying me a coffee! 😃👍

Additionally required parts
- 1x M3x10 Bolt
- 119.5mm PTFE Tube (optional, but recommended)
- 1x BTT Smart Filament Sensor (obviously)
- 1x Cable tie/zip tie (also optional but recommended)
Assembly instructions
If unclear which sides are meant in the instructions, please refer to the pictures for reference. Don't feel intimidated by the long instructions, I tried to be as clear as possible.
- Before you start working on the printer, I recommend unplugging the power. It's probably not necessary, but it's better to be safe than sorry!
- Remove the back cover from the Smart Filament Sensor by unscrewing the screws on the back.
- Cut the PTFE tube to a length of 119.5 mm (make sure both sides are flush!) and insert it into the right side of the filament sensor (the one leading to the extruder).
- Insert the blue short PTFE tube supplied with the sensor into the left side of the sensor (here's where the filament will go in).
- Attach the sensor to the printed adapter, fastening the screws from the back using the screws you unscrewed from the back cover, essentially replacing the back cover with the printed part.
- Remove the stock filament sensor on the Vyper by unscrewing the two screws holding it. Also, remove the small metal bracket on which the filament sensor was resting. You will notice the screw closer to the extruder is shorter than the other, we don't need the shorter screw anymore, it will be replaced by the additional M3x10 bolt later. Note that the filament sensor was screwed into a bottom piece with some sockets and plugs, you will need to screw into it again later.
- Unplug the stock filament sensor from where it's plugged into the Vyper and remember which socket it was plugged in, we will plug in the smart filament sensor in the same socket later.
- Remove the short PTFE tube from the left side of the extruder (you might have to remove the blue clip first and put it back in afterward) and insert the other end of the PTFE tube you cut earlier.
- Put the 2 screws (the longer one you previously removed and the additional M3x10 bolt) into the 2 holes in the bottom of the model and make sure you screw them into the bottom part. This is easier with a screwdriver and a hex bit, but you can also use an Allen key.
- Supplied with the smart filament sensor you will find a cable with a 4-pin plug on one side and a 3-pin plug on the other. Plug in the side with 4 pins into the smart filament sensor on the side and plug in the side with 3 pins into where the plug of the stock filament sensor used to go in. As the cable is quite long, I recommend tying it together with a cable tie or zip tie.
- In Klipper, edit your
printer.cfgand if you already had a filament sensor in your config, replace it or else add this to your config:
[filament_motion_sensor filament_sensor]
detection_length: 10
extruder: extruder
switch_pin: ^PA5
pause_on_runout: True
insert_gcode:
    M117 Insert Detected
runout_gcode:
    M117 Runout Detected
Now press “Save & Restart” and you're done! If you want to test if the smart filament sensor works properly, start a print, then while the print is running either cut the filament before the sensor or pull the extruder tensioning lever, which will prevent the extruder from being able to feed the filament into the hotend. You should now see that in Mainsail / Fluidd it shows “Runout detected” and the print should get paused with your pause macro getting run if you have one defined.
Tags
Model origin
The author marked this model as their own original creation.