On-Air Indicator

Description
PDFMy son is an aspiring YouTuber. This door-mounted, battery-powered “On Air” indicator is intended to help us supporting him by not interrupting when he's recording. It's parametric, so you can edit the OpenSCAD file if you need to resize or use different size components.
You will need:
- The three 3D-printed components
- 4 6mmx2mm round neodymium magnets
- Cyanoacrylate glue (superglue)
- 4 red 5mm LEDs (or change a parameter to use 3mm LEDs)
- 4 47Ω resistors (NB: this assumes your LEDs have a forward voltage of approx 2V. If you use different colour LEDs you may need to adjust.
- Twin AA battery pack
- Rocker switch to fit hole 19mm x 12.5mm (or change parameters to suit)
- Hookup wire, heat shrink tube etc
- 2 M3 self-tapping screws (anything from 8-12mm will be fine). If you don't have self-tapping, ordinary M3 screws will also work but will be bit fiddlier.
Build Instructions:
Print all three components (uncomment the relevant component in the "MAIN" section at the end of the file:
- faceplate()
- case_body()
- ledcarrier()
case_body() may need supports for the switch hole, unless your printer is good at bridging. The other parts won't need supports.
Glue the neodymium magnets into the sockets on the body and faceplate. I used cyanoacrylate glue, which worked well. MAKE SURE of the polarity before you glue - if a magnet is the wrong way round, it won't close. Glue the LEDs into the LED carrier (superglue again), with all short legs (-ve) on one side and all long legs (+ve) on the other. Solder up a 47Ω resistor in series with each LED, and the four LEDS in parallel with each other (see schematic).
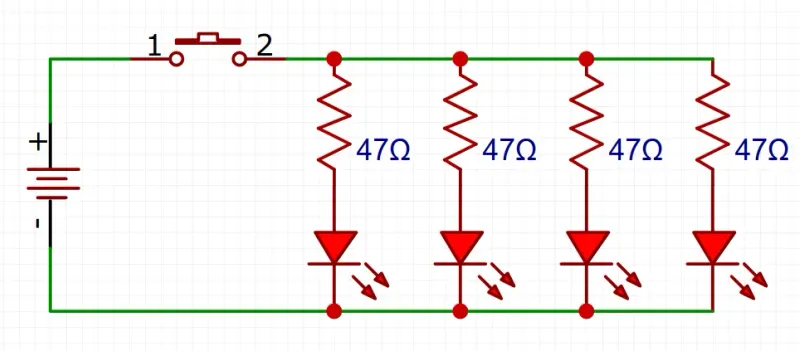
Connect the battery pack +ve to one switch terminal, and the other switch terminal to the shared +ve of the LEDs. NOTE: Feed the wires through the switch hole first, or you won't be able to assemble it. Connect the battery pack -ve to the shared -ve of the LEDs. Wiring done!
With the LEDs facing up, screw the LED carrier into the short pillars on the case body. Clip the switch into place. Tuck the wires away neatly and test.
Cut a piece of something thin and translucent to use as a diffuser. I used a thin (approx 1mm), flexible piece of closed-cell foam that had been wrapped around some small components as packaging. A little piece of shower curtain would work well, but even a piece of ordinary paper would be fine. Cut a piece just large enough to cover the stencilled text of the cover plate. On the inside of the faceplate (ie with the magnets facing up), run a small bead of superglue around the lettering, and glue the diffuser down.
Attach to the door with mirror tape and enjoy!
Tags
Model origin
The author hasn't provided the model origin yet.