RatRig V-Minion - Untethered Mod
Description
PDFThis is a mod to Rat Rig's V-Minion 180 printer to remove the separate electronics box and make the printer a single unit.
Electronics box is designed to take boards compatible with Ender 3 board - SKR E3 V2 in my particular case. The newer SKR E3 V3 should also fit, but may need some tweaks for the power in connector since they removed the exposed Vin from V2.
Work-in-progress currently is adding support for FYSETC-R4 (FYSETC/FYSETC-R4: 3D printer/CNC/Laser cutting motherboard based on RP2040 (github.com)) - an even more compact board that will fit easier and better into the space.
Update: 2023-01-25:
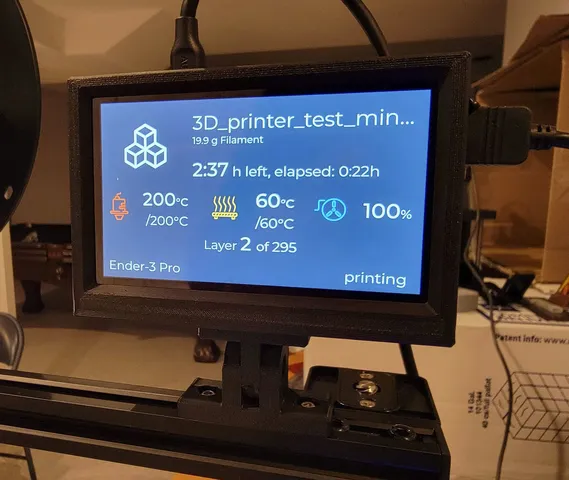
- WaveShare DSI 5" touchscreen case. Turned out BTT PiTFT screen that I originally used, have some touch support issues with the latest Raspbian (bullseye) so I replaced it with the above one which works flawlessly. Since the screen is mounted upside down, some settings on the Pi would have to be changed to change the orientation.
It is a multi-piece one in an effort to make it easier to print. You will need some hardware to put it together as well as 3x heat-set insert M3-5x4mm (standard “Voron” issue). You could use 4x more of these for the fan on the back of the case. Depending on the fan used, regular M3 nuts can be used. Fan I used is 40x40x7 5V one I had laying around, but 40x40x10 should also fit. Optionally - hook it up to 3.3V on the Pi instead 5V to make is less noisy, it will still move sufficient amount of air to keep the RPi cool. Bolts would be 4xM2.5x6mm socket heat bolts(5mm would be ok too) for the 4 corners on the rear frame, 4xM2.5x20mm for the back lid. 3xM3x6mm for the mid-frame attachment and 4xM3 nuts + 4xM3x8 socket head bolts for the mounting bracket. For the fan 4xM3 countersunk bolts + nuts or heat-set inserts depending on the fan size chosen. Frame mount will need a beefier M5x20mm socket head bolt with M5 nut and 2xM6x12mm socket head bolts with M6 T-nuts for the frame attachment (M5 would do too)
The communication between the Raspberry Pi and the MCU is meant to use UART mode (serial interface) to avoid cables sticking out of the side of the screen. It needs 4 wires - Rx, Tx, Vcc (5V) and GND. Old USB 2.0 cable with connectors removed and cut to length works best (use white+green for Rx and Tx and black and red wires for +5V and GND). USB can be used too, perhaps with U-shaped USB adapter to make things look nicer on the side of the screen. UART is most optimal for this setup though.
- Updated mount and caps for the power supply. New version uses 4 heat-set inserts (5mm x 4mm M3 - the standard “Voron” issue). Adding picture of how these parts have to be oriented on the build plate.
Update 2022-03-28: added version for the, now more popular, SKR mini E3 V3 board. E3 has the major advantage of having extra fan control port, perfect for the electronics box cooling fan
You will need a specific power supply to make use of this mod. That would be Meanwhell UHP-350-24
In terms of hardware - 7x socket head M5x12 with M5 3030 T-nuts along with 2x socket head M3x10 bolts to secure the lid to the electronics box and printer frame (3) and the brackets holding the power supply (4). There are 2x countersunk M5-12 to secure the box to the frame of the printer. 4x socket head M3x6 bolts along with 4x M3 nuts to secure the power supply to the bracket. The bolts needed to secure the power supply front and rear caps are 2x M3-25 (front) and 2x M3-50 (rear).
IEC module used for the power inlet is https://www.digikey.ca/en/products/detail/adam-tech/IEC-GS-1-100/9831135 (the typical bolt-in one is too wide and I wanted to keep the slim profile and chose this one. There are many similar sharing the dimensions on Amazon and whatnot.
Enclosure fan is a 6010 axial fan with 5V, if used with SKR mini E3-V2, or 24V when used with newer SKR Mini E3 V3 board (The 5V fan can be hooked up to EXP1 port GND and 5V pins on one end, but will spin all time while printer is powered on).
Screen mount is not included here, since there are many options available and you may not have the same screen that I used for this project. Screen from the picture is BTT PiTFT50, the screen case hosts the Raspberry Pi as well which I feed from dedicated DC/DC buck converter mounted on the frame behind the main PSU and connecting trough Pi's and SKR UART ports (called TFT on the SKR). I may upload the screen case as a separate thing later.
If you like my work - you can buy me a coffee :)
Print Settings
Printer:
RatRig V-Core 3
Rafts:
No
Supports:
Yes
Resolution:
0.2
Notes:
Lid requires support for the fan base, automatic supports touching build plate should do fine. The other parts should print support free with no issues.
Category: 3D Printer Parts
Tags
Model origin
The author marked this model as their own original creation. Imported from Thingiverse.