Dutch Row Houses

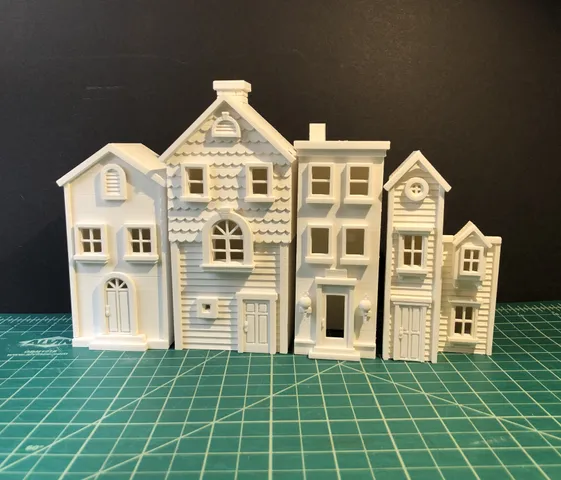
Dutch row houses featured on the Stroopwafels box. Roughly 1∶160 scale (n scale) to a real building.
127
458
2
2346
updated December 7, 2023
Description
PDFI modeled the Dutch row houses featured on the Stroopwafels box. These models are the same size as the picture on the box and roughly 1∶160 scale (n scale) to a real building. To create the models follow the steps below:
Note 1: the buildings are shown in the image from left to right as Building 3, Building 4, Building 5, Building 1, and Building 2.
Note 2: the windows can be difficult to print, make sure the print bed is level and has good adhesion.
Building 1:
- Print the windows. If they are not printing well try scaling up the size of the model.
- Print the front. To get the best surface finish on the front make sure there are one or two layers of infill.
- Print the back.
- Superglue the windows onto the front of the building.
- Superglue the front to the back of the building.
Building 2:
- Print the windows. If they are not printing well try scaling up the size of the model.
- Print the top and make sure to enable supports for this piece.
- Print the front. To get the best surface finish make sure there are one or two layers of infill.
- Print the back.
- Superglue the windows (except for the top one) onto the front of the building.
- Superglue the front to the back of the building.
- Superglue the top onto the back/front.
- Superglue the top set of windows onto the top/front.
Building 3:
- Print the windows. If they are not printing well try scaling up the size of the model.
- Print the front. To get the best surface finish make sure there are one or two layers of infill. A filament change can be added to make the front details a different color, if these details are not printing well try scaling up the model.
- Print the back.
- Superglue the windows onto the front of the building.
- Superglue the front to the back of the building.
Building 4:
- Print the windows. If they are not printing well try scaling up the size of the model.
- Print the top and make sure to enable all supports for this piece.
- Print the front. To get the best surface finish make sure there are one or two layers of infill.
- Print the back.
- Superglue the windows (except for the top one) onto the front of the building.
- Superglue the front to the back of the building.
- Superglue the top onto the back/front.
- Superglue the top set of windows and the top trim to the top.
Building 5:
- Print the windows. If they are not printing well try scaling up the size of the model.
- Print the top front face down.
- Print the front. To get the best surface finish make sure there are one or two layers of infill.
- Print the back.
- Superglue the windows onto the front of the building.
- Superglue the front to the back of the building.
- Superglue the top onto the back/front. Put the side of the top that was attached to the bed front-facing for the best surface finish.
These models were printed on an Anycubic Mega Zero 2.0 with a 0.4 mm nozzle in HATCHBOX PLA filament.
Model origin
The author marked this model as their own original creation.