Sehome Swerve Drive 2
Description
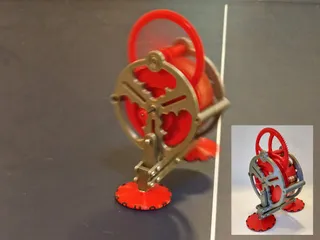
PDFThis swerve drive, nominally designed for FRC competition, is a lighter weight, but vastly simplified, version of my earlier swerve drive (https://www.thingiverse.com/thing:1135618). It is almost completely 3D printable. The heart of this design is the integrated low-profile steering bearing that uses 6mm Airsoft pellets as bearing balls. It also uses a twisted timing belt to simplify the mechanics.
Note that this design is for very lightweight robots - I wouldn't recommend a total weight per wheel of more than 20 lb or so. (The swerve unit itself weighs about 5 lbs.) It is also intended to be very fast - up to 20ft/sec! The wheel tread should be grippy enough for good acceleration, but you won't win and pushing wars. In fact, if you make the tread any grippier, you run the risk of breaking components in a collision (rather than the wheels just sliding on the carpet).
Also note: This design has only gone through very preliminary testing. As we do some more abusive testing, I'll post those results here.
UPDATE: So far, we've hooked it up and driven it around a little. Everything is operating quite smoothly so far. Next up is getting our full swerve drive control implemented so that we can really beat on it!
Print Settings
Printer:
UDIO
Rafts:
No
Supports:
Yes
Resolution:
0.2mm
Infill:
35%
Notes:
Print all parts with 4 perimeter lines, 4 solid top and bottom layers, and use a full triangular infill (3 sets of infill lines on each layer). After printing, clean up and blobs on any mating surface. And on the bearing race in particular, sand smooth any blobs or lumps left from printing.
Post-Printing
Bill of Materials
3D Printed Parts:
base plate
steering pulley
axle support
idler block
bearing inner race (steering bearing)
wheel
18 tooth, 8mm bore pulley (drive motor)
18 tooth, 6mm bore pulley (steering motor)
Fabricated Parts (see Solidworks model):
2 0.250"dia, 0.75L steel pins (idler block)
2 0.500" aluminum axle (wheel axle)
2 0.625 dia steel idler rollers (idler block)
Purchased Parts:
1 CIM motor (drive)
2 AndyMark CIM motor heatsink (drive motor)
1 NeveRest motor w/ 20:1 planetary gearhead & encoder (steering)
1 AMT-103 encoder (drive motor)
50 (approx) 6mm dia airsoft BB's (steering bearing)
1 104 tooth 3mm pitch GT3 belt (drive belt)
1 125 tooth 3mm pitch GT3 belt (steering belt)
1 608 bearing (steering idler bearing)
2 0.500" bore x 1.125" OD flanged bearing (wheel)
Fasteners:
8 8-32 nuts (6 for base plate, 2 for steering pulley)
1 10-32 nut (steering pulley)
1 3/8" washer (steering pulley)
1 1/4" washer (steering pulley)
4 M3 washer (steering motor)
2 #8 washers (steering idler bearing)
1 #10 washer (idler block)
2 0.25" bore by 0.010" thick shim washer (idler rollers)
1 1/4-20 x 1/2" hex head screw (axle)
1 10-32 x 1.425L socket head cap screw (idler block)
6 8-32 x 1/2" pan head screw (steering bearing inner race)
2 8-32 x 5/8" socket head cap screw (axle support)
1 8-32 x 1/2" pan head screw (idler block jack screw)
1 8-32 x 3/4" flathead screw (steering idler bearing)
2 4-40 x 5/16" flathead screw (encoder)
2 10-32 x 1/2" flathead screw (CIM motor)
4 M3 x 14mm screw (steering motor)
1 1/2" external retaining ring (axle)
1 2mm square key (CIM motor)
2 8-32 x 0.25" set screw (18t pulleys)
Assembly
The assembly process follows the posted photos
Photo 3: Start with the Steering Pulley. On the underside, press in the 10-32 nut into the center nut cavity and two 8-32 nuts in the cavities on either side.
Photo 4: Position the inner race so that the ball access holes line up and insert all 40 airsoft pellets in-between the races. (Note I originally designed a cover for the access hole, but the balls are actually really hard to get out even without the cover.)
Photo 5: Press six 8-32 nuts in the hex cavities in the base plate.
Photo 6: Assemble the CIM motor into the base plate with the 2 10-32 flathead screws. (Note the photos shows the 2mm key int hte keyway, but this doesn't go in until later.)
Photo 7: Modify the encoder base plate for 4-40 flathead screws by drilling the holes out to 0.110" dia. and then countersinking for the screwheads. Screw the encoder base to the base plate. (Note, the motor is not shown in this photo.)
Photo 8: Finish assembling the encoder as per the AMT-103 encoder instructions. At this point, you can put the key in the CIM motor shaft keyway.
Photo 9: There's not really any room for much of a connector, so solder the encoder wires directly to the encoder pins. It is not shown, but I then insulated the ends with a blob of hot melt glue. Snake the free end of the encoder cable underneath the face of the motor. You may need to loosen the motor to get the cable shoved through.
Photo 10: Assemble the steering bearing inner race to the base plate using the six 8-32 x 1/2" screws. For each screw, you'll need to rotate the bearing so that the access slot aligns with the screw hole.
Photo 11: Press the beveled ends of the two 1/4" pins into the idler block. Orient the pins so that the beveled faces press against each other inside the block.
Photo 12: Put one 1/4" shim washer on each pin. Apply a little grease to each pin and then slide the idler rollers onto the pins. The grease should be sticky enough to hold the rollers in place during assembly.
Photo 13: Slide the 18t pulley onto the CIM shaft (hub first), aligning the keyway in the pulley with the key. The end of the pulley should be about 1/10" past the end of the motor shaft. Secure with an 8-32 set screw. (Note: you will first need to tap an 8-32 thread in the pulley hub.) Next, put the 104 tooth belt over the pulley and screw the idler block down over the protruding ends of the belt using the long 10-32 screw and a washer. Note the belt twists so that the flat side of the belt rides on the idler roller.
Photo 14: Press the 1/2" bore bearings into either side of the wheel. Assemble the retaining ring into the groove on the axle.
Photo 15: Shove the axle through the wheel bearings, slip the 3/8" washer over the end of the axle and then push the axle through the hole in the steering pulley. Secure the axle in place with the 1/4-20 hex head screw and the 1/4" washer.
Photo 16: Insert the 8-32 x 1/2" jack screw into the side of the idler block but leave it barely engaged. Push the idler block all the way in so that the belt has the maximum of slack. Slip the belt up onto the pulley. Slide the axle support over the free end of the axle and secure in place with the two 8-32 socket head cap screws. Finally, carefully tighten the 8-32 jack screw to push the idler block out to tension the belt.
Photo 17: Screw the NeveRest gear motor to the base plate with the 4 M3 screws and washers. Slide the 18t pulley with the 6mm bore onto the motor shaft and secure with an 8-32 set screw.
Photos 18,19: Assemble the steering belt idler bearing to the base plate with the 8-32 flathead screw and two #8 washers.
Photo 20: Slip the 125 tooth belt over the wheel assembly, over the motor pulley and under the idler bearing. Loosen the 4 motor screws slightly and slide the motor back to tension the belt and re-tighten the screws.
Not Shown: Slip the two CIM motor heat sinks over the CIM motor and secure with a large zip tie. Position the head sinks as close to the base plate as possible without touching it. The CIM motors can get pretty hot, and without heatsinks, they will melt the base plate plastic. Even with the heatsinks, you should check to make sure your motors are not getting more than warm to the touch. Also note that if your motor is getting hot, it may be softening the pulley on the motor shaft. If so, you may need to switch to an aluminum pulley.
Photos 1,2: The base plate is designed with an integral channel for connection to 1" square aluminum frame members using heavy-duty zip ties. To keep the aluminum tubes form pulling out, you may want to stick a screw into the side of the tube just adjacent to the zip tie
so that the screw head will catch on the zip tie if it tries to pull out. Note that I used zip ties because they offer a certain amount of compliance to the frame to help absorb energy in a collision.
Category: EngineeringTags
Model origin
The author marked this model as their own original creation. Imported from Thingiverse.


