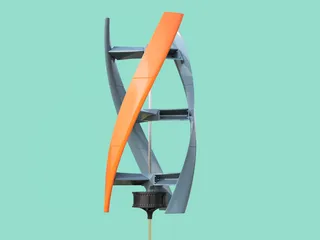
Project Aeolus: Vertical Axis Wind Turbine
Description
PDFNote: Please check out https://www.kickstart-design.com for product design inquiries. Based in Milwaukee, Wisconsin, Kickstart Design LLC is a product development I co-own/operate. We offer a wide array of services that help makers turn their projects into manufacturable products.
You can also check out my blog @ https://www.kickstart-design.com/blog
This is the first version of my vertical axis wind turbine. (V.A.W.T.) I've taken to calling the VAWT Project Aeolus, after the Greek god of wind. The goal of this project is to not only reduce my carbon footprint but also do it in an aesthetically pleasing manner. It is my belief that pure function is not enough to convince people to switch to clean sources of energy. When function is paired with beauty, a spinning bit of plastic can capture both clean energy and the imagination of those who view it.
This VAWT is composed of four easy to 3d-print parts. Its modular design offers two advantages. The ability to print individual parts means that it is more accessible to printers with a smaller build volume. Additionally, the turbine can be stacked to any height without compromising its structural integrity. In essence, this turbine is comprised of two types of vertical wind turbines. A helical Darrieus turbine, and a Savonius style wind turbine.
Please feel free to ask as many questions as you can! Even if it sounds like a silly question! I certainly learn an awful lot by reflecting on a process, or explaining why I designed something a particular way.
Print Settings
Printer Brand: Creality
Printer: CR-10
Rafts: No
Supports: Yes
Resolution: .2mm
Infill: 15%
Notes:
I've already accounted for tolerance in this model, but you may need to adjust it depending on your printer. The center piece is designed for a 12mmx26mmx9mm Thrust Bearing (https://www.amazon.com/gp/product/B002BBH8TW/ref=oh_aui_detailpage_o02_s03?ie=UTF8&psc=1) and the screw holes are designed for 12mm long, countersunk, m3 screws. I used 12mm linear rods (https://www.amazon.com/gp/product/B002BBJ0CA/ref=oh_aui_detailpage_o06_s00?ie=UTF8&psc=1) which are clamped together with 12mm clamping collars ( https://www.amazon.com/gp/product/B0020800IC/ref=oh_aui_detailpage_o08_s00?ie=UTF8&psc=1). These clamping collars also hold up the thrust bearings.
Post-Printing
Each hole on the Vane Component and Center Component must be tapped using an m3 tap (unless you are using different-sized screws). I would also recommend sanding the vanes to improve their aerodynamics.
I did a lot of experimentation with post-print finishing techniques for this piece. I did this to enhance both the form and function of the VAWT. Form from function and function from form being a major theme of my work. For the finish seen in the photographs, I first used a spray filler primer to smooth out the 3d print layers. Then I painted it using Montana Gold spray paint. (Montana Gold is the brand of spray paint. Gold isn't the color, they just call it that for some reason. It comes in loads of beautiful colors) Then I clear coated it using Montana's gloss varnish. (I always recommend using the same brand of clear coat and spray paint. Different brands sometimes chemically react with each other which can cause bubbles to form in the clear coat) And finally, I used a standard automotive clear coat polish to give it a mirror finish. (I also did some wet sanding in between each step, starting with 600 grit for the filler primer and finishing with 1500 grit before using the clear coat polish) It's time-consuming but there are no special resources required. I was amazed by the professional quality finish, despite using only spray paint! I am extremely fascinated with the post-processing of 3d prints.
As for the base, it's actually made from angle iron and iron round stock, which I tig welded together and then powder coated white. The stand is mainly for display purposes, so I could move it easily and subject it to light test winds. Heavier winds can blow it over, so it's not a permanent solution. Ideally, you would just drill a 12mm hole in a fixed structure, with some kind of fastening system, to securely attach it. I'm not sure if a 3d printed stand would be strong enough to safely secure it, but I'll definitely test it out and upload any functional stands. Accessibility being a major goal of this project, a printable stand would absolutely make the turbine more accessible to people without the same metalworking resources.
Tags
Model origin
The author hasn't provided the model origin yet.


