Ductinator CR-10/Ender 3/Pro/V2 /w ABL for Mk8/Microswiss/Volcano

Description
PDFThis is a remix of Madau3D's Ductinator fanduct for Creality CR-10/Ender3/Ender3Pro for use with an M8 or M12 size indcutive probe for bed leveling.
I've included both versions, one for Volcano style hot-ends on a stock-style heatsink (like I have, like this: link) or Microswiss heatsink. The other version is for stock Mk8 or Microswiss hot-ends
The Volcano version simply has elongated part cooling ducts to reach to the nozzle.
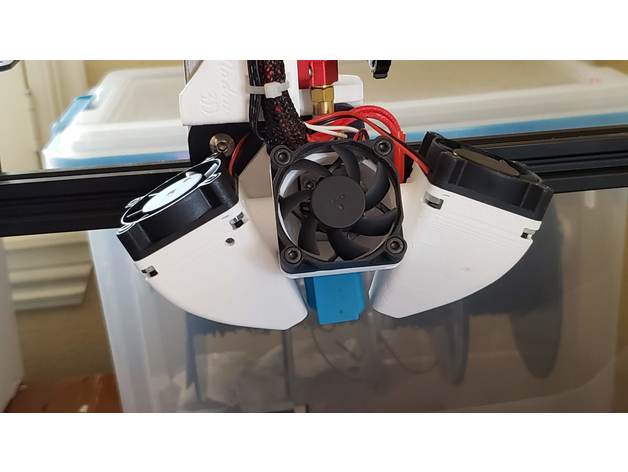
I made new versions that have integrated mounts for bed leveling probes jabbed straight through the middle of the center fanduct, directly in front of the hot-end.
The probe mounts have a 3.7mm hole for a set-screw. You can either thread/force a short M4 screw in, or heatset an M3 insert and use an M3 screw.
- M12 inductive probes (like the LJ12A3 series) offset: X0mm Y-24mm
- M8 inductive probes (like the Prusa P.I.N.D.A) offset: X0mm, Y-27mm
I also added a small block to the hot-end fanduct with two tiny 1mm holes in it to insert a piece of metal wire (like an unfolded paperclip) to be used as a very lightweight cable guide. (see photo's). Might need a little heat to properly insert.
Included in the downloads are Manau3D's Flowinator and Statorinator models. These are flow guides that aim to improve airflow through the partcooling ducts by keeping backpressure and turbulence to a minimum.
I've done some testing with different lengths of the Flowinators and Statorinators, and the results are in the pictures. Tests conclude that longer versions work better and larger and twisted vanes work better than short vanes. See pictures.
I highly recommend using the Flowinators/Statorinators in the part cooling ducts, they work great for me. I personally use the 30mm long Statorinators.
Also, I added a modified Flowinator that can be installed in the hot-end fanduct combined with a probe. The main aim of these is to guide airflow around the probe.
All of the Flowinator/Statorinator flowguides come in a version for fans with an 18mm hub and for a 24mm hub.
Assembly/Installation Instructions:
- (optional) Install heat-set M3 insert into probe mount.
- Install screw into probemount (either M4 or M3 /w insert).
- Install probe with it's head flush with the top hole.
- Install the M3x8 and M3x20 mounting screws.
- (optional) Insert Flowinators into part cooling ducts.
- Install part cooling fans with M3 nuts and appropriate length M3 bolts (my setup uses M3x30 with 20mm thick fans).
- (optional) Insert Flowinator into hot-end cooling duct.
- Install heatsink cooling fan with M3 nuts and appropriate length M3 bolts.
- Attach assembly onto X-carriage.
- Adjust height of the probe and set probe offset (see above for values) in your printer firmware/software.
- Adjust Z-offset on printer.
Tags
Model origin
The author remixed this model.


Differences of the remix compared to the original
Added an M12 inductive probe mount
Added an M8 (P.I.N.D.A. style) inductive probe mount
Added cable guide mount
Added Flowinator and Statorinator airflow guides, with modifications


