NeoGeo Open MVS - MV1B Case
Description
PDFUse a NeoGeo MV1B-Board (and case) with the Open MVS PCBs and Stereo Mod. It uses the original MV1B Shell.
There are 2 versions available. One Split-Version for “smaller” printers and one complete.
The front has an 8mm hole, that can be used for a 5mm LED with the LED Holder from @firstgizmo ( https://www.printables.com/model/625992-5mm-led-holder )
Necessary PCBs:
OpenMVS PCBs ( https://www.retrorgb.com/openmvs.html )
Neo Geo MVS Stereo PCB ( https://circuit-board.de/forum/index.php/Thread/25570-Neo-Geo-MVS-Stereo-RGB-Mod/ )
M3 Screws:
4x M3x5 (Open MVS PCB to Case)
4x M3x6 + 4x M3 Washer (NeoGeo MV1B to Case)
9x M3x8 (Case & Lid Connection - only necessary for the Split-Version)
4x M3x30 (Lid to Case)
Thread Insets:
12x M3Sx4.0 (4mm height, 4mm diameter) (4x Lid to Case, 4x Front Panel to Case (Split-Version only), 4x MV1B to Case)
13x M3x5.7 (5.7mm height, 4mm diameter) (4x Lid Connection (Split-Version only), 5x Case Connection (Split-Version only), 2x Rear PCB to Case, 2x Front PCB to Case)
Optional:
Noctua NF-A4x10 5V ( https://www.amazon.de/dp/B00NEMGCIA )
Instruction:
Stereo Mod PCB:
- Do the 5V Mod from Jamma Nation X ( For pictures: https://www.jamma-nation-x.com/jammax/tutorials.html#mv1b5v ).
Short: Cut the trace of pin 4 (or desolder AC4) of the C844G. Bridge pin 3 of the YM3016 with pin 4 of the C844G. - (Maybe Optional?): Desolder R91 and R92 from the back of the board.
- Solder a wire to Pin 8 or 9 of the C844G, this will be "Left In" on the Stereo PCB.
- Solder a wire to Pin 13 or 14 of the C844G, this will be "Right In" on the Stereo PCB.
- Refer to the Jamma Nation X MV1B Stereo Guide for Point C, this will be "Mix In" on the Stereo PCB ( https://www.jamma-nation-x.com/jammax/tutorials.html#mv1bstereo )
OpenMVS PCBs:
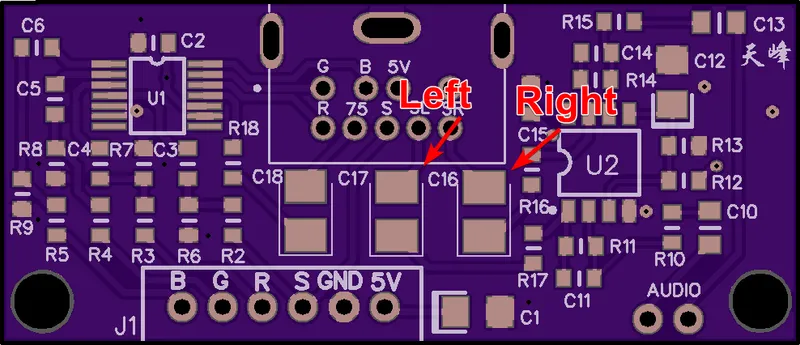
You don't need to solder the audio parts on the right side. Especially don't solder C17 and C16. From the Stereo Mod, go directly to the upper pads. C17 for the left channel, C16 for the right channel:
Tags
Model origin
The author marked this model as their own original creation.

