TARTARUS Canbus & SSR Module for Chamber Heater Enclosure for Voron 2.4

Description
PDF…Please be sure to hit like & post a make, I'd love to see your prints!
WARNING!
If you do not know how to wire this system correctly & safely I STRONGLY recommend you DO NOT attempt to print or use this model as you are dealing with potentiality dangerous situations with powerful heating elements & voltages if mains level is used!
All outcomes good or bad through the use of this or any of my other models or any information shared is totally 100% on you! I accept no responsibility or liability in whole or in part for any loss/damage/ingury/death to you or anyone else linked directly or indirectly through the use of this model or any information supplied here or elsewhere in my published works.
DIY ACTIVE CHAMBER HEATING IS POTENTIALLY DANGEROUS IF DONE WRONG!!
BY DOWNLOADING & USING THESE FILES & ANY ASSOCIATED INFO HEREIN YOU AGREE TO ACCEPT FULL RESPONSIBLY & LIABILITY FOR ANY & ALL RESULTING OUTCOMES OF THEIR USE. USE AT YOUR OWN RISK!
I provide no guaranty or promise that any information presented here is in any way accurate, safe or correct. Use it at your own risk.
You have been warned, do not burn your house down! Seriously don't be that guy!
…I mean it, please be sure you know what you're doing & that your install & setup is safe for you & your family!
Description
This all-in-one frame mounted backpack Canbus module is designed to be a Canbus network expander & housing unit for a EBB36 toolhead board & SSR for use with the…
As well as my remixed Voron Enclosure Top Hat
It will allow easy placement & access to this system on there rear of your machine while keeping the installation neat & tidy & the user safe.
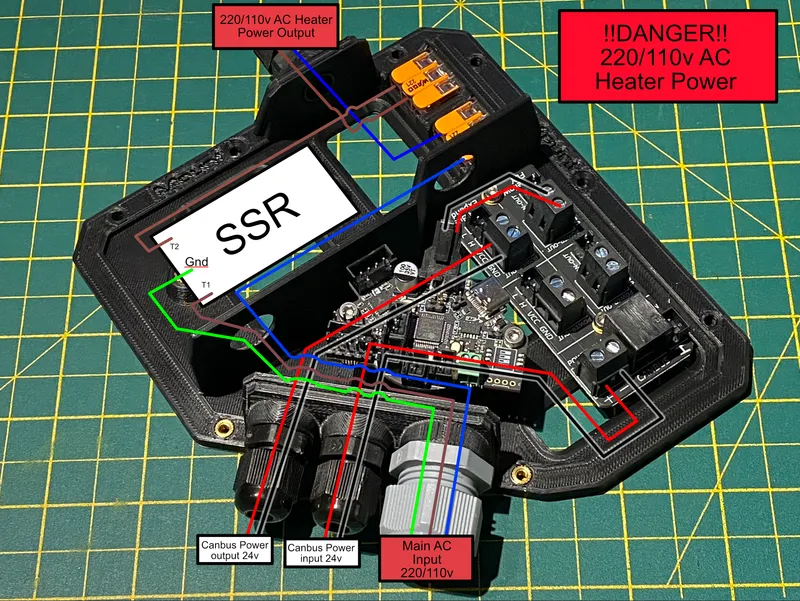
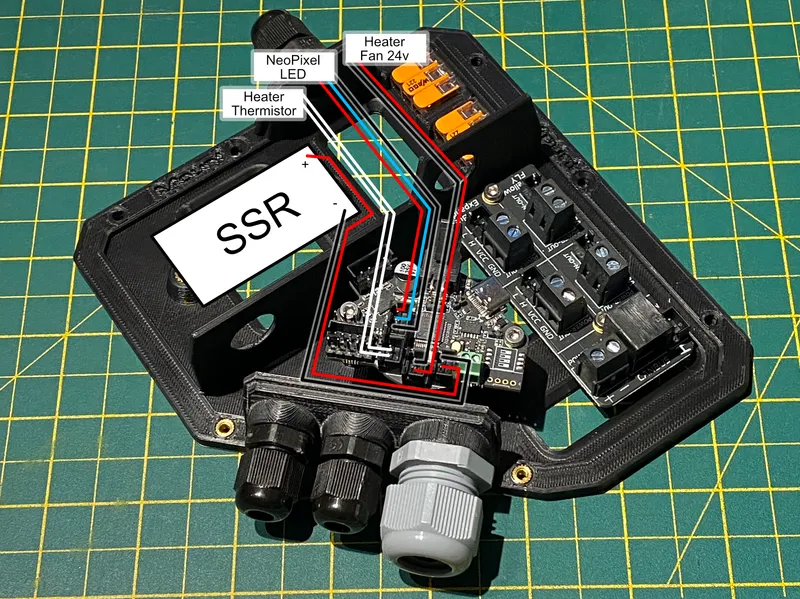
This module is designed for use with 12v/24v/110-220v PTC heating systems that are monitored & controlled by Klipper & that are correctly protected by the appropriate 120ºc thermal fuse. The module uses the PG13.5 cable gland to securely supply power to the SSR & internal Wago 221-413 connectors, then out to the heater core through the upper PG7 cable gland.
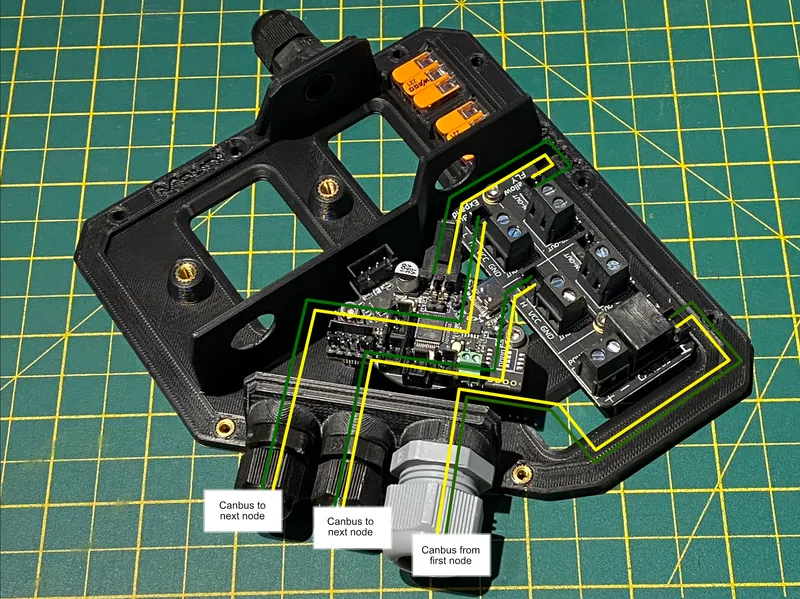
The module also allows a PG7 Canbus in connection to the Mellow Canbus Expand board to the internal EBB36 toolhead board via & then secure connections out to additional Canbus nodes on your system like your machine's toolhead.
BOM
BTT EB36 2209 toolhead board x1
Mellow Canbus Expand Board x1
Omron G3NB-210B-1 DC5-24 Solid state relay (SSR) x1
Note my stunt double cheapo SSR is not the above Omron! Be wary of cheap units!
Wago 221-413 connectors x2
Wago 221-412 connectors x4 - if using TARTARUS Can Module Frame Wago 221-412 v1.0
PG7 cable gland x3
PG13.5 Cable gland x1
M3 Roll in T-nuts x 6
M4 Heat set inserts x2
M4 8mm Cap head bolts x2
M4 washers x2
M3 Voron BOM heat set inserts (5x4mm) x6
M3 20mm Cap head bolts x6
M3 8mm cap head bolts x4
m3 14mm countersink bolts x2
Crimped stud spade connectors x5 - suitable for your gauge wire
Ferrule connectors for the Mellow board x6 min.
Printing
Print in ASA/ABS or better to Voron BOM specs.
NOTE: Although I have slightly oversized the printed threads on the TARTARUS Can Module Platform v1.2 model you must expect to chase the threads with either a correct metric thread tap tool or use heat to warm the thread so it will adjust & reform itself to the PG cable gland as you insert it & start threading it into the model! As if not the cable glands most likely WILL NOT FIT CORRECTLY!
DO NOT LEAVE A BAD REVIEW BECAUSE YOU DIDN'T READ THIS & DO WHATS RECOMMENDED ABOVE!!!
No supports are required on the models apart from the bolt holes on the TARTARUS Can Module Cover v1.2.
Assembly
Correctly install PG cable glands by using heat to thread, or tap to chase threads.
Install heat set inserts into correct hole on TARTARUS Can Module Platform v1.2
Click 221-413 Wagos into place, they're a tight & secure fit & should snap into place with a little force if your printer is dimensionally accurate & set up well & not over extruding.
Install EBB36 board in the lower central location using the TARTARUS Can Module EBB36 Spacer x2 standoffs & 2 M3 20mm bolts
Install the Mellow Cane Expand board lower right with 2 M3 8mm bolts
install the Omron G3NB-210B-1 DC5-24 Solid state relay (SSR) into the M4 heat set inserts upper left using 2 M4 8mm bolts & washers
Install the 6 roll in T-nuts into the upper rear right corner of the frame of your printer. Using the TARTARUS Can Module Frame Mount v1.0 as a positional guide for the T-nuts.
Slide the TARTARUS Can Module Frame Mount v1.0 under the TARTARUS Can Module Platform v1.2 & insert the 2 M3 14mm countersink bolts into the holes marked “Mount”
Offer the assembly up to the upper rear right corner of your printer & secure the unit in place using the countersink bolts
Proceed with safely wiring up your system taking extreme care when using high voltages for any type of heater!!
FINAL WIRING IS ON YOU! YOU MUST KNOW WHAT YOU'RE DOING! BE SAFE!
When installing the TARTARUS Can Module Cover v1.2 be sure to use the M3 8mm bolts on the lower left holes either side of the 3 lower PG cable glands!
24v DC Power Wiring
Make sure you PSU has enough headroom to run all parts of the system, the heater & whatever else you're running on the Canbus network.

220/110v AC Power Wiring - DANGER!!
This setup is potentially highly dangerous if done incorrectly or if you go poking about in here when the cover is removed & the printer is powered!
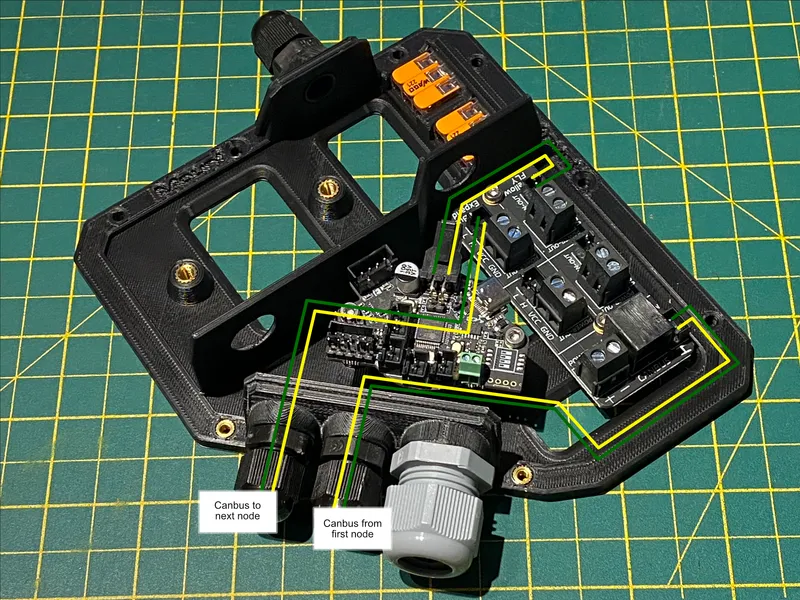
Required EBB36 Connections
Canbus Connections
There's a couple of easy options for Canbus connections depending on which setup above you went with.
Recommended For a 24v DC Setup
Recommended for a 220/110v AC Setup
Macro Control
If you need some macros check out my highly adaptive & automated macro pack! Suitable for most Klipper printers.

Model origin
The author marked this model as their own original creation.


