Open lathe V1


Description
PDFUpdates
23/10/2024: Uploaded main base and headstock files
29/10/2024: Uploaded STEP file and tooling files, added (most of ) the BOM with links.
10/12/2024: Uploaded main body build guide, replaced:
-back right lower, added a slight bezel for threaded inserts
-bed left lower, added ability to better secure headstock coupling nuts
-lower back left, added slight bezel for threaded inserts
-glue spacer, added the hole that needed to be there
-uploaded “special half insert”, thread insert specifically for the lower right of the potentiometer housing
**Parts printed before this date all still work, aside from the glue spacer**
PARTS SOURCING DOCUMENT (90% done):
https://docs.google.com/document/d/1R_BDKDOh9Rerl6iLMlbkM8yhbjUIDVkg0Ww5D5unsyc/edit?usp=sharing
Build guides:
Main body/ Base: https://docs.google.com/document/d/1QNEVx6yvjnJLP0sRS6cpBE0vMcSLvABnK0ZUunaddb8/edit?usp=sharing
(safety disclaimer) the large disc turning is not really the intended use of the lathe and was really just a torture test, the tool caught a lot and just stalled the motor but with a larger motor this could be quiet dangerous. This lathe is really meant for less than 10mm parts.
Also, DO NOT USE GLOVES
On the topic of "hand tools should not be used for metal parts", this is not a new concept and small parts have been turned this way for centuries and still are by some. Sherline sells tool rests for this type of tooling for their lathes. I understand the safety concerns but the motor here is tiny, 1000rpm and taken from a printer. Even on the large off center workpiece with giant saw notches to catch the tool, I never felt any force of note because the motor is just too small. When the tool did catch the motor would just stall. That being said if you are considering this project, dont do anything stupid like put a treadmill motor on it. Accept that it will be a bit slow for your own safety.
Some good info on graver turning:
https://sherline.com/wp-content/uploads/2015/09/gravers.pdf?srsltid=AfmBOorDXRdacZ5UO1EG9wqErR90DZ6Ee86LoJqJ55zjTkErSSOD5IvN
Basic cuts:
https://youtu.be/gK-5s5jAg0c?si=RDDglpCMbMSkIXZC
https://youtu.be/gCb_ZHGb9ws?si=0E6zUO8Gu4-_XFFB
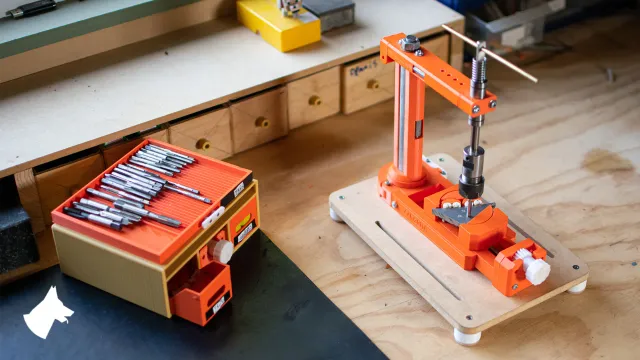
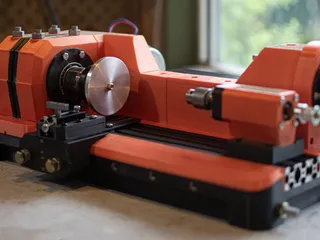
A printed lathe has been a goal of mine for some time. Ive always seen a space for a cheap diy lathe that anyone could make while still providing decent utility.
Open Lathe is my answer to that. A printed shell full of concrete and costing between 100-150 AUD (66-100 USD) INCLUDING basic tooling, Open Lathe is a very open way to dip ones toes in basic machining.
Despite its size, it doesn't use much filament! the entire lathe is less than 1kg of PLA which for something 44cm long, isn't half shabby. The key to this and its strength is the concrete which it is filled with, providing much needed stiffness and vibration dampening that plastic just doesn't have.
Video:
I am going to chip away at a written tutorial for this over the coming weeks rather than rely on a video guide that doesnt really get much of the information across. 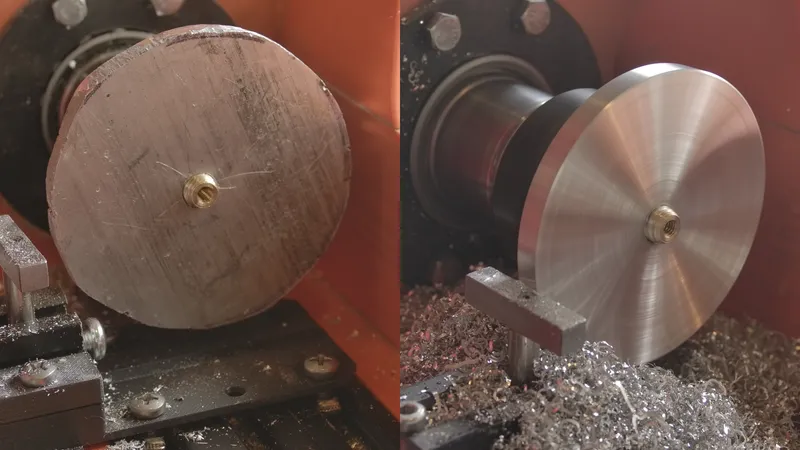
This tourture test was what gave me a lot of confidence in the machine. a 70mm ish 8mm aluminum blank I (very) poorly cut out with a hacksaw, lopsided by at least 5mm if anything was going to shake the lathe to pieces it would be this, but the lathe held up with 0 problems.
Ill be updating this page as I have time over the coming days.
Model origin
The author marked this model as their own original creation.