Creality K1, K1C & K1 Max Glass Sub Bed Mod

Description
PDFCreality K1, K1C & K1 Max Glass Sub Bed Mod
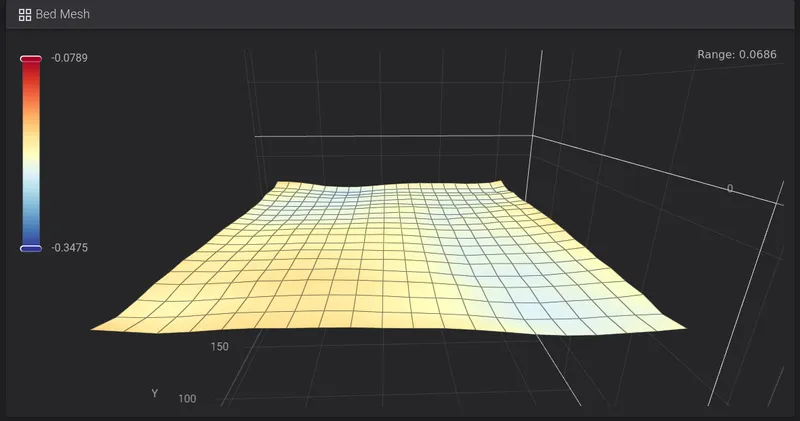
Why? everyone's seen it. the horribly warped stock Creality beds. Some people get around this by buying expensive machined aluminum plates. But mods add up and things get expensive fast, so lets not do that. This is a cheap mod costing as low as $30 if you already have replaced your bed probe and the results are hard to argue with! Cost of mod varies depending on Your region.
Help support my work with Ko-Fi
Please note this mod while easy does near permanent modification. while you can revert back, its unlikely you would want to.
Note - They say glass breaks. Trust me, it wont.
UPDATE - Added low profile versions for compatibility with the Cartographer 3D Probe mount
Youtube Video Walk Through
Have questions? Join the ZeroDotCMD Discord.
What you will need
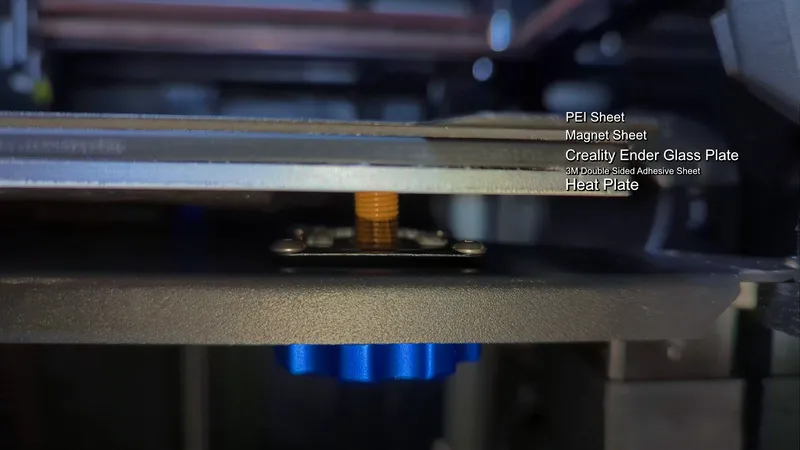
K1 & K1C Glass Plate - Creality Ender Glass Plate - Amazon Affiliate Link - You can use any glass you want providing it fits the plate, but this is cheap and it works.
K1 Max Glass Plate - Creality Glass Plate for K1 Max - Amazon Affiliate Link
K1 Max Note - The K1 Max has a grounding strap that is riveted onto the heat plate. this rivet needs to be drilled out so it doesn't interfere with the glass bed. You'll want to get a larger screw and force thread it to fit the larger sized hole. make sure this screw does not protrude out the other side, as it will interfere with the glass.
Optional - Tuning Knobs/Springs - Amazon Affiliate Link - Note these knobs fit perfectly. larger knobs wont fit due to the frame. Knobs Max Z - If you decide to use the knobs you will need to make sure to adjust your max z so the knobs will not drive into the bottom of the printer. You'll want to reduce this by 10mm to be safe.
K1 & K1C - PEI plate with Magnet Sheet - Amazon Affiliate Link - Note if you purchased the Creality B plate you should have this, unless you threw it away.
K1 Max - PEI plate with Magnet Sheet - Amazon Affiliate Link
K1 & K1C - 3M Double Sided sheet - Amazon Affiliate Link - This sheet has been tested at max temp and found to be perfect.
K1 Max - 3M Double Sided Sheet - Amazon Affiliate Link - This is the largest high temp 3M sheet I have been able to find. It is very slightly under sized but will still work. Make sure to center the sheet on the plate.
Modded firmware - Simple AF by pellcorp is the only recommended firmware. This firmware supports various bed probes.
Bed Probe - Since we will be deleting the heat plate stand offs a new probe is needed. don't worry they are far more accurate and come with some nice features. Check with Simple AF for probe options if you don't already have one.
Probe - This mod does require a new probe. I currently am recommending the Big Tree Tech Eddy - Amazon Affiliate Link. I have also provided a mounting solution for this probe. Mounting Solution
Knobs Optional - Not everyone likes knobs! If you would like to not use the knobs simply do step #1 and #4 then skip to step #6
Printing the channel
I highly recommend this channel be printing out of something like Nylon Carbon Fiber since it will be attached directly to the heat plate!
Note- Make sure to look at the photos for reference.
Here we go!
#1 - Removing the stock magnet sheet
First we need to remove the stock magnet sheet. to do this you will want to heat your built plate up to 80C. Once the plate is heated up slowly start removing the stock magnet from the front two corners. Once you have the front of the magnet up you should be able to slowly roll/pull it towards the back. be patient! yanking on the magnet can and will throw your z screws out of step! Once you have the magnet pealed away you can do what ever you want with it. throw it away, stick it on the fridge. doesn't matter
#2 - Prepping the printer
Before we turn off the printer move the build plate to the center of the z axis. meaning put the build plate in the between the top and bottom of the printer. Once you've done this you can turn the printer off.
#3 - Removing the build plate load cell & stand offs
Next we want to gently move the tool head to the back left of the printer. Don't worry you wont hurt it now that the motors are off. There will be 8 screws that need to be removed. you should have the tool for this in your tools from Creality. there are 4 screws on top and 4 screws directly under each stand off. First we want to remove the top 4 screws. After removing the screws you will be able to pick up the plate and lean it towards the right side of the printer, Don't pull on it, there are wires that we don't want to break. We need the heat bed to remain out of the way while we work. gently take the took head and move it over to hold the heat plate up. Once this is done remove the bottom 4 screws from the stand offs. You will have to hold the stand offs as you remove the screws from underneath the frame. Keep these stand offs as we will be repurposing them. put the extra screws back in the tool box from Creality.
#4 - Installing the New Back Channel
Now we want to install the new back channel. Take the two indexing screws from the top of the heat plate and thread them into the bottom of the new channel. Next, we will screw the new channel into the underside of the heat plate. Make sure the channel is flush with the heat plate; you don't want a gap between the channel and the heat plate.
#5 - Knobs and Springs
Now for the fun part. You'll want to get your knobs ready. Set them inside the printer on the bottom. The hardest corner to do is the back right corner, so let's do that first! Take one of the screws and place it through the back right of the plate. After doing this, slide the spring on and line the screw up with the hole where you removed the load cell standoffs. Do this step for the rest of the holes.
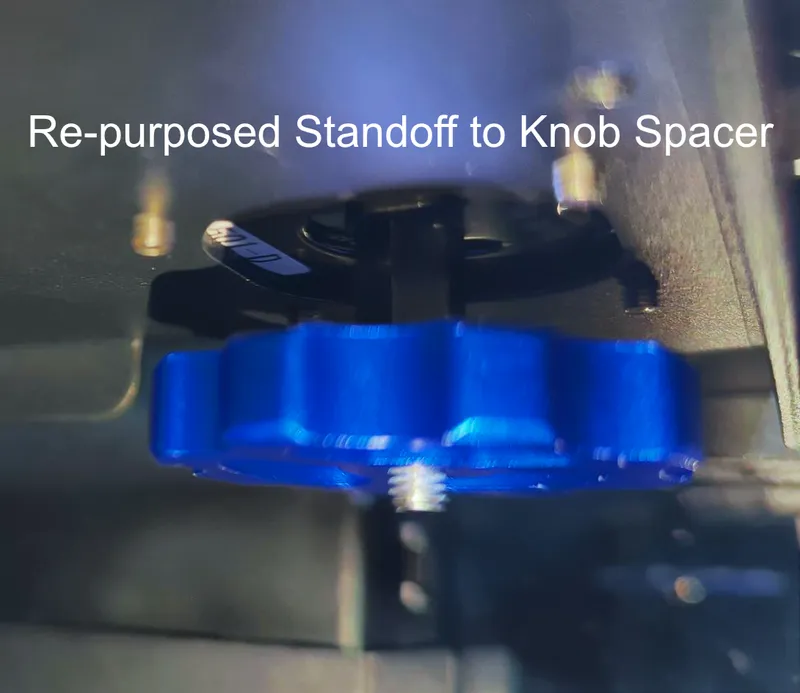
Now that you have all your springs and screws in the correct place, we need to take the old standoffs and repurpose them. You'll need to take a drill and slowly de-thread the standoffs. Go slow; these are plastic and can easily be messed up. I recommend holding the plastic standoffs with a vise or a set of pliers as you drill through them. Don't go too large on the drill bit; we just want to make sure these slide easily over the new screws sticking out of the bottom of the build plate frame.
Once you have the standoffs prepped, place them underneath the build plate frame on the new screws and thread on your new knobs! Tighten the knobs all the way down for now. You'll end up leveling these later. Don't go crazy; they don't need to be “tight,” they just need to bring the four corners of the build plate down.
#6 - Prepping the Glass
Next, we need to get the glass ready. Take your glass and wipe it down with alcohol; we want to make sure there's no grease or oils on the glass. Once the glass dries, take your 3M adhesive sheet and slowly place it on the textured side of the glass plate. Don't lay the sheet flat; you want to go slowly from the front to the back, almost rolling it on to ensure there's no air bubbles. Once you have the sheet applied, take a razor knife and slowly remove the extra from the edges. Cut from the top side with the protective backing still on it.
#7 - Applying the Magnet
OK, now it's time to apply the magnet sheet. It's very important to take this slow and methodical, as this can greatly impact our final results. Slowly peel back a section of the magnet sheet and start applying it on the smooth side of the glass “opposite of the adhesive we just installed.” You'll want to again slowly roll the magnet starting from the front until you reach the end. Make sure you pay attention and slowly slide your finger back and forth as you roll the magnet sheet on. Again, it is very important that we make sure there are no bubbles. If you mess this step up, it's OK. We can slowly peel the magnet off and try again!
#8 - Placing the Glass
This part is important and one of the only parts where you only get one shot to do this right! Now we're going to place the glass on the heat plate! This is the fun part! Make sure to wipe down the heat plate with alcohol and let it dry before placing the glass. Once you're ready, place the back of the glass into the back indexing channel. Make sure the glass is aligned snugly all the way back in the channel. Don't overpress; just make sure you're snugly fit. Once you're ready, slowly lay the glass down on the bed. Again, make sure to take your time. This is the only step where second chances are rare!
Congrats! Now you have a Glass Sub Bed modded K1/K1C
Firmware and probes are outside the scope of this walk through. I highly recommend checking into Simply AF They have a helpful community that is friendly and very welcoming to new people looking for assistance!
Special thanks to pellcorp for his work on Simple AF without it this mod would not be possible!
Last Minute Notes & Firmware adjustments
Knobs Max Z - If you decide to use the knobs you will need to make sure to adjust your max z so the knobs will not drive into the bottom of the printer.
Once you get your printer up and running on the new firmware it is recommended to run your bed at 100C for 20 minutes to make sure the bonding of the new bed is stabilized. Once that's complete lets the bed cool all the way down before warming it up to your desired printing temperature for calibrating your bed mesh.
Tags
Model origin
The author marked this model as their own original creation.


