Alarm Clock ESPHome (D1 Mini)

Description
PDFComponents needed:
| 1 | Rotary Encoder | [Aliexpress] |
| 1 | Pushbutton 5V 12mm | [Aliexpress] |
| 1 | Switch | [Aliexpress] |
| 1 | D1Mini v4 | [Aliexpress] |
| 1 | TM1637 Display | [Aliexpress] |
| 4 | M3x8 Screws | |
| 4 | Heatset Inserts M3 | |
| 4 | M3x6 Screw | |
| 4 | M2.5x6 Screw |
Also needed to work:
1x Homeassistant
1x Smartspeaker (I use IKEA SYMFONISK)
How the alarm clock works:
Set the alarm time with the rotary knob
If the alarm time is reached esphome will send homeassistant the request to execute the script “script.ring_alarm_clock” an example is added to this repo (ring_alarm.txt")
Press the button on top to snooze the alarm and hold to stop the alarm. Double-click the button to toggle if the alarm clock is active (button light indicates state).
For both actions a homeassistant script is executed (script.snooze_alarm_clock [snooze_alarm.txt] & script.stop_alarm_clock [stop_alarm.txt])
If you build multiple clocks you can define an owner in the esphome.txt/substitutions/owner. The argument gets passed to the scripts as the field "clock_owner". I use it to set the different songs we want to listen when I/my partner wake up.
Misc.:
The switch on top overrides the display timeout so the display stays on all the time.
If you hold the button of the rotaryencoder the current time is shown.
If you doublepress the button of the rotaryencoder the display switches between current time and target time
Wiring:
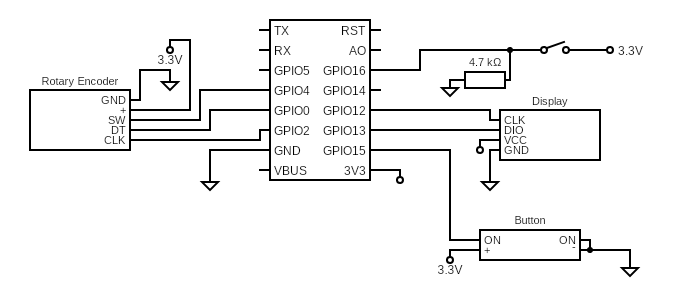
If you dont want to include the resistor for the switch you can use the internal pullup of the D1Mini
Printing:
Print with support.
I used:
0.2mm Layer Height except for the top part of Base.3mf
0.4mm Nozzle width
Files:
If you want to use other components i added the Step and Fusion360 files.
Have fun tinkering!
Tags
Model origin
The author marked this model as their own original creation.