Physical models for teaching DNA structure and DNA-protein interactions

Summary
PDFThe focus of the target group
The target group is represented by Bachelor or Master level students enrolled in a Biology or Biochemistry program. We focus on students that upon graduation, will become biology and chemistry teachers in schools and high schools. This will develop a community of future teachers that realize the potential of 3D printing for creating the missing and much-needed teaching materials for teaching structural biology in any life-sciences field.
Necessary knowledge and skills
Language: students are required good skills in reading a scientific text in English.
Structural biology: students should be able to recognize basic structures, such as nucleotides, protein alpha-helices and beta-sheets. Students should understand the significance of different representations (balls and sticks, cartoon, surface) of molecules.
Computer and 3D modeling good working condition with computers is a must; students should know how structural data can be searched and downloaded from PDB; students should know how to display a molecular structure in ChimeraX, switch between different representations and have basic knowledge in using the ChimeraX command line interface;
3D printing: skills and knowledge not required for students. The students will be introduced in 3D printing by the teacher, which will also be in charge of the 3D printing process.
Project objectives
After completing this project, the students should be able to:
a. Identify atoms, nucleotides, amino acid side-chains and protein domains that are relevant for DNA function;
b. Design 3D printable models of DNA and proteins using common molecular modeling software such as UCSF ChimerX;
c. Rate the impact of 3D printing as a tool to create materials for teaching structural biology in any life-sciences field.
The tangible result of the project are painted models of DNA that students would take home for bragging rights. Another tangible result are 9 models of well-known protein domains and DNA-protein complexes that will be used by faculty teachers in their lessons.
Required equipment
IT Hardware and software: computers (mouse is a must when using laptops) with internet connection for accessing PDB (https://www.rcsb.org ) and ChimeraX pre-installed. ChimeraX is available at: https://www.rbvi.ucsf.edu/chimerax/ .
3D printing hardware and software:: Any FDM printer capable of printing flexible filament extruder will work. The project was done using a modified Creality Ender 5 and a Kingroon KP3S Pro printer. Slicing software: PrusaSlicer.
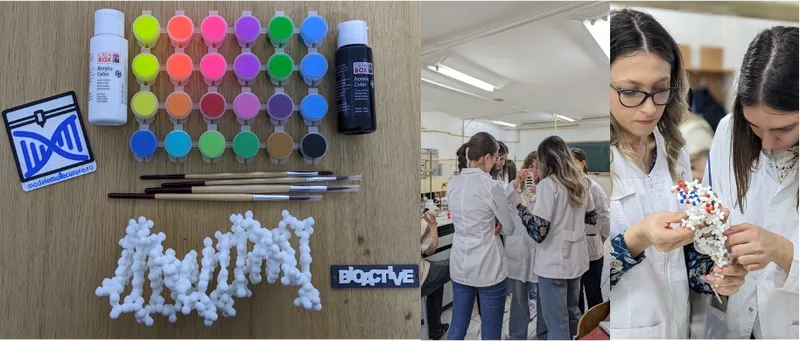
Other tools and components: small pliers and small screwdrivers used for support removal, acrylic paints, and brushes, beakers for water during painting, paper towels, gloves for students during painting, video projector.
Project time schedule
Converting the PDB files to .stl files: We averaged one hour per each model presented here, including creating the instructions for students. If the same models are to be used, stl files and instructions are provided, so no time is involved if the teacher is already accustomed with ChimeraX;
Printing time: 1 day 16 hours for the DNA model, on average two days for every other model, 9 models in total.
Support removal: by far the most labor-intensive step, on average 1-2 hours per model;
Total time spent working on the project: 36-48 hours, not including printing time.
Workflow
The project's focus is to make students discover the structural features of DNA and how proteins interact with DNA. The second focus is to make students discover how easy is to create 3D molecular models useful for teaching. Hence, most of the 3D printing itself takes place without the students.
The project consists of 4 steps involving the students (working independently or working in teams) and 2 steps involving 3D printing where students are only marginally involved.
Step 1. Designing a 3D printable model of DNA double helix – day 1, approx. 2 hours, students working independently at computer, teacher and assistant intervening when required.
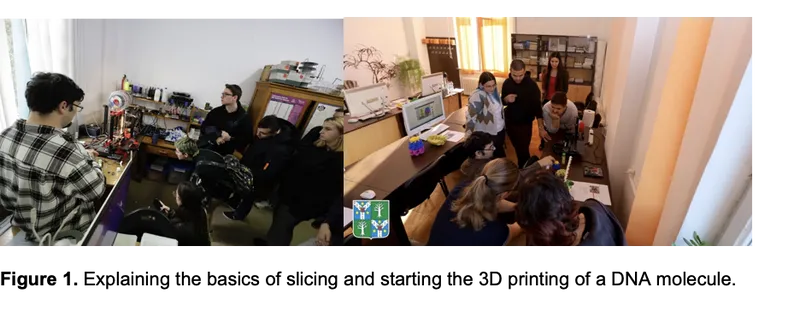
The lesson starts with a presentation by the teacher focusing on how can we use 3D printing to create molecular models – attached file: 3d-printig-molecular-models-presentation.pdf. Students then receive a printed sheet with instructions on how to create a DNA molecule starting with 1BNA PDB entry – file dna-modelling-instructions.pdf. Each student works independently at his computer and saves his .stl file for printing (example file attached - B_DNA_Balls_sticks.stl). The stl file is further loaded in PrusaSlicer and sliced by the teacher, which re-iterates the principles of FDM printing using the slicer. The gcode file (not included) is further sent to the printer (via sd-card, usb connection of Wi-Fi-connection, depending on the printer) is sent to the printer. It is mandatory that the students see the printer in action see the first few layers of the print.
Step 2. Printing a DNA model in TPU – 1 day 16 hours printing time for one model, no. of models depending on the class size; students not necessarily involved.
The model generated by students (or B_DNA_Balls_sticks.stl) is printed in TPU, scale factor of 400%, 5 perimeters, 1.6 mm minimum shell thickness for top and bottom, support is mandatory, outer brim only, 4 mm brim width. We usually print 3 models and involve volunteer students to take part in support removal. If Step 1 and Step 2 are in consecutive days, models need to be printed before handed.
Step 3. Painting the DNA model using acrylic paints – day 2, approx. 2 hours, students working in teams of 4-5, teacher and assistant intervening when required.
The lesson starts with a short presentation (10-15 minutes) by the teacher (file presentation_painting_models.pdf attached, pages 1 to 4) focusing on the CPK color scheme and indicating the task for students: use the acrylic paint provided to color all the phosphorus atoms in the model, as well as at least a GC and a AT base pair.
Teacher projects page 3 from file presentation_painting_models.pdf containing structures of nucleotides to help students identify atoms. Students must be focused on correct atoms numbering in order to identify nitrogen and oxygen atoms. The students should be able to answer to the following questions at the end: which one is the 3’-5’DNA chain? where are the phosphates in the molecule? where are the nitrogens in the molecule? what are the biological implications of this arrangement (in relation with the major/minor groove and proteins accessibility)?
The first tangible result should be ready at the end of the activity – a colored double DNA helix. The model can be taken away by the students, but they need to bring it back for Step 6 when will be really helpful.
Step 4. Designing 3D printable model of DNA-binding domains – day 3, approx. 4 hours, students working in teams at computer and studying the provided scientific articles, teacher and assistant intervening when required.
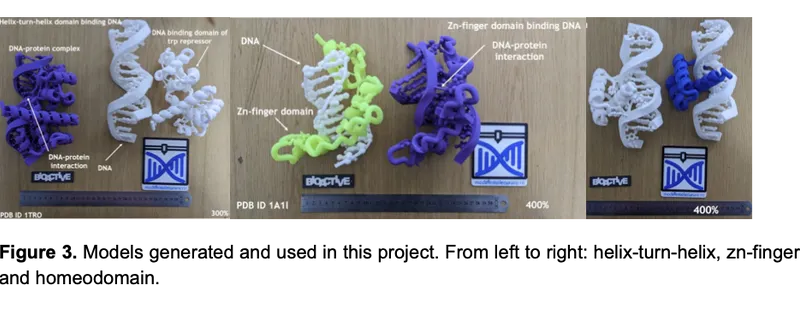
Students are organized in 3 teams, each team receiving a printed sheet with instructions on how to create models of 3 different DNA-binding domains: Zn-finger, helix-turn-helix and homeodomain. Each printed instruction sheet is associated with a scientific article that the student will study in order fulfill their task. At the end, each team will deliver 3 .stl files, corresponding to the DNA-binding domain it-self, the DNA molecule and the complex between the DNA-binding domain and DNA highlighting the protein DNA interactions.
Step 5. Printing the DNA-binding domains models in PLA. Printing time varies depending on model, but we averaged 2 days of printing time / model, so expect more than a week of printing time; if step 4 and step 5 are on consecutive days, the models need to be prepared before handed; also add a couple of hours for support removal for each model; students not necessarily involved.
The models generated by students (or the one provided here) are printed in PLA, scale factor of 300-400% (or a bit less, depending on the printer size), 5 perimeters, 1.6 mm minimum shell thickness for top and bottom, support is mandatory, outer brim only, 4 mm brim width. Support are extensively used and require a lot of patience to remove.
Step 6. Painting the DNA-binding domains – day 3, approx. 4 hours, students working in teams of 4-5, teacher and assistant intervening when required.
The lesson starts with a short presentation (10-15 minutes) by the teacher (file presentation_painting_models.pdf attached, pages 5 to 12) presenting the two tasks for each team:
a. using the two models representing the DNA molecule and the DNA-binding domain it-self, match them together to recreate the complex;
b. using complex model, identify and paint atoms from amino acids that are involved in protein-DNA interactions.
At the end of the class, the students should summarize that 1) proteins interact with DNA at the major groove 2) protein-DNA interaction can take place between amino acid atoms and atoms from the nucleotides as well as atoms belonging to the ribose-phosphate chain and that 3) only interactions between the amino acid atoms and nucleotide atoms is how proteins read DNA.
The second tangible result consists of all the 9 models created and painted by the students in this last step. The models can be taken home by students as trophies or share among faculty teachers and used for teaching and for demonstrations.
At the end of the project, an online form was used to get students’ feedback in an anonymized manner. The students appreciated that the classes were “more engaging, not a simple presentation of data and facts”, “well organized and the models help you learn easier”, “verry practical, I especially loved when we had to paint the DNA models”.

Authors
Model origin
The author marked this model as their own original creation.