MMU Loading Fork

Description
PDFZum deutschen Originaltext gehts nach unten!
--------------------------------------------------------
Push your MMU3 on the next level!
You have an original Prusa MMU3? THIS is your musthave!
Do you have an MMU but you are annoyed by the process of putting in/out of the cassettes when loading new filament?
Do you have little space and find it difficult to get behind the buffer?
Do you have an enclosure and want to integrate the buffer, but then you would no longer be able to load filament?
Here comes your solution!:


Simply insert the MMU loading fork from the front into the MMU slot to be loaded and start the loading process on the printer.
Now you push the filament through the PTFE tubes directly from the spool to the MMU without getting stuck in the buffer or having to partially dismantle it! Just awesome!
Now you can take the fork out again and load the next filament in the same way!
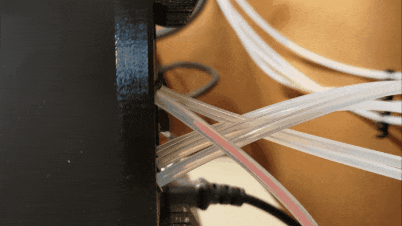
Inside of the buffer it looks like this:
The brand new version MK2 comes with tons of improvements! Here are the most notables:
- Completely redesigned fork tip no longer has any loading errors.
- Through-hole to permanently connect the two parts using a leftover piece of filament.
- Handy PETG profiles with easy-to-remove PLA supports.
- Adjusted length so that the fork rakes into the MMU and never accidentally comes out again.
- Can be stored directly between the printer and the MMU buffer.
- Update 04/21/2024: Released an improved version for MK3.9 and MK4 with MMU3 (or all buffer units converted to R4)
- Update 05/16/2024: Redesign of the buffer plate holder so that it can be screwed on and locks into place at any point as well as before in slots 1+5. This is optional but recommended (you will also need 2x M3x30mm screws and 2x M3 nuts).
- Update 09/29/2024: Redesign of the fork tip for easier insertion into the buffer.
I've collected accessories and cool stuff for the fork in this collection. Check it out!
Printing instructions:
I recommend the .3mf file, which I created for Prusaslicer and which contains all the necessary adjustments. You can use the tolerance test for fast checking if your printer configuration suits this model. If not, please contact me.
If you don't want to use preconfigurated 3mf-files, please use the following settings:
Infill: 10% (easily enough)
Perimeters: 2-3
Layer height: I use 0.30mm, you are free to reduce it.
Supports: Painted supports on the fork tip. I like to use seamless supports with a contact layer in PLA (when printing in PETG).
Hints:
- Assembly should be done in the orientation in which the parts lie on the print bed. After assembly, you should be able to see both top sides on one side of the model and both bottom sides on the other side. It should then look like the first example image shown at the top of the page.
- If your print fails due to spaghetti within the model, you should significantly increase the purging volume!
- It might be helpful to assign the supports and the purgetower to the main material extruder
- For more information or problems when printing with MultiMaterialSupports, I have created a guide for you, which you can view HERE. You can also find a test file there.
At this point I want to say a big thank you to Chris Hill for his countless test prints for the newest R4 model!
![]()
Originaltext (deutsch):
-------------------------------------
Bringen Sie Ihr MMU3 auf die nächste Stufe!
Du hast eine original Prusa MMU3? DIES ist für dich ein Musthave!
Du hast eine MMU aber dich nervt das rein/raus der Bufferkassetten beim Beladen mit neuem Filament?
Du hast nur wenig Platz und kommst nur schwer hinter den Buffer?
Du hast eine Umhausung und willst den Buffer integrieren, aber du könntest dann keine Spulen mehr laden?
Hier kommt deine Lösung!:
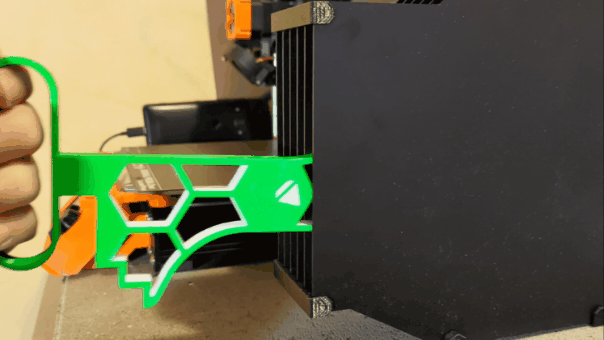


Steck einfach die MMU Loading Fork von vorne in den zu ladenden Schacht der MMU und starte den Ladevorgang am Drucker.
Nun schiebst du das Filament durch die PTFE-Schläuche direkt von der Rolle bis zur MMU ohne im Buffer hängen zu bleiben oder diesen teils demontieren zu müssen! Einfach genial!
Jetzt kannst du die Fork wieder heraus nehmen und auf die gleiche Weise direkt das nächste Filament laden!
Innerhalb des Buffer sieht das Ganze dann ungefähr so aus:
Die brandneue Version MK2 bietet jede Menge Verbesserungen! Hier sind die bemerkenswertesten:
- Komplett neu gestaltete Gabelspitze weist keine Ladefehler mehr auf.
- Durchgangsloch zur dauerhaften Verbindung der beiden Teile mit einem übrig gebliebenen Filamentstück.
- Handliche PETG-Profile mit leicht zu entfernenden PLA-Stützen.
- Angepasste Länge, damit die Gabel in die MMU eindringt und niemals versehentlich wieder herauskommt.
- Kann direkt zwischen dem Drucker und dem MMU-Buffer aufbewahrt werden.
- Update 21.04.2024: Eine verbesserte Version für den MK3.9 und MK4 mit der MMU3 wurde veröffentlicht (oder alle auf R4 umgerüsteten Buffereinheiten)
- Update 16.05.2024: Neugestaltung des Bufferplattenhalters, sodass dieser angeschraubt werden kann und an jeder Stelle so gut einrastet wie zuvor in Slots 1+5. Dieser ist optional aber empfohlen (Ihr benötigt in diesem Fall noch 2x M3x30mm Schrauben und die entsprechenden Muttern).
- Update 29.09.2024: Neugestaltung der Ladespitze für einfacheres Einführen in den Buffer.
Ich habe euch Zubehör und cooles Zeug für die Fork in dieser Kollektion gesammelt. Schaut mal rein!
Druck:
Ich empfehle ich dir die .3mf-Datei, welche ich für Prusaslicer erstellt habe und die alle notwendigen Anpassungen bereit hält. Du kannst den Toleranz-Test nutzen um schnell zu erkennen, ob deine Druckereinrichtung zu dem Modell passt. Wenn nicht, kontaktiere mich und wir finden eine Lösung.
Wenn du nicht die vorgefertigten 3mf-Dateien nutzen willst, nutze bitte folgende Einstellungen:
Infill: 10% (reicht locker)
Perimeter: 2-3
Layerheight: ich nutze 0.30mm, du darfst diese gerne reduzieren
Stützen: Aufmalstützen an der Forkspitze. Ich nutze gerne nahtlose Stützen mit Kontaktschicht in PLA(wenn ich in PETG drucke).
Hinweise:
- Der Zusammenbau sollte in der Ausrichtung erfolgen, wie die Teile auf dem Druckbett liegen. Es sollten also nach dem Zusammenbau beide Oberseiten auf der einen und beide Unterseiten auf der anderen Seite des Modells zu sehen sein. Es sollte dann so wie oben auf dem Modellbild aussehen.
- Solltet euer Druck aufgrund Spaghettis innerhalb des Modells scheitern, solltet ihr das Spülvolumen deutlich erhöhen!
- Es kann u.U. hilfreich sein, die Supports und den Wischturm dem Extruder des Hauptmaterials zuzuweisen
- Für weitere Informationen oder Problemen beim Druck mit MultiMaterialSupports habe ich euch einen Leitfaden erstellt, Welchen ihr euch HIER ansehen könnt. Auch findet ihr hier eine Testdatei.
An dieser Stelle möchte ich mich bei @Chris_Hill für die zahlreichen Testdrucke der neuesten R4 Version bedanken!
![]()
Tags
Model origin
The author remixed this model.


Differences of the remix compared to the original
Reworked overall design for better fit and improved reliability. Original of the loading fork also made by me. Buffer parts only used to make negatives for a better fit.