μv6 Rev 1

Description
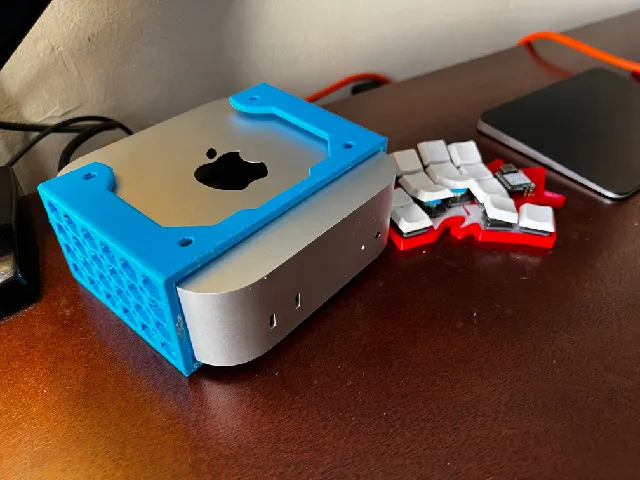
PDFI picked up a used Flsun SR over the holidays. I was excited to make a μSherpa out of the BMG clone extruder and get something a little tighter on board. I never tried the included Bowden, but I'm really happy with this setup overall.
I don't know if I'm just really late to dinner, or if people just aren't interested, but I couldn't find any examples of people using toolhead boards with deltas other than the smart effector, which isn't can so it didn't really work for me. The ebb42 has become indispensable for me on my other printers, so I wanted to include it on the SR as I set it up, which turned out to be pretty straightforward.
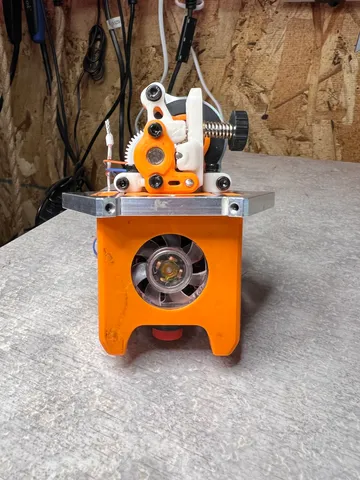
I've been using this model now for about two weeks. It seems sturdy in PETG, although it demonstrates a little “springiness” in the area above the heat block. I'm reprinting it this afternoon in ASA, and would recommend ASA or ABS.
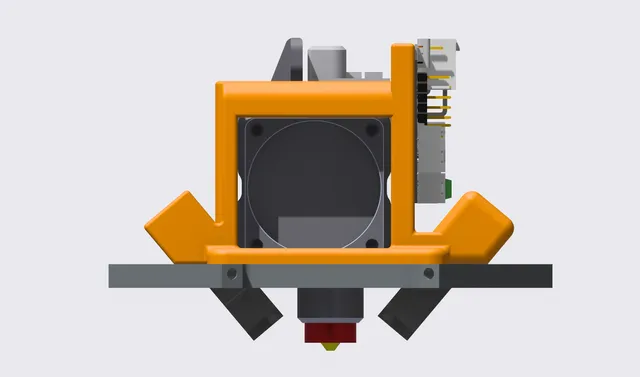
I smooved the airflow inside some in this revision, and opened the top back area to take advantage of the convection there off the ebb. I'd rather have the air going up and out past the motor than down onto the plate. I also opened up the model around the heat block base area a little to increase insulation for higher temp materials, but I may have been too liberal--we'll find out this afternoon when I assemble it if it flares out at the base.
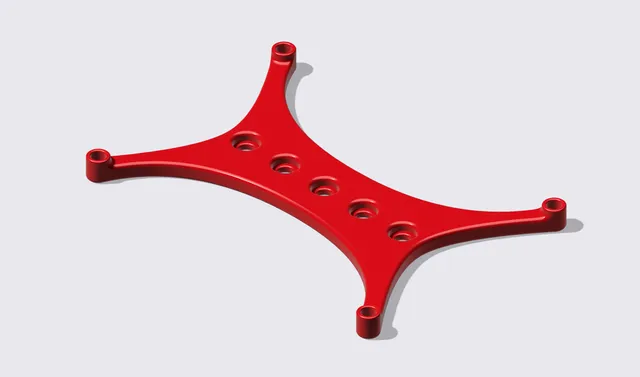
You'll need to print both halves (flat side down worked great for me), then mill out the center area of the flsun effector, and drill the two holes. The red areas in the cuts.pdf file indicate areas to be removed. Print it out (make sure your scale is set to 100% in the print box) and glue stick it to the effector.
Then put 4 M3 heatserts in the front for the fan, and 4 M3 heatserts in the back for the ebb. Place the heatsink in the middle, sandwich it together, do the long screws from the sides, then place the μSherpa on top, and place the really long screws in through the housing, then through the effector and secure with nuts. Screw on the fans, wire it up.
What I really like about this is it effectively makes my SR a multifunction machine. It's a snap to remove the effector from the arms, and all I have to do is unplug the can cable to switch tools.
The fan ducts are going to have to be remodeled. They're too tight. I also am considering flipping the plate (I use it upside down currently) so it can work with the standard level probe. I also would like to lower the Revo V6 down 10mm or so…. The plate would still have to be drilled, but I'd like to have a little more space between the heat core and this model…
update 1/28/24: The recently smooved air channel seems to be working well. The operating temp of the ebb has dropped by about 10 degrees. The switch to ASA feels very solid, and the partially rounded screw exit doesn't seem to be effecting the stability of the mount. Unfortunately, the screw holes for the parts fans no longer work in ASA. Where the screws just kind of stuck in the PETG goop (surprisingly well), they don't have anything to hang on to in the ASA it's so much cleaner. Additionally, they seem to be intersecting with the heatserts much more problematically. I'm going to have to do a little remodel, probably downsizing to a 3510 heatsink fan or something…. Stay tuned….
A great thank you to the following models:
https://www.printables.com/model/193851-flsun-sr-effector-plate-cad-file/files
https://grabcad.com/library/e3d-revo-6-hotend-1
https://grabcad.com/library/ebb42-v1-1-1-2-1
https://grabcad.com/library/noctua-fan-nf-a4x10-flx-4010-1
https://grabcad.com/library/4010-radial-fan-1
https://github.com/Annex-Engineering/Sherpa_Micro-Extruder/blob/main/CAD/sherpa_micro_release_2.x_t
Tags
Model origin
The author marked this model as their own original creation.