Original Prusa Enclosure (OPE) Precision Fit Multicolor Mesh Side Boxes (for MK3/S/+, MK3.5/S, MK3.9/S & MK4/S - MMU Not Required)

Description
PDFDon't want to read all of this? There's now a tl;dr at the bottom of this document.
Important Note Regarding Input Shaper:
Before printing please see the Input Shaper section below for important notes regarding potential issues with input shaper.
Update:
24 August 2024 -
Added a New Version of the SnapFit Plug for temporarily attaching the Long Side Boxes to the printer extrusion when not installed in the Original Prusa Enclosure. See Model Versions and Installing the SnapFit Extrusion Connector Plug details.
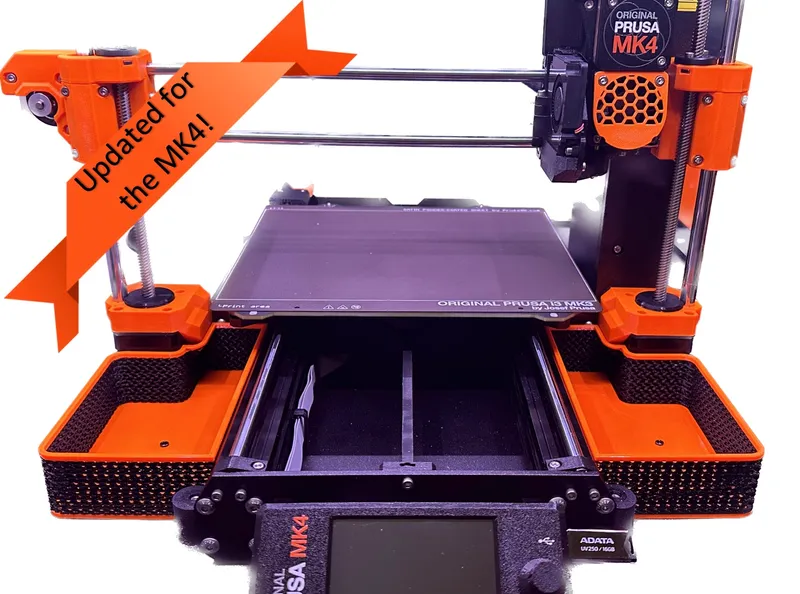
Update: New Universal (MK3/S/+, MK3.5, MK3.9 & MK4/S compatible) Model added!
8 September 2023 -
I have added a new version of the side boxes; the Universal Side Box. These boxes will have all the same variants listed below, but they will work with any version of the MK3 and MK4 printers when Installed in the Original Prusa Enclosure. See Model Versions section below for all the details.
I do not know if they will fit printer models prior to the MK3, such as the MK2. If anyone has an MK2 and can provide dimension details, that would be greatly appreciated.
As of now, all files have been uploaded. All of these boxes are designed to be used inside the enclosure.
See the Other Similar Models section below for side box models that are for those of you who do not have the enclosure.
Why? What do they do?
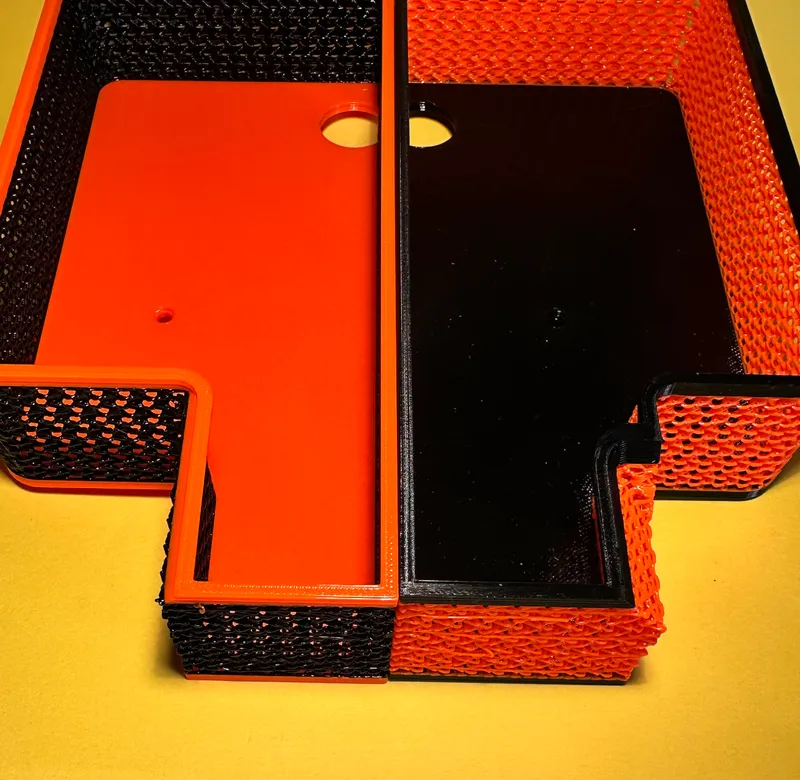
You mean besides look amazing? Well, is your Original Prusa Enclosure in need of some organization? Are you always trying to figure out where you left your needle-nose pliers? Or, my personal favorite, does your enclosure look like a decorator crab because of all the stuff you have hanging from the sides? If so, then this is the enclosure mod you’ve been looking for. These side boxes are great places to keep tools handy, spare nozzles, or whatever you use and lose often. (Probably not a great place for gummy bears though.) My favorite thing about them (particularly the right side box) is that the stray purged filament just drops right into the box and doesn't get scattered all around the inside of my enclosure.
Not Just a Simple Remix
While there are lots of similar boxes out there, despite what they may claim, these are the only Mesh Side Boxes on Printables specifically designed to fit the Original Prusa Enclosure. I've completely redesigned, updated and improved my previous MK3 version to accommodate the changes to the Z-bottoms on the MK4/S; making for a precise fit with the enclosure and the printer. They also work with the xLCD mounted either internally or externally. And now, there is a Universal model that works with every MK3 and MK4/S models.
Improvements (from my previous MK3 Only model)
- Now using a height modifier (rather than a slab modifier) to create the mesh look. This allows for more precision with the color changes and makes for a cleaner render.
- The MK4/S version is a bit wider and has been engineered to fit perfectly between the frame extrusions and the z-bottom pieces. This allows for maximum storage in the space provided.
- Added a small cutout on the bottom of the boxes to account for the enclosure anchor points that stick up; the boxes now are flush on the bottom of the enclosure.
- Added a variant with small holes (rather than cutouts) so you can secure the boxes directly to the anchor points on the floor of the enclosure; which ensures the boxes stay put, even when you need to remove your printer.
- Added alternate versions of the left side box to accommodate the wiring bundle for the xLCD, for those of you who don’t want to tinker with rerouting the wiring.
- Added a longer variant of each model that fits around the dampers, allowing for a full size box that fits snuggly between the printer frame and the faceplate.
- Added a Universal version of each model that can work with any version of the MK3 and MK4 printers inside the enclosure. They are slightly narrower at the narrow end of the boxes and the top is slightly adjusted at the narrow end to deal with the z-bottoms for both printer models.
What makes this an Original Prusa Enclosure upgrade and not an printer upgrade?
Well, I'm glad you asked. Here is why this model isn't just a printer upgrade, despite being made to fit the MK3 and MK4 printers.
- There is already an MK3 version specifically for the Original Prusa Enclosure, it was time to update it for the MK4
- The side boxes attach to the enclosure, not the printer
- The long side boxes are precisely designed to accommodate the enclosure dampers and anchor points on the bottom of the Original Prusa Enclosure
- The side boxes aren't made to work without the Original Prusa Enclosure (specifically); which is why I have other models published for use without the enclosure.
Models
There are now two main versions of the Original Prusa Enclosure Side Boxes; the MK4/S Side Boxes and the Universal (compatible with all versions of the MK3 & MK4) Side Boxes. The primary difference is that the MK4/S version is wider at the narrow end of the box and has geometry to accommodate the changes to the z-bottoms on the MK4/S.
The Universal model works with any version of the MK3 or MK4 printers. To do this, I made the narrow end a bit narrower (since the z-motors are at different distances from one printer model vs. the other). I also slightly moved the geometry at the top of the narrow end of the box to allow it to fit under the MK4/S z-bottom.
If you have a MK4/S printer, the MK4/S version is the most precise fit for those printers. However, if you have an MK3 version printer, then the Universal version will help you avoid having to reprint the side boxes down the road should you end up upgrading.
Model Versions
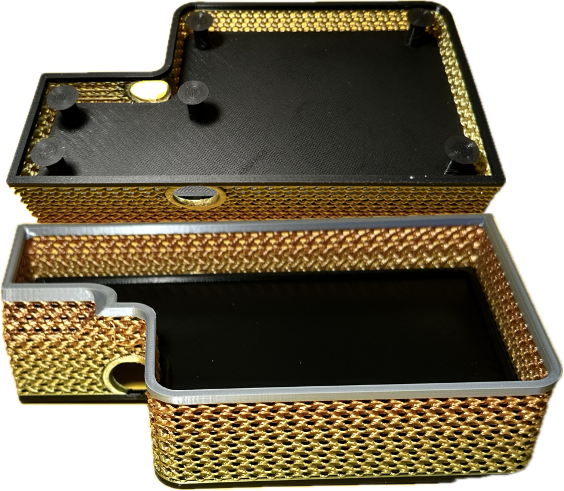
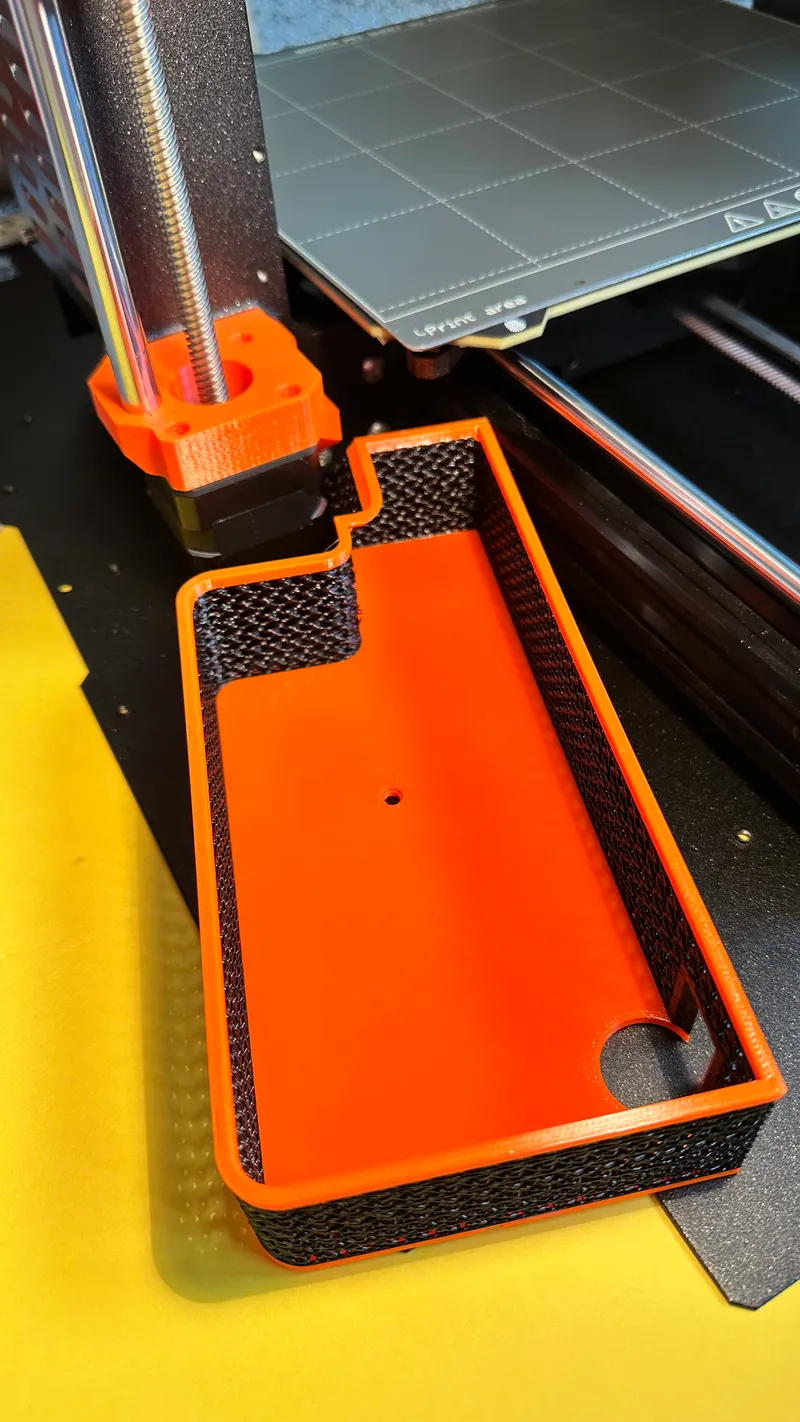
Each model comes in Short Box and Long Box versions. As you might guess, the primary difference between them is the length. The Short Boxes are 170mm long and fit between the printer frame and stop at the foam dampers toward the front of the printer. They squish into the foam to help hold them tightly.
The Long Boxes are 203mm long and have a cutout that surrounds the foam damper; allowing the box to stretch from the printer frame all the way to the face plate of the printer.
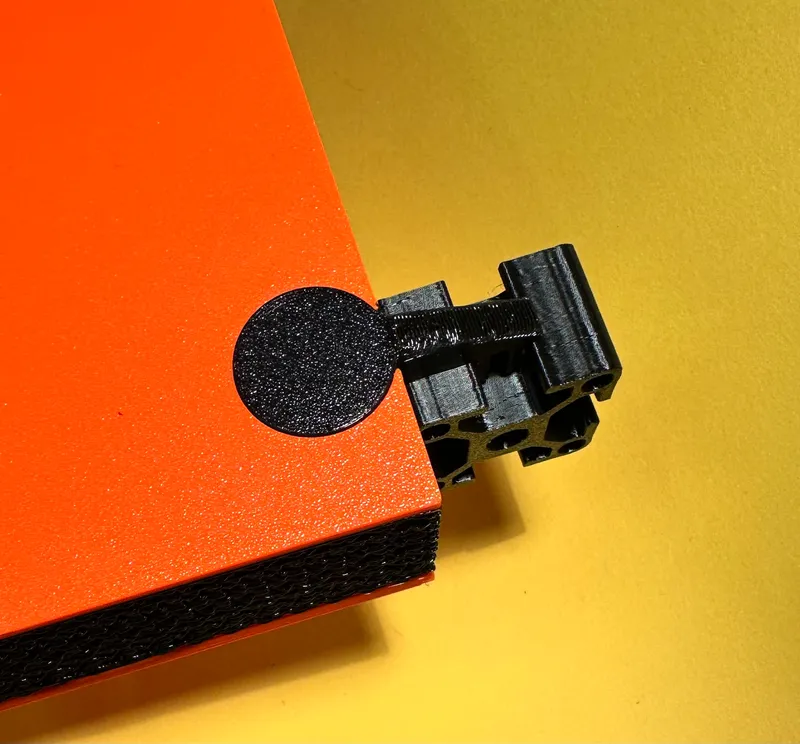
Although not intended to work outside the Original Prusa enclosure, I received a special request from a Printables community member to make the Long Boxes temporarily work until their enclosure arrived in the mail. So, I created a SnapFit plug that connects to the printer extrusions that allows you to temporarily connect the boxes to the printer and plug the hole made for the damper cutout. Once your enclosure is setup, simply remove the clip, pop out the SnapFit plug, and you're ready to install the boxes into your enclosure.
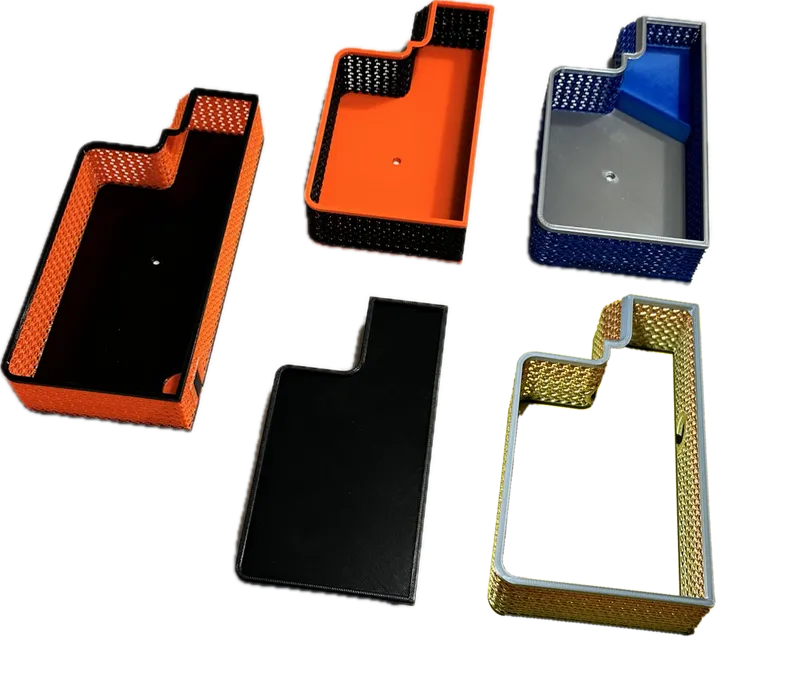
Model Variants
There are also several variants of each model. As mentioned above, all model variants come in MK4/S models and Universal models. Each variant also comes in a Long Box version and a Short Box version.
Side Boxes with Anchor Holes -
These boxes have an anchor hole that matches with a specific attachment ("anchor") point in the bottom of the Original Prusa Enclosure. This allows you to securely attach the boxes directly to the bottom of the enclosure with a single M3x4 screw.
Side Boxes without Anchor Holes -
Instead of a hole, these boxes have a small cutout in the bottom where the hole would otherwise be. This is to accommodate the small protrusion that is created by the anchor point on the bottom of the enclosure. This allows the boxes to sit flush on the bottom and also creates a tight fit without the need to screw the box to the enclosure.
All of the Long Boxes (regardless of if they have an anchor point hole or not) have this cutout at a second anchor point at the front of the box. This is because this attachment point is right under the front border (wide end) of the box; making it impractical to attach the box with a screw at that specific point.
Alternate Left Side Boxes -
Although the xLCD wiring can be rerouted to work with the standard left side boxes, I was asked to design a box that would work without the end user having to mess around with the wiring. With the help of some members of the Printables community, I have created two different designs: an Arch design, and a False Floor design. Both designs create a space under the box for the xLCD wiring bundle to pass through. You can see a photo of the Arch version in the make uploaded by @fotrik_769344.
NOTE: The Universal Version of the Arch side boxes is still under construction.
Other Similar Models -
For those not using the Original Prusa Enclosure, I also have longer versions of these boxes for all MK3 & MK4 models. Remember the older MK3 only model is now deprecated; the new Universal model should be considered the MK3 2.0. You can find them here: @VisualReversal/models
Additionally, there is an MMU2S version for the MK3S made by @dotson90_17676, which was the inspiration for my models. They can be found here: prusa-mk3s-mesh-side-boxes-mmu2s
Included Files
There are a lot of files, but you'll only need one or two depending on which side boxes you want to print. You will find several folders. They are broken down by “MK4/S” versions and “Universal” versions. In each of those categories you'll find folders for each variant in the long and short versions. In most folders you'll find a .gcode file for the left box, another for the right box and one for both boxes.
For the False Floor and Arch versions (which only contain a left side box), you will find both the long and short versions in the same folder, however, they will still be in folders separated by MK4/S and Universal.
Also, the False Floor versions have two separate files that need to be downloaded; One contains the shell of the side box, and the other files contains the floor and feet.
There are also several .3mf files available. Those files contain all versions and variants based on the category of box. For example, all of the false floor side box shells are in the same file.
You will find the following folders containing .gcode files:
MK4 & MK4S Folders
MK4/S Long Side Boxes with Anchor Holes
MK4/S Long Side Boxes without Anchor Holes
MK4/S Short Side Boxes with Anchors Holes
MK4/S Short Side Boxes without Anchor Holes
MK4/S False Floor Side Boxes (Long & Short)
MK4/S Arch Left Side Boxes (Long & Short)
Universal Folders
Universal SnapFit Extrusion Connector Plug (works with MK4/S Long Boxes too)
Universal Long Side Boxes with Anchor Holes
Universal Long Side Boxes without Anchor Holes
Universal Short Side Boxes with Anchor Holes
Universal Short Side Boxes without Anchor Holes
Universal False Floor Side Boxes (Long & Short)
Universal Arch Side Boxes (Long & Short)
.3mf Model Files
I've also included .3mf files with those settings, so you can reslice for your specific filament and print settings. The models have been consolidated as much as possible. Just toggle the “eye” icon to make whichever boxes/items you want active and then slice and export as a .gcode.
The following .3mf files are included:
MK4/S Side Boxes with Anchor Holes
MK4/S Side Boxes NO Anchor Holes
Side Box SnapFit Extrusion Connector Plug
Universal Side Boxes WITH Anchor Holes
Universal Side Boxes NO Anchor Holes
All Versions False Floor Side Box Shells
All Versions False Floor Side Box Floors and Feet
All Versions Arch Side Boxes
Printing Instructions/Recommendations
You do not need the MMU to print these boxes in multiple colors. Your printer will pause after the solid bottom is printed and direct you to switch the filament for the color change for the mesh section. After the mesh section is printed, the print will pause again and you will have the opportunity to switch the filament for the final color change. All you need to do is follow the prompts on your printer.
The mesh weave pattern is coded into the models using a height modifier. This allows for a solid print on the floor and top and automatically changes to the gyroid infill pattern at the same points in the print as the color changes.
The included .gcode files contain the following settings for all model versions with some slight difference specified below:
- Printer: MK4 (without Input Shaper)
- Filament: Prusament PETG (see Note #3 below regarding PLA). I used Prusa Orange and Jet Black.
- Print Settings: 0.30mm (draft)
- Supports: Organic supports for the following:
- The overhang on the narrow end of the boxes;
- The arch area of the Alternate Left Side Box Arch design;
- The small cutout for the foam damper on the Long Side Boxes; and
- The small cutouts on the bottom on the side boxes where anchor holes are not used.
- Infill: 15%, with a gyroid fill pattern. The Height modifiers will change the infill automatically to 20%.
- Nozzle: 0.4
- Ironing: Topmost Surface Only
These settings shorten the print time significantly from the MK3 version, but still retain the quality of the look.
Print Time
Total print time will vary depending on what printer you are using, which model you print, and what settings you use. Expect about 2.5 hours per short box and about 6 hours for both long boxes.
Input Shaper (potential issues and solution)
Although I've received feedback that these models print well with input shaper, I haven't tested that myself. However, thanks to the help of @Ylriell_1003708 we have identified an issue that can come up when using input shaper.
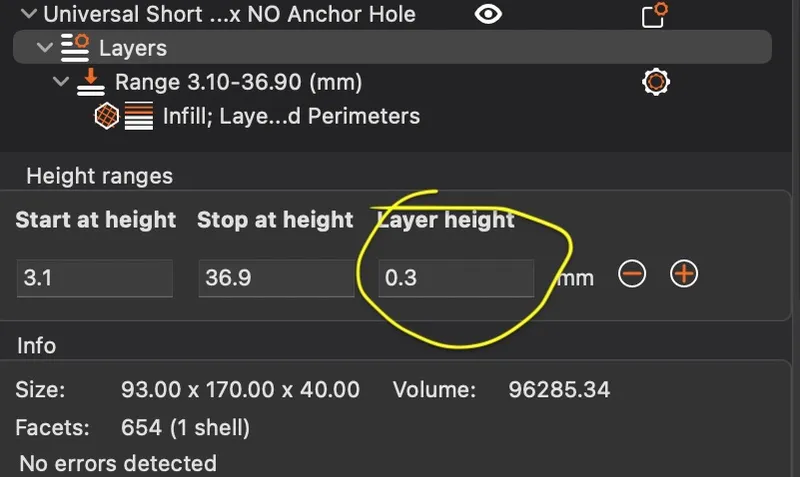
The .gcode files here were created before input shaper was a thing. At the time .3mm layer heights were common and the files were originally sliced at a .3mm layer height. Input shaper primary uses a .2mm layer height. So, to avoid any issues, if you're going to use input shaper you will need to adjust the modifier height to match your layer height (i.e. 2mm).
PrusaSlicer used to generate an error if you tried to print the file without doing this, but for some reason the error is no longer generated. Printing the boxes with input shaper at a .2mm layer height and leaving the modifiers layer height at .3mm will likely end up printing an unsupported line in the mesh every 2.7mm. While it probably won't ruin the model, you may have to do some post print processing to remove the stay strands. If you change the modifier however, that will eliminate the problem.
I do have it on my list to update the files, but with 50+ files to reslice, test and upload that's going to take some time. In the meantime, if you're going to use input shaper, be sure to change the modifier height to match your layer height.
To change the modifier layer height, simply select the model you want to edit in the righthand column of PrusaSlicer, select “Layers” and input the new value in the “Layer height” box and hit enter. You'll need to do this for each box you want to print. Then, slice the model, save it, and send it to your printer. That's it!
As always, if you have questions, please let me know, or if you don't want to be bothered with all that, send me a message and I'll whip up a custom file for you.
Printing the Long Side Boxes -
In general the Long Side Boxes make use of a modifier shape to ensure the area around the foam dampers is solid (rather than mesh) to allow for a break in the wall of the model. That modifier shape should not be removed or relocated.
Printing the Alternate Left Side Boxes -
Like the other side boxes, there are two versions of the Arch design: One has the anchor hole and the other has the cutout for the anchor point. Both use the same print settings. Be sure to use organic supports for the arch section.
The Arch design lifts the floor of the narrow end ~15mm; creating a space to accommodate the wiring bundle. In order to do that, this model makes use of modifier shapes to create solid sections at different levels.
If you reslice the model, you will likely need to use the latest version of PrusaSlicer (at least 2.6+) as other, less sophisticated, slicer software may see these shapes as solid objects. You will also want to be careful about moving or adjusting the position of the modifier shapes as they are in specific places.
To print the False Floor design, you need to access two different files. The first file contains the false floor and the hex shaped “feet” that the floor rests upon. I used the cutting tool in PrusaSlicer to automatically generate the dowels that connect the feet to the bottom side of the false floor. You can print the feet with a brim and leave it in place if you like. Keep in mind you can adjust the feet to any height you like; just resize them to your preference. You can also use the cutting tool to shorten them. If that isn't something you're comfortable with, let me know and I can whip up a set for you at whatever length you'd like.
The second file is the shell (the side box just without a floor). Print this just like the other boxes. This also has some shape modifiers to make the mesh solid around the wiring passthrough. It's a good idea to use organic supports here as well.
If you have any questions regarding how to manipulate the modifiers, please message me. I'd be happy to help if I can.
Installation
Mounting the xLCD -
First, you'll need to decide if you're mounting the xLCD on the front of the Original Prusa Enclosure or on the MK4. If you're leaving it on the MK4, you can skip right to the installation of the boxes. If you want to mount the xLCD to the enclosure, you'll need to print the xLCD Support files provided by Prusa. You can find them with the Enclosure Printable Parts in the LCD support & FS cover folder. Look for the files labeled “xLCD-support-L (MK4).stl” and “xLCD-support-R (MK4).stl.” Note: There is now a Version A and a Version B of the xLCD, so be sure to check the Original Prusa Enclosure Assembly Manual, section 4C for details.
The xLCD Cables -
Here you have two options. If you're not comfortable with moving the cables around, you can print the Alternate Left Side Boxes (see below). However, if you are comfortable, then you will need to reroute the cables slightly for the left side box to fit properly. This is easier to achieve without the textile sleeve on the cables.
- Route the xLCD ribbon and power cables along the back of the frame, then under at the first notch in the frame.
- Then route the cables along the inside of the left extrusion and finally through the hole in the front of the enclosure.
- It's helpful to slide the printer forward (toward the front) a bit to connect the cables to the xLCD. Then you can attach the xLCD to the enclosure and put the printer back in place.
- You should still have enough slack to install the boxes. If not, recheck the cable routing.
Installing the Short Side Boxes -
- With the printer in place, simply push the printer away from you (toward the back of the enclosure) a bit.
- Put the boxes in place. You may need to gently push the box against the damper to get the fitment correct.
- If you opted to use the side boxes with anchor holes, insert one M3x4 (or longer) screw and slightly tighten (you should have some M3x4 screws left over from your enclosure build). If you’re using one of the Alternate Left Side Boxes, ensure the wiring bundle is routed through the appropriate space under the side box. See next section for installation details specific to each Alternate Side Box design.
- Pull the printer back to you (towards the front of the enclosure). It will stop when the back plate on the printer frame gets to the rear dampers.
- The boxes should fit snugly between the printer frame and the dampers.
- If used, carefully finish tightening the M3x4 screws.
Installing the Long Side Boxes -
There are two methods that work well for installing these boxes.
Method #1 - Installing by removing the printer.
- Remove or lift the printer from the enclosure.
- Place the side boxes in place and align them with the two attachment points on the bottom of the enclosure and the foam damper. Note: the anchor hole versions of the model only have one anchor hole (roughly in the center of the side box). The second attachment point on the bottom of the enclosure is right at the edge of the side box. So, that area simply has a small cutout to allow the box to sit flush with the bottom of the enclosure.
- If using the side boxes with the anchor holes, use one M3x4 (or longer) screw to attach the side box to the bottom of the enclosure.
- Carefully place the printer back in the enclosure taking care to align it with the foam dampers (both front and back) and the side boxes.
Method #2 - Installing without removing the printer (particularly when routing the xLCD bundle under the side box.
- Remove the foam damper using an Allen key.
- Place the narrow end of the box into the printer frame (between the z-motors and the extrusions) by angling the wide end of the side box away from the printer. Take care to put the xLCD wiring bundle under the left side box during this step.
- Push the side box all the way to the printer frame and slide the wide end behind the back edge of the printer face plate.
- Reinstall the foam dampers.
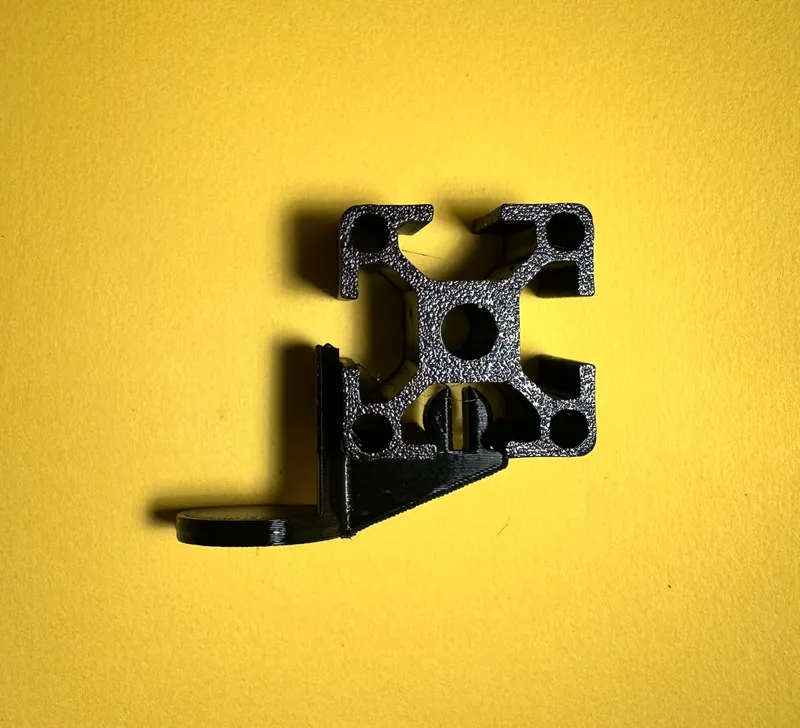
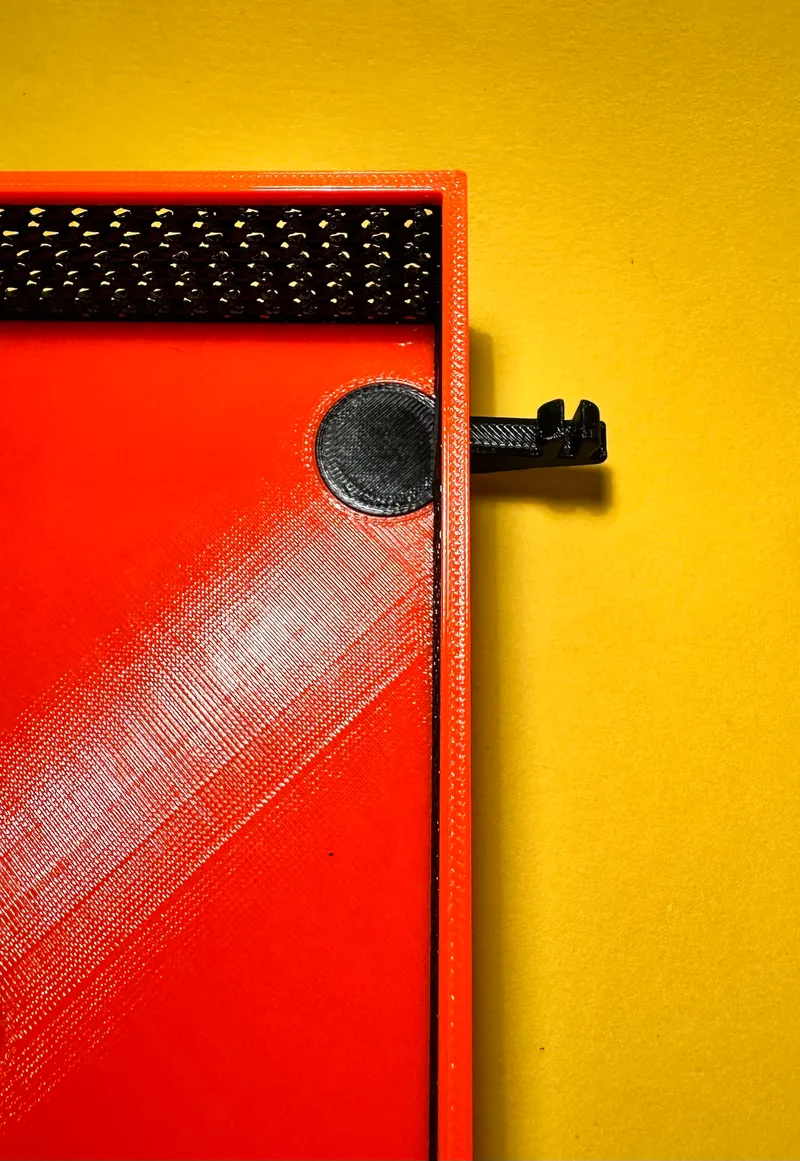
Installing the SnapFit Extrusion Connector Plug -
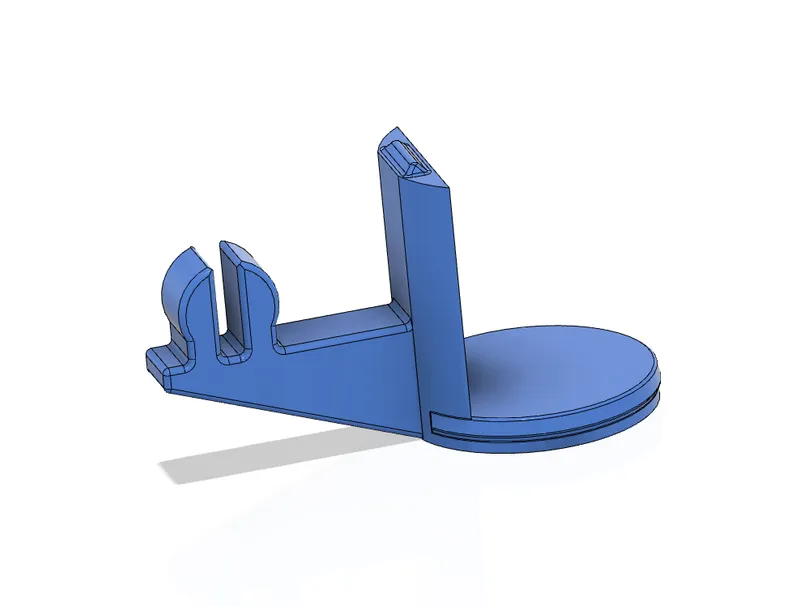
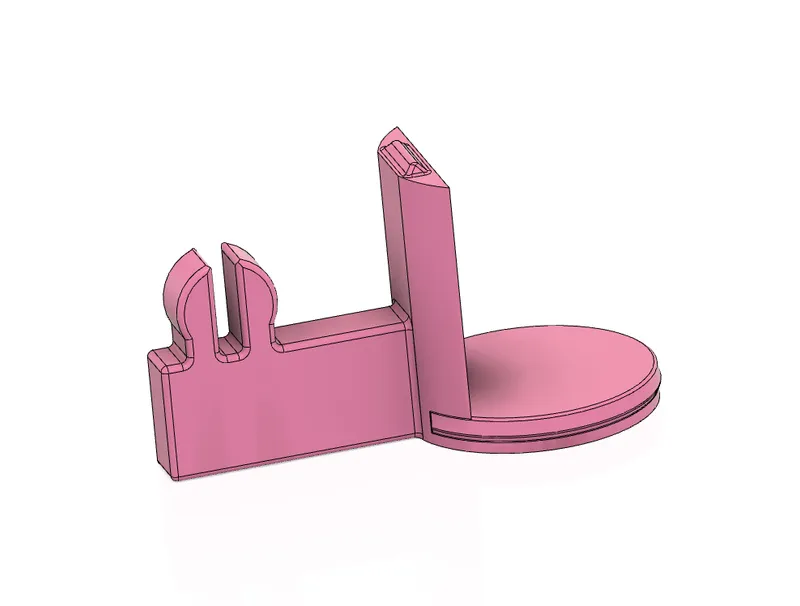
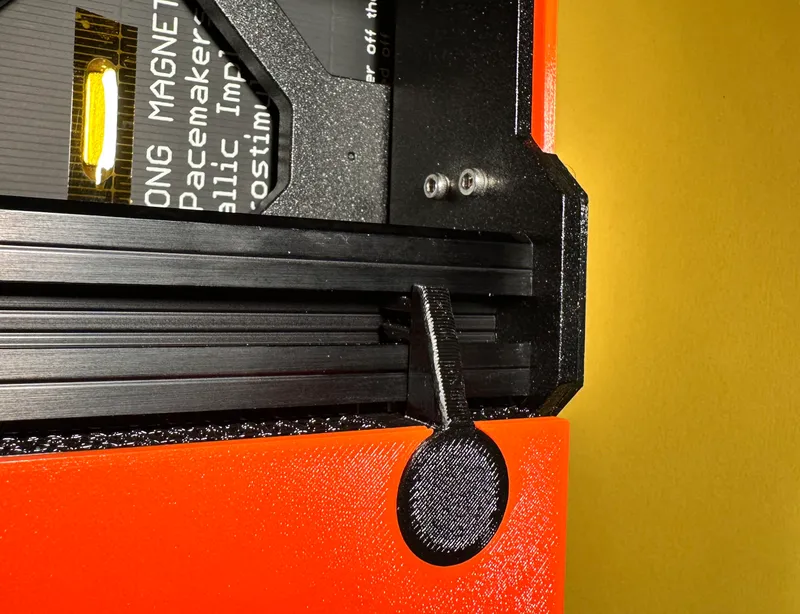
There are two versions; one has a flat bottom an the other is angled. Be sure to use organic supports for the angled model. Just pop the plug into the damper hole on the bottom of the Long Side Box (make sure the tab is pointing up and aligned with the cutout in the side of the box). Then, press the round connector tabs into the bottom of the printer extrusion. (You may need to move the rubber front feet one the bottom slightly to make room.) Once your Original Prusa Enclosure is ready, just remove the SnapFit plug and install as per above.
Notes on Installing the Alternate Left Side Boxes -
The Arch Design -
These boxes basically install just like the other side boxes; the main difference being that you'll need to route the xLCD wiring bundle under the arch. If you printed it with the anchor hole, then follow the same installationinstructions as the other models with the anchor hole.
The False Floor Design -
This one is a little different to install. For the most precision, pay attention to the placement of the Hex Feet on the build plate. You will notice the feet are printed in the same basic pattern as the floor of the side box. If you put the floor over the feet without moving them, you will find they line up with their corresponding hole in the bottom of the floor. I've also named them in PrusaSlicer to make them easier to identify. Depending on the fit of the dowels, you may want to put a small drop of Super Glue (or other similar adhesive) inside the holes in the bottom of the floor before inserting them. Next, you can put the side box in place and then lower the false floor from above (feet down of course) into the side box. That's it!
Feedback
Thank you for taking the time to check out my model. I’ve put a lot of hours into this project to get it just right. Please consider clicking the ❤ and/or leaving me an encouraging comment if you appreciate my effort.
If you print this model, please take a picture of your awesome new MK4/S Original Prusa Enclosure Precision Fit Mesh Side Boxes. Then, click here to post your make and leave a review. ;) I love seeing the cool color combinations makers come up with.
If for some reason you don't think my model deserves five stars, please reach out to me with your feedback before leaving a negative rating so I can have an opportunity to address any issues. Often, problems encountered can be solved with some simple trouble shooting or a small redesign.
If you have suggestions on how the model could be better, please let me know. Along those lines, if you would like some adjustment to the model that you personally would find helpful, please reach out. I am more than happy to tweak the design to fit someone's needs if I can.
I will continue to update the model with new variants as long and often as needed to ensure it is the best possible quality. See the Updates section below with notes on changes to the models.
I’m always happy to share my designs with anyone who wants to use them. You’re welcome to remix this model and share this model, but if it’s something very simple, I would appreciate the opportunity to add it to my model first. Likewise, if you do share or remix it, I only ask that you give the appropriate attribution and share under the same license.
Thank you to @fotrik_769344, @Dutch_443178, @RickyRacer_798578, and Stepfan Sell for your valuable input for the various Side Box designs.
And finally, although this isn't actually a remix of any other model, a big thank you to @dotson90_17676 for the original mesh side box design concept.
If you really appreciate my work, you can also donate to my PayPal filament fund:

Notes
Note #1: This model was designed in Fusion360 (2.0.16490) specifically for the Prusa MK4/S and the Original Prusa Enclosure. It was sliced in PrusaSlicer 2.6., using a height modifier. YMMV using other, less sophisticated, slicer software. If you try to open the .3mf files in PrusaSlicer versions before 2.6 it will throw an error, so be sure you’re updated to the latest version
Note #2: The left and right sides are not mirrors of each other. The holes/cutouts are in slightly different spots to account for the differing placement of the anchor points in the Original Prusa Enclosure.
Note #3: After consulting with Prusa support I've deleted the PLA .gcode files. It is recommended you use PETG or another material with a higher glass transition temperature to deal with the higher temps inside the enclosure.
Updates
6 Jan 25 - Discovered potential problem with IS if modifier height isn't adjusted to match later height. Added notes regarding this issue with instructions.
24August24 - Added new version of the SnapFit plug to include a connector to the bottom of the printer extrusions.
5November23 - Added notes regarding Input Shaper.
9September23 - V2.0 Universal and MK4 Arch models added.
8September23 - V1.0 Universal models added. V2.0 MK4 False Floor model updates. Universal models are designed to be used with all models of the MK3 or MK4 printers. MK4/S Models can only be used with the MK4 & MK4S printers.
23August23 - V1.0 Added Long Side Box models - Increased the overall length of the side boxes to 203mm with a very precise fit over the dampers. 18August23 Ver1.3 Alternate Left Side Boxes - Added files for the Arch version that contain both the Anchor Hole and the cutout versions of the model.
17August23 Ver1.2 Standard Side Boxes (both with and without Anchor Hole) - Made naming convention changes to better reflect the description of each file. Also made a small adjustment (less than .1mm) to the hole/cutout in the left boxes to make them more “precise" and aligned with the right side boxes. This doesn't change the fit or look, and was something only I would notice.
13August23 Ver 1.1 Alternate Left Side Box without Floor - Widened the oval shaped modifiers to more easily accommodate the ribbon cable connector.
12August23 Ver 1.0 Alternate Left Side Box - Uploaded two Alternate Left Side Box designs for those who are not comfortable with rerouting the xLCD wiring bundle.
31July23 Ver 1.1 - Made small change to left side box to create better overall symmetry between the right and left sides. Slightly moved the cutout on the right side box for a better fit. Changed the file names slightly to better reflect the model.
tl;dr
- The only Mesh Side Boxes on Printables that precisely fit the Original Prusa Enclosure
- Mesh Side Boxes for your Original Prusa Enclosure that fit your MK4/S
- Gives you a place to put your stuff inside your enclosure
- Adds to your cool factor
- Long and short versions of each model
- MK4/S Only and Universal (MK3/S/+, MK3.5/S, MK3.9/S & MK4/S compatible) versions available
- Works no matter where you put the xLCD
- .gcodes are set to use Prusament PETG, 0.30mm (draft), Organic supports, 15% Infill, 0.4 nozzle, ironing on the topmost surface - Not sliced with IS (yet)
- .3mf files also attached to reslice to your taste
- Make sure to adjust modifier layer heights to match model layer heights if reslicing
- See the Install instructions for details if you need additional info on installing
- If you print it, click here here to leave a rating and post pictures.
Tags
Model origin
The author remixed this model.


Differences of the remix compared to the original
NOT ACTUALLY A REMIX of any other model, however, added as remix to give credit for the original design concept and to direct users who find the obsolete MK3 model to this page. Updates from my MK3 Only Version to accommodate the MK4/S. Added a version that will work with any version of the MK3 and MK4. Added long and short variants. Added a version with a false floor. Added a version with an arch.


