3D Printer Lack enclosure Sovol SV06, Creality, Prusa 53cm (variable) Printers

Description
PDFEnglish:
This remix is made for the SV06. There is space for the printer as well as a 4cm thick concrete/stone plate and a 1cm thick rubber dampener. And there is 3cm space still left to the top.
All parts need to be printed out of PETG or a higher temperature resistant filament.
You will need:
- 3x 440*520*3 mm Acryl for the sites
- 2x 220*520*3 mm Acryl for the Doors
- 1x XT60H 30cm extension cable
- 4x 20*6*1.5 mm neodym magnet for the doors
- Superglue
- 4x 6*140 mm screws like these: https://www.bauhaus.info/holzschrauben-spanplattenschrauben/spax-tellerkopfschraube-hiforce/p/20544685
- 4x 6*50 mm screws like these: https://www.bauhaus.info/holzbau-moebel-konstruktionsschrauben/spax-halbrundkopfschraube/p/10013389
- Pack of 3.5*25 screws like these: https://www.bauhaus.info/holzschrauben-spanplattenschrauben/spax-universalschraube/p/10077466
- 4x 6*20-30 screws like these: https://www.bauhaus.info/holzschrauben-spanplattenschrauben/profi-depot-sechskant-holzschraube-a2/p/20086637
You have to print the amount that stands in the names of the parts.
You will need to print these things also:
- PSU Mount https://www.printables.com/model/346977-sovol-sv06-psu-mount-bracket/files
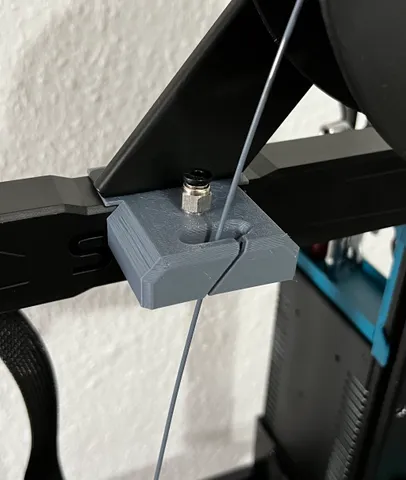
- Some kind of filament passthrough like: https://www.printables.com/model/7115
I have used this as help (it is in german) https://nachdenksport.de/2019/06/07/3d-drucker-gehaeuse-super-schick-und-einfach-gebaut/
German:
Dieser Remix basiert auf dem Gehäuse für den Prusa MK3. Ich habe es so angepasst, dass der Sovol SV06 mit einer 4cm starken Beton/Steinplatte und einer 1cm starken Gummimatte (z.B. für Waschmaschinen) reinpasst. Es bleiben zur Sicherheit weitere 3 cm Platz nach oben.
Welche Teile wie oft gedruckt werden steht im Namen.
Alle Teile müssen mindestens aus PETG gedruckt werden. Es kann auch ein anderes Filament genutzt werden das hohe Temperaturen aus hält. In keinem Fall PLA nutzen.
Zum Zusammenbau werden folgende Teile benötigt:
- 3x 440*520*3 mm Acryl für die Seiten
- 2x 220*520*3 mm Acryl für die Türen
- 1x XT60H 30cm Verlängerungskabel https://www.amazon.de/dp/B08RRRWD7G?psc=1&ref=ppx_yo2ov_dt_b_product_details
- 4x 20*6*1.5 mm Magneten https://www.amazon.de/dp/B00382J9UO?psc=1&ref=ppx_yo2ov_dt_b_product_details
- Superkleber für die Magneten
- 4x 6*140 mm Schrauben: https://www.bauhaus.info/holzschrauben-spanplattenschrauben/spax-tellerkopfschraube-hiforce/p/20544685
- 4x 6*50 mm Schrauben: https://www.bauhaus.info/holzbau-moebel-konstruktionsschrauben/spax-halbrundkopfschraube/p/10013389
- Pack of 3.5*25 Schrauben: https://www.bauhaus.info/holzschrauben-spanplattenschrauben/spax-universalschraube/p/10077466
- 4x 6*20-30 Schrauben: https://www.bauhaus.info/holzschrauben-spanplattenschrauben/profi-depot-sechskant-holzschraube-a2/p/20086637
Außerdem müsst ihr folgende Teile drucken:
- PSU Mount https://www.printables.com/model/346977-sovol-sv06-psu-mount-bracket/files
- Filament Durchführung https://www.printables.com/model/7115
Ich habe diese Anleitung genutzt: https://nachdenksport.de/2019/06/07/3d-drucker-gehaeuse-super-schick-und-einfach-gebaut/
Tags
Model origin
The author remixed this model.


Differences of the remix compared to the original
Fits a wide range of printers because of the distance brackets. If you need it higher just change the Z-height of the spacers in the slicer.