Mobile Soldering Station (TS-80)


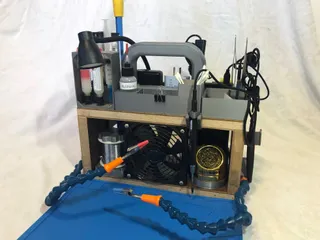


Mobile soldering station based on the TS-80. Could be adapted to other types of battery powered soldering irons.
In the contest Organization Tools
77
87
1
3214
updated February 16, 2021
Description
PDFMobile soldering station based on the TS-80. Could be adapted to other types of battery powered soldering irons. Features ventilation fan, solder spool holder, tip cleaner holder, de-solder pump holder, flux holder and storage for other miscellaneous things.
Print instructions
Mobile soldering station based on the TS-80. Could be adapted to other types of battery powered soldering irons. Features ventilation fan, solder spool holder, tip cleaner holder, de-solder pump holder, flux holder and storage for other miscellaneous things.
Solder spool holder:
This was designed to work with parts I had lying around. The spool holder could be designed with less hardware parts (3D printed threaded parts).
Printed Materials:
- solder spool holder base.stl
- solder spool holder dovetail.stl
- solder spool holder knob.stl
Non-Printed Materials:
- (1) 608 bearing
- (1) 1/4"-20 2-1/2" bolt
- (1) washer small
- (1) washer large (could 3D print a replacement)
- (1) 1/4"-20 nut
- (1) paperclip
- (1) Spool of solder
Desolder sucker holder:
Printed Materials:
- desolder pump holder.stl
Non-Printed Materials:
TS-80 soldering iron:
Printed Materials:
- ts-80 holder.stl
- ts-80 stop ring.stl
- pd to qc3 bottom case.stl
- pd to qc3 case holder.stl
- pd to qc3 top case.stl
Non-Printed Materials:
- (2) #6 x 1/2" wood screw
- (1) ZY12PDN-1 USB-C PD trigger (without connector)
- (1) QC3.0 DC-DC buck converter
- (1) 22 AWG wire, solder
TS-80 tips holder:
Printed Materials:
- ts-80 extra tips holder.stl
Non-Printed Materials:
Flux holder:
Printed Materials:
- flux holder.stl
Non-Printed Materials:
Tip cleaner holder:
Printed Materials:
- tip cleaner holder.stl
Non-Printed Materials:
Battery holder:
Printed Materials:
- battery holder.stl
Non-Printed Materials:
Fan:
Printed Materials:
- fan duct.stl
Non-Printed Materials:
- (3) #6 x 1/2" wood screw
- (4) M3 x 10mm bolts
- (4) M3 nuts
Helping hands:
Printed Materials:
- helping hands base.stl
Non-Printed Materials:
- (2) Loc-Line 1/4" assembly kit
- (2) Loc-Line 1/4" hose
- (1) Loc-Line 1/4" hose assembly pliers (makes things easier)
- (2) Alligator clips
- (2) Bullet connector
- (4) #6 x 1/2" wood screw
Misc:
Printed Materials:
- charger holder.stl
- cleaner holder.stl
- cleaner holder qtip.stl
- flush cutter holder.stl
- handle.stl
- misc holder.stl
- misc holder straight tweezers holder.stl
- misc holder bent tweezers holder.stl
Non-Printed Materials:
- (7) #6 x 1/2" wood screw
- (4) #8 x 1.25" wood screw (alternative)
- (8) #8 x 2.5" wood screw
- (1) Double-sided tape
- (4) Rubber feet
Soldering equipment
- TS-80 (TS-80P USB power delivery)
- TS-80 iron tips
- Anker PowerCore+ 26800 PD battery bank
- Desoldering pump
- Desoldering wick
- Flux
- Syringes
- Syringe adapter
- Syringe tip
- Soldering iron tip cleaner
- Hakko 599B-02 tip cleaner
- 120mm USB fan
- USB LED light
- Plastic bottle (for alcohol)
- Hakko CHP 3-SA straight tweezers
- Hakko CHP 7-SA angled tweezers
- Kester solder 6040
- Silicone mat
Instructions:
- No supports needed
- Screw wooden side panels into bottom panel with 4 #8 x 2.5" flat head wood screws
- Mount 120mm fan to fan duct with 4 M3 x 10mm bolts and nuts
- Secure fan/fan duct assembly, solder spool holder base, tip cleaner holder and battery holder using #6 x 1/2" screws. Recommended to layout and test fit 3D printed pieces before securing with screws.
- Mount the carrying handle to the top wooden panel with 4 #8 x 1.25" wood screws
- Mount the top wooden panel to the side panel with 4 #8 x 2.5" wood screws. This will form the frame of the solder station.
- Mount de-solder pump holder, solder iron tips holder, flux holder and miscellaneous holders to the top of the top panel. Test fit 3D printed pieces before securing. Use photos for reference.
- Assemble solder spool holder
- Press 608 bearing into dovetail insert
- Insert 1/4-20 bolt into bearing
- Insert 1/4-20 nut into spool holder cap
- Secure washer, solder spool and spool holder cap assembly onto bolt
- Bend paperclip into solder guide shape as shown in the picture. Insert guide into slot in the dovetail insert.
- Slide solder spool assembly into spool base
- Assemble helping hands
- Assemble 19 pieces of 1/4" Loc-Line
- Attached 1/4" NPT threaded connector
- Wrap base of bullet connector with electrical tape to 'thicken' it
- Hot glue bullet connector to 1/8" nozzle
- Attach alligator clip to bullet connector. Optional: add heatshrink to alligator clip teeth.
- Attach 1/8" nozzle to the rest of the Loc-Line
- Screw NTP connector into helping hands base
- Attach helping hands assembly with #6 x 1/2" screws
- Attach TS-80 holder key with grounding screw
- Attach TS-80 holder to top panel with a #6 x 1/2" screw
- If you are using a TS-80 (first version), attach PD to QC3 case holder with a #6 x 1/2" screw
- Clip the LED to the back of the left panel. Route the power cable to the USB breakout of the USB fan.
- Add rubber feet to the bottom of the bottom panel
Tags
Model origin
The author hasn't provided the model origin yet.


