Flower Lampshade with Posable Petals - Easy to Print & Assemble

Description
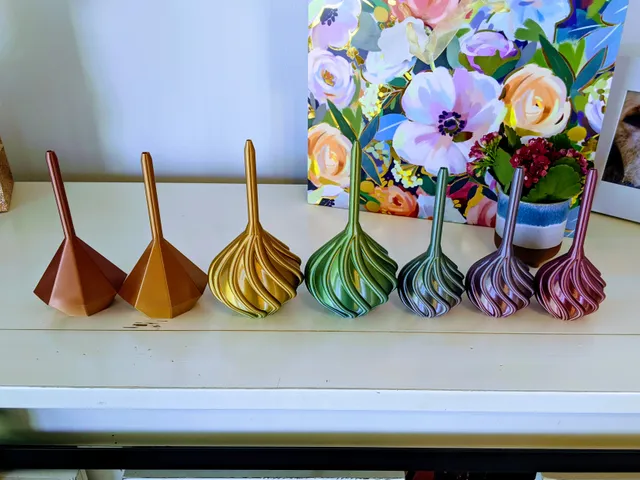
PDFThis floral lampshade is easy to print and assemble. Designed to be compatible with an IKEA Hemma socket, this lampshade makes for a striking overhead light or can be easily set up as a tabletop accent light. Every petal in the lampshade is posable so your floral options range from budding to blooming.
More options for different light sockets will be added in the future!
UPDATE: Added threaded option for Spiral Base.
Print instructions
General
There are 3 main files for this print: spiral base; inner petals; and outer petals. For simplicity, I recommend that they be printed separately though they can be printed together.
Caution
Only compatible with LEDs or other low-temperature bulbs. DO NOT use with incandescent lights. The print will melt.
Layer Height
Print all 3 files with a layer height of 0.2mm.
Spiral Base
This is the piece that connects the socket and the posable petals. There are two options, threaded, and unthreaded. The threaded option is designed to screw onto an IKEA Hemma socket and cord.
Print either option without supports at 15% infill with 'detect bridging perimeters' turned on.
Petals
Both the inner and the outer petals are arranged so that they can be printed simultaneously with minimal support. Use a Brim or Raft to ensure that the petals adhere well to the print bed. The files titled 'inner petal' and 'outer petal' are individual petals should you wish to print them on their own.
Print both the inner petals and outer petals with support at 100% infill. 100% infill is needed to strengthen the loops that attach each petal to the spiral base in order to prevent them from breaking when the lampshade is assembled.
Post Processing
After printing, carefully remove the supports from the petals and then separate the petals. The petals should be easy to pry apart but running an Exacto knife between the petals can help separate any stubborn areas.
Assembly
Determine which of the attachment points on the base are for the inner petals and which are for the outer petals. The attachment points for the inner petals do not protrude out from the base as much as the attachment points for the outer petals.
Starting with the inner petals, snap each petal to one of the five inner attachment points on the base. To avoid breaking the petal as you attach it to the base, grip the petal near the attachment hook.
Close the inner petals to make attaching the outer petals easier.
Finally, attach the outer petals by snapping them one by one to one of the five outer attachment points on the base.
Now you're done! Arrange the petals to give the lampshade the look that you want.
Tags
Model origin
The author hasn't provided the model origin yet.