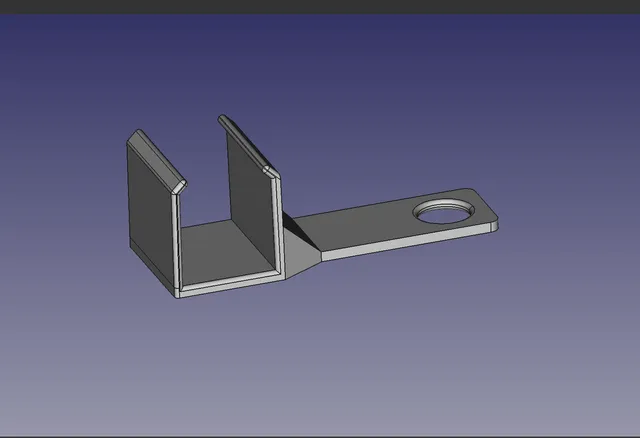
Sovol SV06 mount adapter for PurchenZuPoden's Universal Spool Holder

Popis
PDFThis is a mounting adapter for the Sovol SV06 so it can use the universal spool holder by PurchenZuPoden: https://www.printables.com/model/66440-universal-filament-spool-holder-gen-2
This should be used with the stock spool holder's metal arm. I struggled to find M8 bolts long enough for this spool holder, but learned that 5/16" works as well.
I've included multiple versions because the maximum length I could find for 5/16" regular hex bolts was 6" and it just barely sticks out of the bearing, so this version had to be thinner to allow a nut on the end. It doesn't have enough room to put a nut on the inside side of the spool holder, so instead I could only have it riding against a lock washer (otherwise the spool holder's whole face rubs against the mounting plate). Then I found that 5/16" carriage bolts are easier to get a hold of in 7" & 8" lengths which allowed a lot more space to add more washers and nuts.
Required Materials
Here's the hardware you need for each version. Also note that you should be able to replace all 5/16" hardware with metric M8 versions. They should be equivalent.
7" (or longer) Carriage Bolt version materials:
- Stock SV06 spool holder metal arm
- Universal Spool Holder linked above, or any other spool holder system that uses 608 bearings
- Print Mount_Block_Front_7inCB_v1
- Print Mount_Block_Back_7inCB_v1
- 5/16" x 7" (or longer) carriage bolt with square head. Here is the one I used: Hillman 5/16-in x 7-in Zinc-plated Coarse Thread Interior Carriage Bolt https://www.lowes.com/pd/Hillman-5-16-in-x-7-in-Zinc-Plated-Coarse-Thread-Carriage-Bolt/3824933
- 5/16" hex nut - at least 2 of them. I used 3, with 2 on the outside end to act as a locking nut.
- Optional - 5/16" washer. Optional but recommended for strength (and you have space for it with a 7" or longer bolt).
- Optional - 5/16" lock washer - Optional but recommended to keep inner nut from working itself loose
6" Regular Hex Bolt version materials:
- Stock SV06 spool holder metal arm
- Universal Spool Holder linked above, or any other spool holder system that uses 608 bearings
- Print Mount_Block_Front_6inHex_v1
- Print Mount_Block_Back_6inHex_v OR Mount_Block_Back_6inHex_v1_embedWasher
- 5/16" x 6" regular hex bolt, fully threaded. Here's the one I used: Everbilt 5/16 in.-18 x 6 in. Zinc Plated Hex Bolt https://www.homedepot.com/p/Everbilt-5-16-in-18-x-6-in-Zinc-Plated-Hex-Bolt-800806/204645560
- 5/16" hex nut - just 1
- 5/16" lock washer
- Optional - 5/16" washer, ONLY if you use the embedded washer version of the back block. The one I used has 22.20mm outer diameter and is 1.85mm thick.
Alternative to the bolts - threaded rod:
I've noticed the first couple folks who posted a make of this used threaded rod, cut to the length they desire, instead of a hex bolt or carriage bolt. This might be easier to find and possibly cheaper than the bolts listed above, but you may require a person at the hardware store to cut it to the appropriate length if you don't have the tools to cut it yourself. Just make sure you:
- Bring the nuts you want to use with you when you buy the rod so you can test if the threads match, or just buy them at the same time so you can make sure they fit each other.
- Use one of the mount block back side models I designed for the 6" hex bolt, since you'll want the hex nut to fit into it. Alternatively use any of the mount block backs, but put a washer on first since that bypasses having to sit the nut into the hole altogether.
- Maybe sand the cut end(s) or put an extra nut on to prevent accidental scratches/cuts! Be safe folks!
Printing Settings
- .2mm layer height
- 25-100% infill. I used 100% on everything for maximum strength (doesn't take long anyway), but i'm sure you can go lower just fine.
- No supports
***IMPORTANT NOTE: If you want the extra structural sturdiness of the embedded washer version, you must pause your print after the last layer before the overhang starts. See the picture of the wireframe with the red arrows for clarification. When your print has been paused, insert your washer, then start the print again. My printer had trouble after this step because the filament didn't want to stick to the washer. However, I let it continue and it printed anyway, correcting the messy start it had. I just had to pull out a few strands of weird filament at the end but it wasn't bad. If I printed it again, I'd probably put some glue stick on the face of the washer where the resumed print will start, to possibly help it stick on that first layer.
Installation
- Remove stock SV06 spool holder from the metal mount arm.
- Insert bolt into the square/hexagonal hole of the printed back mount piece.
- Seat carriage bolt or hex head fully into the back mount piece. 6" Regular Hex Head model will have hex head slightly sticking out, not totally flush.
- Thread bolt through the hole in the metal mount arm from the back, so that you end up placing your back piece up against the metal, in between its side fins.
- Slide the printed front piece onto the bolt with the smaller radius cylinder facing towards the metal arm, so that it slides into the hole and you can push the whole thing flush against the metal arm & back piece.
- If you're using a 7" or longer bolt, you can now slide a washer & lock washer onto the bolt in that order. Then screw on a nut all the way down so it squeezes the front and back pieces tight against each other & the metal arm. If you're using the 6" bolt, just slide on a lock washer.
- Slide your universal spool holder (or whatever spool holder you're using) onto the bolt, threading the bolt through the 608 bearings.
- If you're using a 7" or longer bolt, screw on 2 nuts to the end. Tighten the inner one against the bearing to your liking (tighter = more friction → less free spinning) then the outer one against the inner to keep it from moving. If you're using a 6" bolt, just tighten one nut against the bearing to your liking.
Štítky
Původ modelu
Uživatel se označil za původního autora tohoto modelu.